Showing posts with label graphic design. Show all posts

watercolour pencil experiment on fabric bags

Friday, January 15, 2016


If you have been following me on Instagram you might have seen the watercolour drawings that I created during our family vacation in St. Thomas last month. Next to my camera, I almost always pack a small pad of watercolour paper, some watercolour pencils and a few paint brushes when I travel. 

This week I though that it would be fun to experiment with my watercolour pencils to see if they would work on these fabric favour bags


I knew that if I was planning to make dozens of favour bags that I would have to come up with some simple graphics that would be easy to recreate on each bag. I would have to come up with something quite different from these watercolour paintings that I created on my holidays.


And this is what I came up with!


 Of course, I had to add some text to one of my designs. I think these bags would be adorable for a Valentine's day gift, a wedding favour, a baby shower or a crafting party. 

What do you think? Want to try to make these yourself? Here's what I did to create my abstract watercolour "blob" ...


Gather your supplies: Derwent watercolour pencils, cotton fabric drawstring bags, assorted watercolour paint brushes, paint palette, two containers to hold water, a pencil sharpener and some paper towels.


Top left  I inserted a small board into my bag so that the watercolour paint didn't soak through to the back of the bag. Mix up your watercolours in your mixing tray using the pencil crayon colours of your choice. I used (39) turquoise blue, (40) turquoise green, (44) water green and (48) may green.

Top middle and right  Starting on the left side of the bag, I painted a single stripe of turquoise blue using a wide flat paint brush. While the first stripe was still wet I painted a second stripe using turquoise green that overlapped the first stripe slightly ... 

Bottom left and middle then I continued to add two more stripes using water green and may green, again overlapped each one so that the colours blended together. 

Bottom right  Once the paint dried I was able to add extra depth to each colour by drawing directly onto the stripes using wet pencils. I blended the pencil strokes using additional watercolour paint and my paint brush until I achieve the look I wanted.


Tip: If you want to add a word over your watercolour "blob" like I did with the pink love bag, it is best to wait until the background is completely dry before adding more paint for the lettering. 


I hope that I've inspired you to make something this weekend!


love letters - handmade script fonts

Wednesday, January 7, 2015

love letters from Lorrie Everitt Studio - handmade script fonts

I love letters. fonts. typography.

I have been known to purchase clothing, jewellery, coffee mugs and home decor items just because they have beautiful lettering on them. 

Typography was one of my favourite classes when I studied Graphic Design in the early 80's. That was a long time ago when computers where just an idea. I really enjoyed learning how to create beautiful lettering by hand and that skill came in handy when I was getting married. I can still remember doing all of the calligraphy on the invitation envelopes and the escort cards.

Right now, I'm really loving fonts with a handmade script look. I don't know why ... maybe it's because it's getting close to Valentine's day, or maybe it's because I'm working on a number of wedding projects, or maybe it's because I'm inspired by so many of the script fonts I've been pinning from Creative Market

A lot of people ask me about the fonts that I use in my art and where I get my fonts. My go to source for fonts for the past year has been Creative Market. Their font selection is current, the artists who created the fonts are amazingly creative and helpful and it's very easy to purchase and download the files. 

 Creative Market has weekly freebies and every once in a while they offer bundle specials that are pretty hard to resist (especially when the bundles include fonts that I've been wanting to add to my collection!).

Here's a collection of some of the handmade script fonts that I have been using lately. I've listed each font by name and you can find the links for all of the fonts below!

love letters from Lorrie Everitt Studio - hand drawn script fonts


If you are looking for more lettering, font and typography inspiration, you may want to check out these Pinterest boards that I have created: fonts, typography, creative sign inspiration, chalkboard, and graphics.


{birthday} celebrations

Sunday, February 6, 2011

We have so many family and friends that are celebrating birthdays at this time of year ... I can hardly keep up with all of the dates. That's why I'm currently designing a birthday calendar that I can bind with my cinch to help me keep track of all of the birthdays, anniversaries and special dates that we celebrate. I'll share more about that once it is done!

Today my "great" nephew, Ethan, is celebrating his very first birthday. {Happy birthday little man!} I can still remember when his Mommy, my beautiful niece, Anmarey, was born (omg - 28 years ago). It feels strange that we are already celebrating birthdays for the next generation ... I really don't remember getting this old.
I designed and made Ethan's birth announcements and thank you cards as a shower gift for Anmarey and Peter ... isn't Ethan just the cutest little guy! The first graphics in this post with Ethan's birth details was another gift I designed to celebrate his birth ... I had it printed as a 12x12 picture and framed in a simple square frame from Ikea for his room.

Now I'm off to make my shopping list for tomorrow ... cake mix and candles are at the top of the list because my oldest daughter will be 17 on Wednesday!

mommy card giveaway

Friday, September 3, 2010


I didn't get a lot done in my studio this week ... lots going on before the kids go back to school next week.
It was my birthday on Tuesday ... the last day of August ... and I am not too happy to say that this is the last year that I can honestly say I'm "forty-something" when someone asks my age. I think that I read somewhere that "50 is the new 30" ... I hope that is true! {giggle} I'm so happy that I waited until my mid and late 30's to have children ... at least they keep me young!

To celebrate my birthday and being a Mommy ... I thought that I'd do a little giveaway today! I'm going to offer one of my personalized Mommy card digital files for printing at home to one lucky person.

The digital file will be formatted so that you can print eight cards at a time on  8.5"x11" cardstock on your home printer. I have a number of different designs in my etsy shop to pick from and there are two colour ways for each design ... you can see them all here:

  
These sweet little cards can be used as Mommy cards, family cards or for your blog!

Here's how to enter ... just leave me a comment and tell me in your comment which design would like if you are the winner (don't leave any personal information ... I'll get that from the winner).

** If more than 15 people leave comments ... I will select TWO winners ... so if you help to spread the word about this contest by linking this post to your blog, you could increase your chance to win as well! **   

This giveaway will be open until the end of the day on Tuesday September 7th, 2010. 
I will announce the winner(s) on Wednesday morning!
 Good luck everyone!


{new and old} favourite tools in my studio this week

Friday, August 27, 2010

I just love it when I find a new tool to use for crafting. I picked up the crop-a-dile corner chomper when we were in the USA a few weeks ago ... I haven't seen it in Canada yet but I'm sure that it will be soon. I have a number of different crop-a-dile tools but this is my favourite one right now. I just printed off some new business cards for myself and used this tool to round off the corners ... something that would have taken me all night to do with my old corner cropper that did one piece of paper at a time ... this tool does a few cards at once and it is so easy to use.
I "borrowed" some of my husband's tools in his workshop to bend these vintage silver forks into business card holders for my desk ... they are quite fun to make so I have a feeling that I will be looking for some more forks to upcycle!
I'm helping a friend's daughter with her wedding ... she is getting married next summer and I'm making their wedding stationery. We have been looking for fabrics to use for the reception decor and from there I can figure out colours and design elements. I love my pantone colour books when I'm working on projects like this ... it helps me to figure out ink colours for printing. I was also soooo excited to find this really awesome book at the bookstore this week ... it is called "Drip.Dot.Swirl" and it is by Von Glitschka. It has 94 copyright free patterns in it to use for designing ... the book is so inspiring and there is a dvd at the back of the book with all of the art files. I'm not sure if I will use any of the patterns it in the wedding stationery but it has been very inspiring. I've been working in Photoshop a lot lately but I think that I may start playing in Illustrator for a while!
My husband bought me a new printer over a year ago ... we were having a problem finding inks and he bought the new one without me as a surprise. The new printer is a great colour printer but unfortunately it has a terrible scanner. I hate using it to scan so much that I have been avoiding doing any work that involves scanning. Well I've been drawing elements to be used for the wedding stationery all week ... I just LOVE my letraset bleed resistant paper pads and pigma art pens ... and I had to breakdown and use the scanner this morning. Let's just say that my printer is still not one of my favourite tools in my studio. With back to school just around the corner, I think that I'm going to start checking out the sale flyers for printers. I'm pretty sure that Kelly Rae Roberts mentioned the name of a printer/scanner that she uses to scan larger canvases in her e-course ... if anyone else has a recommendation for a good one - please let me know! 

garage sale signs

Tuesday, May 25, 2010

We just celebrated the official start of summer at the cottage this past long weekend ... the Victoria Day holiday (also known as the May "24" weekend) is always a busy cottage weekend in Ontario.

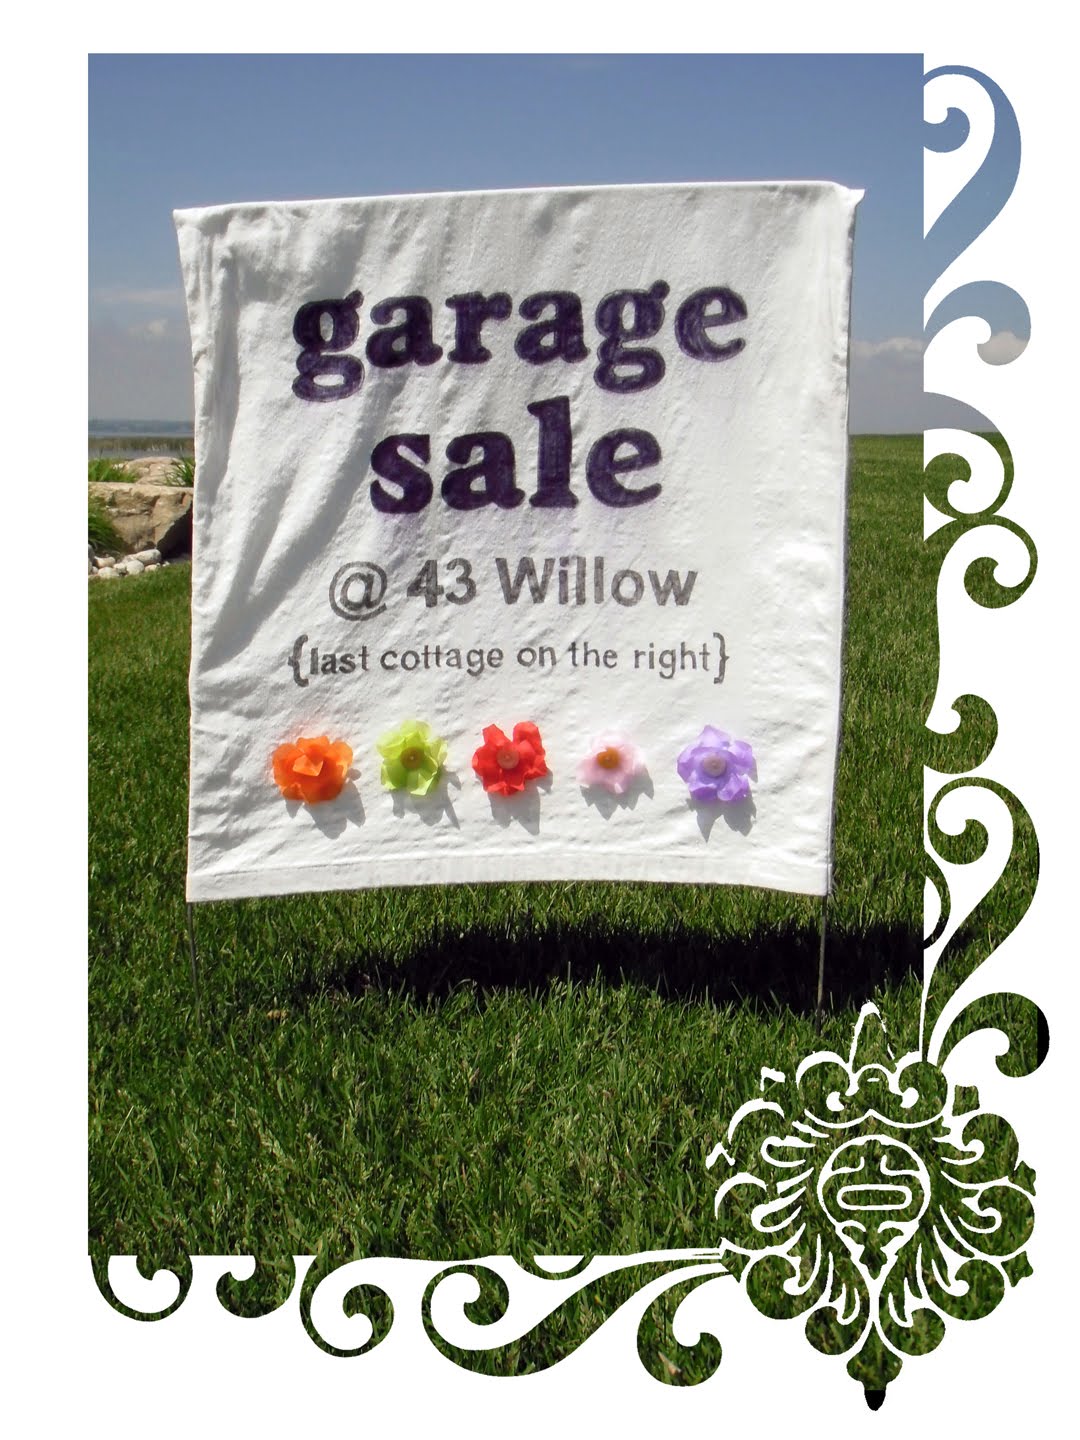
The girls and I had our annual garage sale on Saturday. It rained all day ... lucky for us we have a garage at the cottage and were able to stay dry. I had so many positive comments about our garage sale signs that I thought that I'd share with you what I did.

I recycled some metal sign holders that were discarded in the open fields by our house ... these metal frames combined with plastic signs are used a lot during election time and throughout the year by small businesses. The metal frames are easy to stick into the ground (no hammers needed) ... and hold their shape really well when you add the fabric sleeve.

To make a fabric sleeve for the sign, I cut an old white curtain (bedsheets would work too) into a 48"x24" panel. Then I folded the fabric in half (24"x24") and sewed the two sides together so that I had an opening at the bottom that could slip over the metal frame. 

To keep the signs looking a little more professional looking, I created a 20"x20" document in my computer to format the type for my sign. I printed the document in sections on 8.5"x11" paper and taped all of the papers together. I placed the final (20"x20") paper under the fabric and traced the letters with a black fine point Sharpie permanent ink marker. I repeated this on both sides of the sign. Then I took a broader tip permanent marker and filled in the type on the larger letters.

    
I wanted to add some colour to the signs for visual impact ... so I added flowers to the bottom area. The flowers were from a Hawaiian lay that I bought at the dollar store. I simply hand sewed the flowers to the fabric with a centre button.

The cool thing about these signs is that it rained all day Saturday and they stood up really well compared to everyone else's cardboard signs. Many of the women who came to the cottage asked where we had the signs made ... my youngest daughter was quite proud to say that we made them ourselves!
The only thing that I will do differently next time is to only use Sharpie brand permanent ink markers. We used Sharpie brand fine tip markers and Staples broad tip markers. Both brands said that they were permanent ink - but it was very clear when it started raining which markers did not bleed!


 I also wanted to share this adorable card that I picked up in Walmart a while ago ... it's from Taylor Swift's line of greeting cards. Her card line is sooo cute ... great graphics, fun pictures and the words are perfect. Taylor Swift had a couple of concerts in Toronto on the long weekend ... my oldest daughter Haley was at the Friday concert ... needless to say, we listened to Taylor Swift songs all weekend at the cottage!
So happy that summer is here!

a day of inspiration with my friend Robin Davis

Wednesday, May 12, 2010


admire the moon. be silly.
take risks. look on the bright side.
listen to your heart. don't fear love.
remember it's never too late!
don't run. face your fears.
be an optimist. open a new window.
laugh often. live today.
speak straight and true. be brave.
life is too short to be ordinary.
the sky's the limit!


... love these words ... I don't remember where I found them but they have been on my
personal stationery for a number of months now ... I created the stationery on my computer in Photoshop -
it's a mix of some of my graphics and some brushes that I bought years ago at two peas in a bucket .

I feel so inspired today ... I spent most of the day with one of my favourite creative friends - Robin Davis.
Robin is an artist who licences her artwork and has been a great source of inspiration for me.
You can visit Robin's website and blog to see her work.


This is one of Robin's pieces from Blossom Bucket ... I bought a few of these snow pixies last Christmas
... they are soooo cute! Her new pieces for Halloween and Christmas 2010 are awesome ... I can't wait to go to Robin's open house later in the year for a little "retail therapy".  

I had a bunch of blogging "how to?" questions that Robin was able to help me figure out.  We spent some time looking at websites and talking about supplies. It's great to have a day to just bounce
ideas off someone else. As much as I like having a studio at home to work in ... it can be a little lonely at times. It's nice to be with friends and have a reason to get out of my sweatpants!

camera fun with the kids - part 2

Thursday, March 25, 2010

I just created the "letters" alphabet that my daughters and their friends helped me photograph when we were on vacation last week. I wrote earlier about Shona Coles' idea http://shonastudio.blogspot.com/2010/02/fun-photo-exercise-to-do-with-kids.html and here is my take on the activity ...


I pulled the letters together in a stamp format. The stamps were modified from a digital kit that I purchased on line at http://www.twopeasinabucket.com/ so that it would fit 28 images.

I'm now working creating 8x10 pictures for each of the 13 children that were with us on vacation and using the letters we photographed to spell out each of their names. Here's the first 3 that I have completed ...


I had to take a few extra pictures of different letters so that I'd have some options when putting the kid's names together and I am happy with the way that they have turned out so far. Three done ... ten more to go!!! 

camera games

Friday, March 12, 2010


My girls were very excited when they left for school this morning. Today is the last day of school before March Break and we are going away this year. The girls are more than ready to trade in their winter coats and boots for swimsuits and flip flops. We haven't been away to somewhere hot for two years ... these photos are some of my digital scrapbooking photos from that trip.

I found a great exercise to do with the kids on Shona Coles' blog last month and I'm planning on doing it with the kids when we are away. http://shonastudio.blogspot.com/2010/02/fun-photo-exercise-to-do-with-kids.html  Shona had the kids take pictures of things that looked like letters ... they basically did a photoshoot of the alphabet!! How cool is that? Afterwards, she cropped all of the photos into a collage. I was thinking that I would take it one step further and crop the letters so that they spell out each of the kids'
names for their bedrooms. We are going away with 7 other families so I will have about 14 children's names to play around with when we get home. I think that once I have all of the letters cropped for the alphabet collage it will be easy to make up the names with the same files.


I will be back in a week!

stationery designs

Tuesday, March 9, 2010


I started some "spring cleaning" on my computer this morning ...
deleting files, organizing, etc ... but as often happens when I start
working on my computer, I get an idea and start creating more files.
Take for example this collection of pictures that I just put
together to highlight some of the stationery designs that I created
prior to getting sick and having brain surgery last spring.


... these were created after a trip to Paris with my daughter Haley ...


... as were these ...


... a little more colour and a little more vintage with these ...


... I love nature - especially birds - and our cottage is
always a wonderful source of inspiration ...


... love the look of printing on kraft paper - so organic ...


... maybe it's from so many years studying
typography - but i looove letters ...


... baby announcements and mommie/family cards
 are my favourite kinds of stationery to design because
they are so personal and they just make you smile ...


... I started making these little cd calendars a couple of years ago
- they look so cute sitting on your desk - the one I made for 2010 has
the saying "Enjoy life. This is not a dress rehearsal." on this month's
page - love that saying but I don't know who wrote the quote ...


... sometimes I wish that it was Christmas all year long
- not the presents - just the spirit ...


... and a little more holiday! ...
We are going on holidays next week with the kids for March
Break and I think that I may need to pack a sketch book and my
watercolour pencils because I'm suddenly in the mood to do
some more designing!