Showing posts with label tutorial. Show all posts

You can do it - DIY chocolate rings

Friday, September 22, 2017

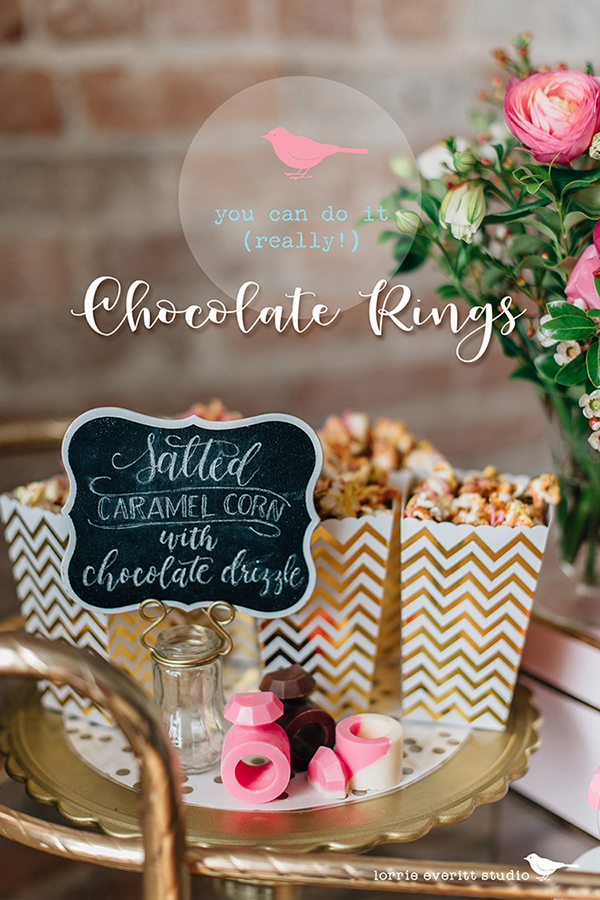
DIY chocolate rings using a ring shaped ice cube tray and melted chocolate in the colours and flavours of your choice. | Lorrie Everitt Studio

I created these sweet chocolate candy rings for a DIY bridal party styled shoot earlier this year. I can't share a lot of the details about the shoot just yet but my DIY tutorial for making these chocolate rings is up on the Weddingstar blog now. They were made using ring shaped ice cube trays and melted chocolate wafers. 

I originally found a recipe to make these as sugar rings with flecks of edible gold but after three tries I gave up and started experimenting with chocolate. I think that my chocolate rings are much easier to make if you are not a professional candy maker. And honestly, who doesn't love chocolate?!

DIY chocolate rings using a ring shaped ice cube tray and melted chocolate in the colours and flavours of your choice. | Lorrie Everitt Studio

DIY chocolate rings using a ring shaped ice cube tray and melted chocolate in the colours and flavours of your choice. | Lorrie Everitt Studio

Photo credit: Sara Wilde Photography (for the first three photos)
Sources: hand lettering on chalkboard by Prose & Fawns Paperie, sweets by Savoury & Cakeflowers by Petal to the Metalpackaging and party supplies from Creative Bag, ring ice cube tray from Weddingstar. Styled shoot photographed at Fox and Fawn Antique Shoppe. 

DIY chocolate rings using a ring shaped ice cube tray and melted chocolate in the colours and flavours of your choice. | Lorrie Everitt Studio

These chocolate rings look great on cupcakes. 
I hope that you'll pop over to see the full tutorial here.


DIY Wedding Proposal Boxes

Thursday, April 6, 2017

diy wedding proposal boxes | Lorrie Everitt Studio

I wanted to share a little DIY project that I did recently using products from Weddingstar and Creative Bag. I created a series of proposal gift box ideas for the bridal party - Maid of Honour, Bridesmaid and Flower Girl. You can find all of the DIY details, tutorials, my free downloads and links to all of the products on both the Weddingstar and Creative Bag blogs.

You can find the Weddingstar blog posts here:


The Creative Bag blog posts with packaging supplies links are here:


Note: Creative Bag sells select Weddingstar products in all of their stores and online at creativebagwedding.com.


I loved seeing all 3 of my projects featured at the bottom of the Weddingstar website this morning!


DIY tissue paper fringe garland

Sunday, November 27, 2016


I know that most people are in the process of decorating for winter holidays right now but I just had to share this adorable DIY project. I have been creating these festive tissue paper fringe garlands for a December birthday party and not only are they super easy to make but they are inexpensive party decor option.


All you need are a few different colours of tissue paper, scissors and a stapler. That's it.


I recommend using a minimum of four different colours of tissue paper. You will need one piece of tissue paper in each colour for each garland. My tissue paper sheets are 20" x 30".


Step one. Cut the tissue paper layers into strips 5" wide by 30" long.


Step two. You need to staple all four layers of tissue paper together. Staple along the centre of each strip about 5" apart. You may want to fold the tissue paper layers in half first so you will have a better idea of where to add the staples.


Step three. Cut fringes on both sides of the tissue paper strips. 
Tip: I found that by folding the tissue paper in half and cut the fringes on both sides at the same time I saved a lot  of time. Just be careful not to cut to far into the centre.


Step four. Now you are ready for the fun part. Simply twist the tissue paper at the centre and watch the different colours on the fringes take shape. 


Here's a closer look at the twisted tissue paper. Don't worry about the staples because they kind of disappear when the tissue paper is twisted.


You can staple the garlands together to make the garlands as long as you wish. For less than five dollars I created 54' of fringe garland using a total of twenty sheets of tissue paper (6 sheets each of 4 different colours).

If you wanted to make these for a holiday party, just select tissue paper colours to match your holiday decor!


Simple Daily DIY - twine challenge project

Wednesday, June 8, 2016


I'm taking part in the Simple Daily DIY challenge during the month of June. Have you heard about it? The first challenge was all about twine/jute. I created this unique photo display box using supplies I already had on hand.


My supplies - a wood shadow box (mine was purchased at Ikea a number of years ago), a birch branch wood slice (my Dad cut a bunch of these for me but they are easy to find), a screw eyelet, twine/jute, a photo and scrapbook paper. 


I measured the top of my shadow box to find the centre and drilled a hole in that spot. The hole was just large enough so I could feed the two ends of the twine through it. 

I left my shadow box with the natural unfinished wood but you could easily paint it at this point if you wanted to. 


I used a round paper punch to crop an old family photo so it would fit on my birch branch slice. I added the screw eyelet to the top of the birch slice and then glued the photo onto the birch slice so it would hang straight.


To suspend the branch slice in the box: 
1. centre a long piece of twine through the screw eyelet and tie a quick knot close to the screw eyelet, 2. feed both ends of the twine through the hole of the shadow box, 3. figure out where you want the branch slice to hang inside the box and tie a knot at the top of the box to keep it in place. I tied a bow at the top of the box and trimmed the twine to finish.

Note: As you are working with the placement of the branch slice inside the box, you may need to adjust the angle of the screw eyelet so that the branch faces forward. Just give it a little twist until you are happy with the placement.


I cut a  piece of scrapbook paper to fit the back of the shadow box to complete.

 I used a kraft and gold foil dot pattern to match my home decor. Instead of using a pattern paper background I could have added another photo as a background. For example, a scenic water/sky photo would have added to the boating theme and complimented the colours in my family photo. Another idea is to add sand or beach glass inside the bottom of the shadow box.

If you try this project I'd love to see what you made! Add your own spin to make it your own. I'm on Instragram and you can tag me at @lorrieeveritt or #lorrieeverittstudio. 

 You can view Sustain My Craft Habit's YouTube video here to find out more about the Simple Daily DIY Challenge. 


personalize your clear phone case using sharpie markers

Sunday, March 27, 2016


personalize your clear phone case using oil based sharpie markers | Lorrie Everitt Studio

I love my new iphone.

I have never had an iphone so it was kind of a big deal for me.

When I decided to finally purchase an iphone I knew that I wanted one in rose gold.

I HAD to have a rose gold and I waited two weeks for it.

After waiting for so long to get my phone I realized that I didn't want a phone case that covered up the rose gold finish. So I purchased a clear case. My clear case is okay. It does it's job which is to protect my phone but it's B-O-R-I-N-G. So after a couple of weeks, I decided to personalize it myself.

personalize your clear phone case using oil based sharpie markers | Lorrie Everitt Studio

This is such an easy diy project and you can do it in an afternoon. If you can trace - you can do this.

personalize your clear phone case using oil based sharpie markers | Lorrie Everitt Studio

Gather your supplies: clear phone case, extra fine tip white sharpie oil based marker, paper, pencil, extra fine tip black sharpie marker and a light box. If you don't have access to a lightbox you can use a piece of glass from a picture frame and a light source to create your own. 

personalize your clear phone case using oil based sharpie markers | Lorrie Everitt Studio

I drew out my design in pencil first. You can trace around your case with a pencil to make sure that your design will fit properly. Once you have your rough design worked out use an extra fine tip black sharpie marker and go over your pencil sketch to create your final art.

personalize your clear phone case using oil based sharpie markers | Lorrie Everitt Studio

I wanted my design to be on the inside of my case so it would not scratch off easily. Because I have lettering in my design, I had to reverse my finished art. I flipped my paper over on the lightbox so I could see the design from the back. Then I positioned the phone case on top of the paper and used painters tape to keep everything in place for the next step.

personalize your clear phone case using oil based sharpie markers | Lorrie Everitt Studio

This was the fun part - tracing my design onto the phone case using the white sharpie marker. I actually practiced a few times with the paint marker on scraps of acetate before I traced out my phone case. It helped me to get the feel of the markers and to see how long it took for the paint to dry. 

Tip: I am right handed so I started to draw out my design at the top left side and worked my way across and then down so that I did not smudge the ink as I was tracing.

personalize your clear phone case using oil based sharpie markers | Lorrie Everitt Studio

When you are done flip the case over and take a look at your design. You can add some extra doodles at this point if you need to. I thought that the space under "Hello" needed a little something so I added some additional dots.

I let the paint dry for about 15 minutes before I put the case on my cell phone. 

personalize your clear phone case using oil based sharpie markers | Lorrie Everitt Studio

And there you go! One personalized cell phone case.

personalize your clear phone case using oil based sharpie markers | Lorrie Everitt Studio

I'm going to be entering this project into the Makeful weekly challenge tonight. I know that I have some very creative followers and I'd love to see your projects at Makeful too. Leave me a comment here or on Instagram if you have joined Makeful - I'd love to see what you are making too.

Let's paint some onesies! A baby shower party DIY.

Thursday, February 25, 2016


Here's a fun and creative party idea for a baby shower - painted onesies! I recently set up a baby shower party display at Creative Bag and I incorporated my painted onesies into the party display by hanging them up like bunting.

The concept is that you invite each guest to paint a onesie at the shower as party activity.
Set up a table so guests can paint their onesie and then set up a second area so that you can hang the onesies to dry before the party ends. 


Gather your supplies: plain white onesies, small paper bags with handles (one for each onesie), Martha Stewart tintable fabric medium, craft paint in assorted colours, assorted paint brushes, disappearing fabric ink pen and something to mix your paints on. 

Optional: my free printable to trace.


1. Insert the small paper bag into the top of the onesie as shown above. The bag will protect your fabric so that the paint does not bleed through to the back and you can use it like a hanger later to hang the onesie to dry.

2. Use the disappearing ink pen to draw out your design on the onesie. For guests that do not feel they are very crafty or can draw, allow them to trace one of the designs from my free printables using the disappearing ink pen.


3. You can make any paint into a fabric paint by adding Martha Stewart's tintable fabric medium. Follow the fabric medium instructions on the bottle for more details.


4. Once everyone has completed painting their onesie, hang them up on display so they can dry and everyone can see them. I used baker's twine and small clothespins to hang our onesies. The disappearing ink will take a few hours to disappear so don't worry if you see the purple lines for a while.


Check out my birds and bees baby shower party post here for more inspiration.


Handmade photo cards for Valentine's Day and a free printable

Friday, February 12, 2016


handmade photo cards for Valentine's day and a free printable | Lorrie Everitt Studio

What could be more personal and thoughtful than giving your sweetheart a Valentine card that you created yourself? It's so easy to make keepsake cards for the holidays or a special occasion using your photos and some basic card making tools.

handmade photo cards for Valentine's day and a free printable | Lorrie Everitt Studio

For Valentine's Day I am giving my husband this handmade card. I created it using a picture that was taken of us at the Eiffel Tower last year. The card took less than an hour to make because I was able to print the photo at home on my photo printer. The hardest part about making the card was trying to decide which photo to use!

handmade photo cards for Valentine's day and a free printable | Lorrie Everitt Studio

Photo cards don't have to be really complicated to look good. So keep it simple!

handmade photo cards for Valentine's day and a free printable | Lorrie Everitt Studio

Gather your materials: blank cards and envelopes, photos, glue dots or two-sided tape, decorative tape, scissors, ruler and a pencil. It's also nice to have a large paper cutter, paper punches, cardstock, scrap paper, stamps, ink pads and ribbons.

You can purchase blank cards at most arts and craft stores or make your own using cards using cardstock. 

To help get you started on making your own handmade card for Valentine's Day, I created a free download with six different love themed sayings.

handmade photo cards for Valentine's day and a free printable | Lorrie Everitt Studio

 I prefer to cut my photos using large paper punches or my paper cutter because I can quickly and easily crop photos into perfect shapes.

My tip for using paper punches - position your photo in the paper punch so that you can see what you are cutting out before you punch.

For the best results, always use glue dots or two-sided tape to attach your photo to your card. Washi tape and glitter tape make nice decorative elements to use on your cards.

handmade photo cards for Valentine's day and a free printable | Lorrie Everitt Studio

If you prefer not to cut your photos, another option is to cut a hole on the card front using the paper punches and add your photo to the inside of the card as shown above.

handmade photo cards for Valentine's day and a free printable | Lorrie Everitt Studio

I created this free printable with saying that are suitable for Valentine's day, wedding or  anniversary cards. Simply download the file and print the second page onto cardstock. Cut the sayings out and add them to your handmade cards.

handmade photo cards for Valentine's day and a free printable | Lorrie Everitt Studio

Like the idea of creating more cards using your photos? Want a little more inspiration? Check out Roam New Roads and my video tutorial for handmade photo cards.