Showing posts with label photoshop. Show all posts

personalize holiday cards and gifts with photos

Wednesday, December 16, 2015

personalize holiday cards and gifts with photos | Lorrie Everitt Studio

Are you ready for the holidays? The countdown is on! My cards are in the mail, I've started gift wrapping many of our gifts and I can't wait to start my holiday baking this weekend. 

I take photos of my family all year round and for the past 21 years I have tried to incorporate a few of my favourite photos into my holiday crafting projects. Today I'm going to share with you a couple of the things that I did with my photos this year.  

personalize holiday cards and gifts with photos | Lorrie Everitt Studio

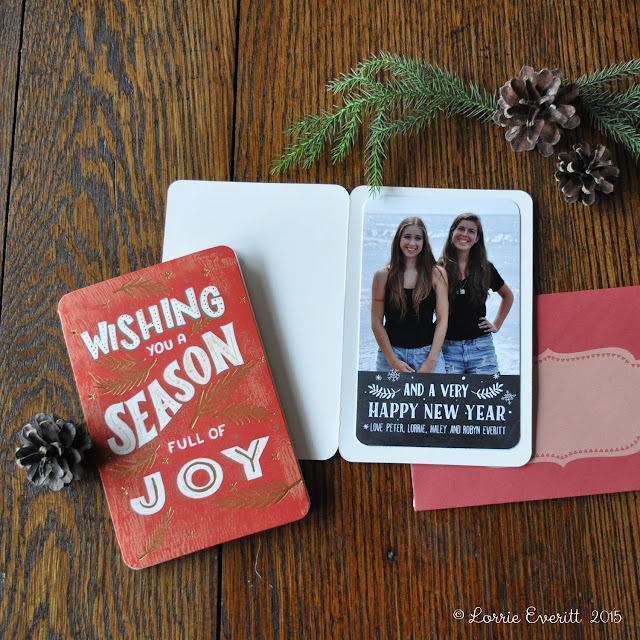
I shot photos of my daughters on the beach of Lake Erie this summer and I was originally planning to use one of the pictures on the front of our Christmas cards as I always do. But I ended up doing something a little different this year. I purchased these holiday cards and personalized them on the inside with my photos.

personalize holiday cards and gifts with photos | Lorrie Everitt Studio

I cropped and re sized my photo to fit the inside of my cards and added a holiday message using Photoshop. I didn't have a lot of spare time to make my cards so I printed my photos at home on my Canon PIXMA Pro-100. I love my photo printer because the photos look like they were professionally printed and I know that the colours won't fade over time.

personalize holiday cards and gifts with photos | Lorrie Everitt Studio

I set up my photos so I could print twelve at a time on 13"x19" sheets of photo paper. I cut the photos out using my large paper cutter. You could use scissors to trim your pictures but a paper cutter is quicker and your finished photos look more professional.

personalize holiday cards and gifts with photos | Lorrie Everitt Studio

My premade Christmas cards had rounded corners so I used the Crop-a-dile corner chomper to round the corners on my photos as well. I really like this corner cropping tool because it allows me to crop four or five pieces of paper at a time. I use glue dots to attach my photos to the cards. 
personalize holiday cards and gifts with photos | Lorrie Everitt Studio

And there you go! I personalized 80 cards in just a couple of hours!

The other project that I wanted to show you are my holiday photo gift tags ...

personalize holiday cards and gifts with photos | Lorrie Everitt Studio

I've created these for my family gift for many years. I like to number the backs of my daughters' photo gift cards so they have to open their gifts in the order of the tags. It makes Christmas morning a little more fun as we watch them hunt for which present to open next. 

For this project I sized and cropped my photos in Photoshop to fit my tag shaped paper punch. I printed them on my PIXMA Pro-100 photo printer at home so I would have better control of my picture size for this project. I was able to print eight tags at once using 8.5"x11" sheets of photo paper. I like to add baker's twine to my gift tags so I added a hole to each tag using this single hole punch. 

personalize holiday cards and gifts with photos | Lorrie Everitt Studio

Here's a close up of one of my gift tags on a small kraft gift box that I embellished with lace and gold glitter tape, a deer figurine and a mini bottle brush tree. 

Stay tuned ... I have a few other projects that I'm working on for the holidays! 


World Photo Day

Friday, August 19, 2011

So today is World Photo Day and I thought that I'd share with you some of the photo tricks that I have used this month. I love this new picture that my daughter took of my husband and I on the beach. My husband, Peter, is not always the most co-operative "model" and my best shots of him are when he is not looking or is doing something with the kids.


Here's how my daughter, Haley, and I worked together to get a picture that I would be happy to print. I set my camera to "action" and then I told Haley to just keep clicking ... then after a few {boring} photos I leaned into Peter and gave him a kiss on the cheek. As you can see Peter was a little surprised and he loosen up and gave us a natural smile.


As much as I loved the final photo ... I didn't like the person & two seagulls in the background by my head ... so I opened up Photoshop and started to work with my "clone stamp tool" to clean up the background. If you have never used the clone stamp tool before I'm going to suggest that you check out Rebecca Cooper's blog simple as that for her clone stamp tool tutorial ... it's easy to follow and she has some great tips on photography and using Photoshop.
 

Here's one last picture of my daughters on the beach.

I hope that you get your camera out today and take a few pictures to remember the day. By the way, 4x6 photos are on sale for eight cents at Costco (Canada) until the end of the month ... another good reason to take some photos!


We do not remember the days ... we remember the moments.

photoshop actions - just playing around

Thursday, July 7, 2011

This picture of my daughter was on my post yesterday ... it was attached to my fashionista clipboard ... and I thought that I'd share with you what I did to create this photo.

To be honest ... I'm not totally sure what I did ... I am still learning! I do know that I was playing with my Photoshop Actions. I was reading about actions on Rebecca Cooper's blog - she has some great tutorials there for Photoshop that are quite easy to follow. It was there that I stubbled across Pamela Topping's website and her Photoshop Actions. Pamela has some free goodies if you are interested in trying out some actions on your own photos.

I encourage you to pop by to visit both of these talented ladies if you are interested in learning something new ... Rebecca is doing a giveaway on her blog for one of Pamela's Action packages ... oh what fun! I'd love to win any of them but if I had to pick just one I think that I'd go for "Secret Treasures"!

playing with photoshop filters

Tuesday, June 7, 2011

I was checking out some blogs today and found this quote that I just loved ... "Tell me, what is it that you plan to do with your one wild and precious life?"

As soon as I saw the quote I knew that I wanted to add it to a photo of one of my daughters. I've been spending a lot of time with both of them talking about what they want "to be" when they grow up and where they want go to school.

I found this great photo of my daughter Robyn from a few years ago ... she was sitting on the side of our boat and I noticed that the sun's reflection seemed to be dancing on the water in front of her. I played with the picture in Photoshop CS3 and tried out a bunch of different filters before committing to the one that you see ... artistic/watercolour.

"Imagination is more important than knowledge. For while knowledge defines all we know and understand,
imagination leads us to all we might yet discover and create." - Albert Einstein

If you have Photoshop on your computer, I'd like to challenge you to pick out picture that you love and play around with it for a while to see what you can do. Send me a link so that I can see what you created.

If you are still learning how to use Photoshop or are looking for some Photoshop tutorials to show you how to do something , I would recommend that you check out pugly pixel for some really simple Photoshop tutorials. I was looking at their tutorial today for creating a photoshop letterpress effect  and it's on my list of things to try out next!

holiday cards and a free download

Thursday, December 9, 2010


My Christmas cards have all been made, addressed and are on their way to our family and friends as we speak. The material costs to hand make cards are a little high when you start to add everything up and it takes a long time to make the cards .... I know that I could buy a couple of boxes of cards for less ... but I won't ... this is one of my favourite Christmas traditions that I look forward to doing every year.

For this year's card I used old file folders as the base of the card ... I loved the natural and organic feeling of the kraft stock. I combined a number of different Basic Grey holiday papers in this year's design and created the photo element with a black and white photo overlay that I created. Black photo corners, a piece of lace machine stitched to the card and a vintage button lovingly handstitched in the middle of a paper flower are the final touches. I used a vintage date stamp to the back to add the year and my name.


Just in case any of you have not made your Christmas cards yet or would like something to file for next year ... I've created a PNG file for you to download ... it's for a 4x6 card that you use in Photoshop to create your own little card or photo insert. The picture above shows a sample of how it will look ... the photo is an engagement picture of our friend's daughter and I simply added the words that I wanted in the red space.
Please note that the download is free but it is for your personal use only - you can not use it for commercial use of any kind and I ask you to please not modify the art and call it your own (that's just bad karma!). If you would like to share the art with your friends that is okay if you tell them to download it directly from me! You can download the art here. Hybrid scrappers will most likely want to add some elements to this piece ... I can easily see some glitter and bling added to this ... maybe even a piece of lace or ribbon ... you decide!


Here's a quick "how to" tutorial for using the holiday card art ... I use Photoshop CS2 on a PC so you may have to modify some of the commands based on your software ...
1. Open a new file - 6"wide and 4"high, 300 dpi , RGB mode
2. File/Place/ and open my png file (let's call this layer "card design")
3. Then add another layer go to File/Place/ and open your photo ... you will want to move this new layer below the layer called "card design" before you go on.
4. Working on the layer with your photo, you will need to resize your photo and position it so that you are happy with the layout.
5. To add words to your card you will need to add another layer on top of the two we already have ... do this by adding a type layer and add  your text in the red box area.
6. To save your art for printing wherever you do your photo printing ... save your Photoshop file as a JPEG copy and you are ready to print!


Now speaking of printing ... I have to share with you a cute little print project that just arrived in the mail yesterday. I created these buck and doe tickets for Breann and Kyle (featured in the holiday card) and had them printed at moo.com .  This is the first time that I've used MOO myself ... it was really quite easy to upload the files online and they have excellent directions and templates if you want to create your own art. I screamed with delight when I opened the package. These cards turned out so nice ... beautiful colours ... nice thick stock and the finish is amazing. The best thing is that I could have uploaded 100 different images for one side of the cards for the same price! Breann and Kyle selected 4 engagement photos that they liked and I created the card backs as a ticket ... now all we just have to number the 400 cards and they will be ready to sell!


Aren't these just too cute! Oh and before I forget ... we need to give credit to the talented photographers who took Breann and Kyle's engagement photos ... Cindy and Kal at Silver Parrot Studio ! I can't wait to see the wedding photos next summer!


photo textures and giveaway winner

Wednesday, September 8, 2010

It's been a busy week in my studio ... so much inspiration and so many things on my "to do" list now that the kids are both in school.

I have been so inspired by an idea in Real Simple Weddings magazine (2010) ... in one article they showed chalkboards being used as props in a "photo booth" at the wedding reception. Our friend's daughter Breann is getting married next summer and I'm working on her wedding stationery and a few other things for the reception. I bought a bunch of old frames at the second hand stores and started painting them this week..
I painted all of the frames a flat white and added wood inserts that I painted with blackboard paint. I found a beautiful fabric that we are going to use as the backdrop for a "photo booth" at the reception ... the fabric is also my inspiration for the colours and design of the wedding invitations, etc. 

 I'm going to store the glass from the frames in a safe place so that after the wedding Breann and Kyle can pop out the blackboard pieces, add the glass back and use the frames for their wedding photos.
This week I created the calling card for Terri Smith ... the winner of last week's contest! I made the card to promote her blog and etsy shop as she requested. I did a couple of changes to my original design to work with her blog colours and font ... Terri and I are both pleased with the way that they turned out.
You can visit Terri's blog at here .

While I was working on the card for Terri I realized that I could use one of my existing invitation designs to complete a mixed media piece that I had started a looong time ago.
 The invitation became the piece I needed to complete the "i" block in this 6 piece series. With the series completed and no where to hang it in the house, I decided to add it to my Etsy shop yesterday.

 
The "f" canvas is my favourite part ... I made a bunch of these little fairies a couple of years ago and have been looking for ways to use them!
Do you like my new photo frame? It's a freebie from Shadowhouse Creations and I got it from here . I talked about Shadowhouse Creations in my last post. I spent a few nights this week with the tutorials and textures from this site ... it is so much fun and it was great to just play with some of my pictures. Here's some of my fall inspired photos that I created ... I also made the photo frame above into a square for these pics ...
 

Don't these just make you want to get out your fall sweaters and pack up your summer linens?

Speaking of summer linens ... I started tearing up some of my daughters old linen dresses last night ... ones that they have out grown years ago and I couldn't part with because I love the fabrics so much ... yep, found another use for them when I was reading one of my GreenCraft magazines yesterday ....
there was a great article by Maize Hutton on how to make frayed flowers ... here's mine so far ...
I checked out Maize's blog and she has a tutorial on how to make these here if you are interested in creating some yourself! I still have to add some ribbons and scraps to these ... I think that I'm going to tea dye some newer ribbons to make them look old and add pin backs so that I can add the flowers to couple of my purses.  These frayed flowers are a great way to use up some of those vintage buttons from my collection. I think that I will try to find some pictures of the girls wearing the dresses that I'm cutting up. I want to make hang tags using the photos and add the tags to the flowers that I'm going to make for gifts ... my Mom and Mother-in-law will get a kick out of these!

Hope that I've given you some inspiration too ... have a great weekend!

I love downloads! Here's another one ...

Tuesday, June 22, 2010


I'm loving that I figured out how to add downloads to my blog ... I could hardly sleep last night ... so many different things that I can work on to offer as {free} downloads to everyone.

Here's a design that I originally created for baby announcements. I've adapted the design so that it can be printed as a 5"x7" photo ... all you have to do is add the picture of your choice in the space provided and you are ready to go! If you are a digital scrapper ... add a couple of words if you want!

You can download the file here.
Of course this is just for your PERSONAL USE ONLY ... and if you show it on your blog/website it would be nice if you gave me credit for the art with a link back to here.

Here's what the png overlay looks like (minus the green box and the words "photo here")


Here's how to use the png overlay using Photoshop:
1. FILE>NEW> create new document width  5", height 7", resolution 300, color mode RGB
2. FILE>PLACE> my png overlay file
3. FILE>PLACE> find a picture that is suitable for framing
4. In your layers palette move your picture so that it is under the png overlay.
5. Using your move tool move the picture around in the opening so that you crop the picture in a pleasing way ... you may want to enlarge or reduce your picture at this point for better cropping.
6. Now you are done and your 5x7 picture is ready for printing!

Enjoy!
Lorrie


linking it up at anything related {tuesdays}

testing - downloads to share

Monday, June 21, 2010

I've been away for the past 5 days ... at a conference in Ottawa, Canada. We were with patent and trademark lawyers (and their spouses) from all over Canada, USA and the United Kingdom. It was a business conference for my husband and I spent a lot of time on tours of museums, art galleries and historical buildings. I had an amazing time ... took lots of pictures and drew lots of ideas in my sketch book.

Last night I did a quick check of my emails and a couple of blogs. I stubbled across a couple of interesting blogs by Malia and Megan that lead me to http://www.mediafire.com/tour.php . Last week I mentioned that I would love to learn how to add downloads to my blog so that I could share some of my art, etc. and I think that I figured it out by following Megan on Shabby Blogs ... Megan has some beautiful {free} downloads for blogs.

So ... I'm going to test this out and see if it works!

I have had a few people ask me about how I cut out some of my pictures ... so I'm going to share one of my latest "photo die cuts" with you. The design inspiration for this photo die cut is anthropologie and is one of my current favourites. You can see how I used the die cut on my first photo ... which, by the way, is a shot that I took of the ceiling in Ottawa's Museum of Civilization ... don't you just love the graphics and the colours.
Hopefully ... if I have done this right ... you can download my die cut file here . If you can't download it, please someone tell me in the comments section!!!
Here's what the png file looks like ... a combination of three different rectangles.

And here's a quick lesson on how to use the photo die using Photoshop:

1. open a new document.
2. FILE>OPEN> to find a picture that you want to use with the die cut.
3. Open my png file.
4. In the layer palette make sure that your picture is above the die cut ... this is very important! ... you will be working on the layer with your picture for the next step.
5. Next you are want to group together your picture and the die cut so that the picture will take on the shape of the die cut ... basically, the picture will look like it has been cut out. To do this go to LAYER>CREATE CLIPPING MASK (in PSCS2) or GROUP LAYERS (in PS) or GROUP WITH PREVIOUS (in PSE).
6. You can move the picture around by clicking on the photo layer and using your move tool. You can change the size of the photo or move it around to get it just the way you want ... have fun!

a day of inspiration with my friend Robin Davis

Wednesday, May 12, 2010


admire the moon. be silly.
take risks. look on the bright side.
listen to your heart. don't fear love.
remember it's never too late!
don't run. face your fears.
be an optimist. open a new window.
laugh often. live today.
speak straight and true. be brave.
life is too short to be ordinary.
the sky's the limit!


... love these words ... I don't remember where I found them but they have been on my
personal stationery for a number of months now ... I created the stationery on my computer in Photoshop -
it's a mix of some of my graphics and some brushes that I bought years ago at two peas in a bucket .

I feel so inspired today ... I spent most of the day with one of my favourite creative friends - Robin Davis.
Robin is an artist who licences her artwork and has been a great source of inspiration for me.
You can visit Robin's website and blog to see her work.


This is one of Robin's pieces from Blossom Bucket ... I bought a few of these snow pixies last Christmas
... they are soooo cute! Her new pieces for Halloween and Christmas 2010 are awesome ... I can't wait to go to Robin's open house later in the year for a little "retail therapy".  

I had a bunch of blogging "how to?" questions that Robin was able to help me figure out.  We spent some time looking at websites and talking about supplies. It's great to have a day to just bounce
ideas off someone else. As much as I like having a studio at home to work in ... it can be a little lonely at times. It's nice to be with friends and have a reason to get out of my sweatpants!

free art from the graphics fairy = personalized copyright watermark

Wednesday, March 31, 2010

I have been following The Graphics Fairy blog for a while ... it is written by a very talented woman named Karen and she shares {for free} graphic art that can be used in craft projects, on blogs, etc. She recently posted a picture of an antique camera http://graphicsfairy.blogspot.com/2010/03/thursday-is-request-day-bee-babies.html that I loved.


I knew that I could use Karen's graphic along with a few of my own graphic elements (the sitting wren and my logo) to make it my own little personalized copyright watermark for my photography.  I created the art in Photoshop CS3 and then turned it into a "brush" so that I could add it to my photos in whatever colour worked best for the shot.

I tested the watermark on a bunch of my recent photos from St. Lucia ... I'm pretty happy with the way that it turned out and now I will have to remember to add the watermark to all of the photos that I post ... I'm sure that will make my husband smile - he is a lawyer and specializes in patent, trademark and copyright law :)


camera fun with the kids - part 2

Thursday, March 25, 2010

I just created the "letters" alphabet that my daughters and their friends helped me photograph when we were on vacation last week. I wrote earlier about Shona Coles' idea http://shonastudio.blogspot.com/2010/02/fun-photo-exercise-to-do-with-kids.html and here is my take on the activity ...


I pulled the letters together in a stamp format. The stamps were modified from a digital kit that I purchased on line at http://www.twopeasinabucket.com/ so that it would fit 28 images.

I'm now working creating 8x10 pictures for each of the 13 children that were with us on vacation and using the letters we photographed to spell out each of their names. Here's the first 3 that I have completed ...


I had to take a few extra pictures of different letters so that I'd have some options when putting the kid's names together and I am happy with the way that they have turned out so far. Three done ... ten more to go!!!