Showing posts with label paper flowers. Show all posts

gift wrapping inspiration for a bridal shower

Tuesday, May 16, 2017

bridal shower gift wrapping inspiration | Lorrie Everitt Studio

Gift wrapping is the most important part of gift giving to me. Even if I give a gift card or cash, I always try to spend a little extra time with the gift wrapping. 

 I like to mix everyday basic supplies with bold graphic elements and a few unexpected elements. Follow along and I'll show you how I recently gift wrapped some items for a bridal shower.

1. Start with a plain brown paper bag with handles. Use a bold black and white striped ribbon to tie a bunch of handmade crepe paper flowers to the handle. 

bridal shower gift wrapping inspiration | Lorrie Everitt Studio

2. Use pretty wrapping paper like this one with the gold confetti pattern and add the same black and white striped ribbon to finish. Not very good at tying bows? Then don't make a bow. Cut the ribbon ends to look professional.

bridal shower gift wrapping inspiration | Lorrie Everitt Studio

bridal shower gift wrapping inspiration | Lorrie Everitt Studio

bridal shower gift wrapping inspiration | Lorrie Everitt Studio

3. I actually don't like using wrapping paper to wrap gifts, so I took the vintage serving utensils out of their original boxes and repackaged them in these burlap bags. The vintage forks and cake server were hand stamped by a local artisan and I simply tied them onto kraft cardboard using a thinner ribbon and placed them inside the bag.

bridal shower gift wrapping inspiration | Lorrie Everitt Studio

4. Add a card. I love how this gold foil card from Prose and Fawns Paperie co-ordinates with the gold confetti wrapping paper that I designed for Creative Bag. I think that this card would be sweet framed as a piece of art.

bridal shower gift wrapping inspiration | Lorrie Everitt Studio

5. Put everything inside the bag and add two pieces of fluffed green tissue paper to finish.

I created my crepe paper flowers but you could also use silk flowers. If you are interested in making your own paper flowers you will find lots of flower making inspiration on my Pinterest board.

bridal shower gift wrapping inspiration | Lorrie Everitt Studio


Mingle Magazine feature - Boho styled wedding

Wednesday, November 2, 2016

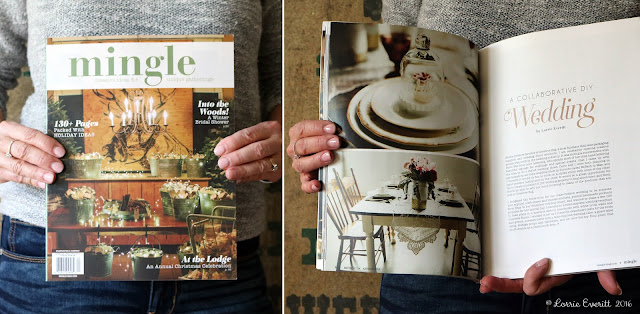
autumn Mingle magazine - entertaining inspiration

I am so happy to finally post about a styled boho wedding shoot I did earlier this year with a talented team of local wedding vendors. The styled shoot is currently featured in the autumn 2016 Mingle Magazine.

Mingle is full of creative ideas for unique gatherings. I'm all over the fall and holiday party ideas - there's a ladies wrap night and flower arranging lunch, cookie swap party, holiday prep party, santa's workshop party and hot chocolate and ice skating party. Oh my, I wish I was at all of these gatherings! 

autumn Mingle magazine - entertaining inspiration for creative get togethers

Our Boho wedding was featured on 7 pages (yeah!) but there are so many more photos and details that were not shown in the magazine that I'd like to share. So here you go ...

boho wedding inspiration | Lorrie Everitt Studio

Our photographer, Kat Williams from Attakat did such an amazing job. We were at The Warehouse Event Venue in Downsview Park. The white walls and polished concrete floor at the venue were like a blank canvas just waiting for us to make it our own. Toni from Confetti and Bows rents her huge 8' by 8' wall of handmade paper flowers and we used it to create the most amazing photo booth area.

boho wedding inspiration | Lorrie Everitt Studio

Doris from Love Lettering created the mirror/sign for the photo booth. Doris found the mirror in the trash and rescued it from a landfill. Doris is also the creative genius and maker behind PosecardsTM  - our awesome photo props.

boho wedding inspiration | Lorrie Everitt Studio

All of the wedding cakes and sweets were created by Caitlin from Cakelaine. Doris did the custom hand lettering on the chalkboard And if you are looking for guidance on how to easily add hand lettering onto chalkboards you can find my DIY tutorial here

boho wedding inspiration | Lorrie Everitt Studio

The paper lanterns, balloons, chalkboards, cake stands and cake topper were all from Creative Bag. I added the gold details to the "best day ever" cake topper and you can find my DIY tutorial here.

boho wedding inspiration | Lorrie Everitt Studio

These adorable Sugargirlee latex balloons from Creative Bag and are not only cute they are made in Canada and earth-friendly. The balloons will decompose as fast as an oak leaf in your backyard. I added white and gold tassels to one of the large hellium filled balloons.

boho wedding inspiration | Lorrie Everitt Studio

The paper goods were all created by Alicia from Alicia's Infinity. Alicia's beautiful watercolour illustrations were the inspiration behind all of the wedding details.

boho wedding inspiration | Lorrie Everitt Studio

The Perfect Table supplied all of our vintage and specialty tabletop and accent pieces. You can find the lace table runners here.

boho wedding inspiration | Lorrie Everitt Studio

Alicia also designs and creates custom wedding jewellery. I love this necklace that she created featuring one of her watercolour illustrations that match the wedding stationery. The necklace was packaged in a kraft jewellery box that was hand lettered by Doris for a Bridesmaid proposal gift.

boho wedding inspiration | Lorrie Everitt Studio

Our gift table set up featured a clear wishing well that Doris embellished with her beautiful hand lettering and illustrations.

boho wedding inspiration | Lorrie Everitt Studio

I created this vignette beside the wishing well with a something old, something new, something borrowed and something blue theme. A vintage bride and groom where placed inside a new glass apothecary container. And a borrowed family wedding photo were embellished with a blue ribbon and displayed in this new vintage inspired card holder.

boho wedding inspiration | Lorrie Everitt Studio

All of our beautiful floral arrangements were created by Jessica from Periwinkle Flowers. I added gold paint to white hobnail milk glass vases from Creative Bag

succulent favour in love mason jar | Lorrie Everitt Studio

I also have to thank my daughter Haley for being our "hand model" for the shoot and agreeing to wear whatever I put on her for the photo styling. This is the only picture that you can see more than her hands. 

I keep seeing the Autumn Mingle magazine in Michael's, Indigo and Whole Foods and I have to admit it makes me smile every time I see it!


paper flowers using the spellbinder flower die on my cuttlebug machine

Monday, February 27, 2012


My oldest daughter just recently celebrated her 18th birthday. She didn't want a party or to do anything special on her day ... her only requested was that I made her a chocolate cake and to make sure that her Scooby-doo candle was on it.

We gave my daughter money for her birthday and I wanted to personalize the gift box so that she would want to save it. The green kraft paper box is from Creative Bag. I picked up some of the new Basic Grey "kissing booth" papers and my first Spellbinder flower die to decorate the box. I've wanted to buy a spellbinder flower die since I first saw them last year at Scrapfest but they have always been out of stock when I look for them. This die is amazing and I know that I will be using it a lot.

Here's a quick tutorial for how to use this die on a Cuttlebug die cutting machine ...

1. To use the spellbinder flower die on the cuttlebug you will need: (1) A board, (1) B board and (1) C board. 2. Place the A board on the cutter, 3. followed by the C board. 4. Then place the die on top of the C board with the cutting edges facing up. 5. Put the paper you want to die cut on top of the die, 6. and put the B board on top of that. Now you are ready to turn the handle and watch the boards go through the machine.
7. Remove the scrap paper from the die and 8. carefully remove your cut flower shape from the die. 9. To form the flower, start with the smaller end of the die cut shape and start to roll the paper as shown.
10. Continue to roll the paper until to you can twist the flower shape to rest on top of the widest end. Glue the flower in place to hold.


Here's Haley's finished gift box beside her birthday cake.


Here's Haley making her wish and blowing out the candles on her cake. That crazy Scooby-doo candle has been on everyone of my daughter's birthday cakes since she was 3 ... I cried when I packed it up after her birthday ... next year Haley will be in University and I have a feeling that this was our last birthday at home with our baby. sigh.

holiday packaging details & my paper flower and decortated bottle cap tutorials

Wednesday, December 21, 2011

My holiday wrapping continues! This time I wanted to share with you my little tin gift card holders.

Again, I purchased these plain metal containers at Creative Bag and I used the digital scrapbooking kit I purchased here to create the art to decorate them. I printed my designs as 4x6 photos at Costco but you could do this on your inkjet or laser printer. I've used patterned scrapbook papers to decorate these gift card holders as well. All you have to do is cut your paper into 3 3/8" x 2 1/4" rectangles and round the corners with a corner cropper. This same size will work for the outside and inside of the tin ... it's important to round the corners of the paper to fit the shape of the container.

I prefer to use a gel medium to adhere the papers to the tin. Golden (medium matte) gel medium works great and there are lots of other brands of gel medium available at most arts & craft stores. Modge podge will also work or if you don't like to use "glue" you can use two sided tape.

I decorated my tins with paper flowers, decorated bottle caps and of course, divine twine & buttons to match my other holiday wrapping projects. 

Here's a couple of quickie tutorials to show you how to make the paper flower and bottle cap embellishments:
1. gather your supplies: scrapbook paper, large circle punch (or you can cut a circle by hand), scissors, and a mini mister (or something to spray water)
2. punch a circle from the scrapbook paper - larger circles create larger flowers, smaller circles smaller flowers (the ones shown are 2 1/2" diameter). You will be cutting a spiral shape from the circle - if you do not want to do this by eye you can draw a shape similar to the one pictured to map out where to cut
3. cut your spiral out
4. I like to trim any edges that are not smooth as you can see in this photo
5. lightly mist your paper so that it is slightly moist - not wet - this will help you to manipulate the paper
6. from the centre of the paper, form a small cone shape and begin rolling the paper into the centre while the paper is still damp
7. continue to roll ... the tighter the roll the more layers you will make ... you can always go back and make it tighter if you feel the flower is too loose when you get to the end
8. you can also loosen the paper if it is too tight. Super easy right?! Let the paper dry before you use it as an embellishment in your projects. While it is drying ... go grab your paper punch and make some more! These are easy to make while the kids at swimming/skating/dance lessons.
Want to know how I attached the paper flowers to my tin gift card holders? My secret is to use a big blob of Golden gel medium ... but this time I use the heavy gel (matte). You can most likely get away with using the medium weight too but I like to make sure that my projects look good and stay together long after I have given them away.
9. & 10. use a wooden stick to apply a large dab of gel medium
11. place your flower on top of the gel medium and press it down into shape ... you can relax the paper and let it open a bit if you want at this point. The gel medium will dry clear so don't worry if you see a little bit of it at the base of the flowers.
12. I think that a grouping of 3 or more of these flowers is sweet. You can add rhinestones, small buttons or glitter to the centres of the flowers if you want. I often add small scraps of green ribbon or paper for leaves.
And now for the bottle caps ...
1. gather your supplies: paper (photo, scrapbooking paper, etc), 1" circle punch, bottle caps (recycle ones you have or use new ones without liners) and diamond glaze (I used Glossy Accents - available at most craft and scrapbooking stores).
2. first you have to cut a 1" circle from whatever paper you are using for the design in your bottle cap. I flip the punch over so I can see exactly what I am punching out.
3. pour a small dab of diamond glaze on the inside centre of your bottle cap to adhere the paper circle
4. press the paper down and leave it to dry for an hour ... you want the paper to be completely bonded to the bottle cap because if not, the paper will move during the next step and will not lay flat.
5. & 6.  once you know that the paper will not move we will apply a thin coat of diamond glaze to the top of the design to seal it and give it a glossy finish. Tip: DO NOT SHAKE your bottle of diamond glaze ... it will give you bubbles and you do not want bubbles. If the bottle is plugged, use a pin to poke the top and allow the glaze to run freely. Start by adding a generous blob of diamond glaze in the middle and then gently move it around to cover the entire surface. It will dry clear.

Allow your diamond glaze to dry for a few hours ... if you touch it too soon you will leave a finger mark. Once it is completely dry you can add a magnet to the back if you wish. I use E-6000 glue to attach the bottle caps to magnets, wood & metal.

Warning: if you are using these bottle caps as embellishments on gift card holders, do not add a magnet to the bottle cap. Sounds like a cute idea but the magnet will deactivate any electronic gift cards that you put inside and you don't want that to happen. I glued my bottle caps to the tin containers.

You can see more of my other wrapping projects over here ...
4 more sleeps till Christmas;)

happily ever after ... wedding inspiration

Tuesday, August 16, 2011


Don't you just love fairy tales and happy endings ... I do ... and I was so happy to attend the wedding of our friends' daughter recently. Breann married her Prince Charming {Kyle} and their wedding and reception was amazing.

I collected a number of old frames to use at the reception as part of the decor. We removed the glass, painted the frames white and added chalkboards. The sign pictured above was a gift I made for Breann and Kyle. I hand painted the words so that the "happily ever after" will never rub off or go away. I also made another one with the words "thank you" ... it was used in the wedding day photography and I am just waiting to see the wedding photos so that we can print the thank you notes.


One idea that we had was to set up a photo booth at the reception. Breann fell in love with this yellow and grey fabric {which ended up being our inspiration for the wedding stationery} and we knew that it would make a beautiful backdrop for photos inside the hall. We purchased enough fabric so that I could sew two 8' panels together ... we wanted to make sure that we had enough width for group pictures. We hung the fabric in the reception hall, added some chalkboards and chalk, a big white frame and lots of silly props and that was all it took to "get the party started"! This would be great for a kid's party too! ... just let the fabric and props set the party theme.
Here's a picture of myself, two daughters and a friend's daughter ... can you tell we were having a lot of fun at the wedding?


I had a case of vintage mason jars that we filled with fine beach pebbles & candles to use at the bar. I created the paper flowers using extra* papers from Breann and Kyles' stationery. A little bit of Tim Holtz's distress ink in yellow (scattered straw) and grey (weathered wood), some pop dots and a ribbon to tie the flowers to the jars was all it took to make these candles complete.

I think that these would be cute for an anniversary or birthday party too ... just remember to keep the paper decorations away from the flame!

*Just have to tell you that we had "extra" stationery because a few weeks after we printed the invitations we found out that Breann's youngest brother was going to be representing Canada in the World Junior Swim meet in Peru ... and he would be swimming in Peru on her wedding day. Long story short ... the wedding date was moved ahead by two weeks, I made new invitations and I we have 200 extra wedding invitations to "play with".

I hope that you find these ideas inspiring whether you are planning a wedding or a party!
Have a great week.