Showing posts with label sewing. Show all posts

DIY Easter themed gift packaging using pom poms

Saturday, March 17, 2018


 DIY Easter themed gift packaging inspiration using handmade pom poms | Lorrie Everitt Studio

In my last post I showed you how to make your own pom poms using The Loome pom pom tools. Today I thought that I'd show you some of the Easter themed projects that I created using my pom poms.

DIY Easter themed gift packaging inspiration using handmade pom poms | Lorrie Everitt Studio

I placed pom poms on these burlap tote bags. I think that these tote bags would be so sweet for an Easter egg hunt. Finish the front and the backs of the bags or just add a pom pom to one side ... there's no right or wrong.

On the front: a small pink pom pom along with a few hand stitched whiskers. 
On the back: a larger white pom pom.

DIY Easter themed gift packaging inspiration using handmade pom poms | Lorrie Everitt Studio

Turn plain muslin drawstring bags into Easter favor bags by adding pom poms. I added a small punch of colour to the pom poms to represent a bunny nose and a chick beak. It was easy to add an embroidered word to the muslin bag for another fun detail.
Tip: I used disappearing fabric ink pens to write out what I was going to embroider.

DIY Easter themed gift packaging inspiration using handmade pom poms | Lorrie Everitt Studio

DIY Easter themed gift packaging inspiration using handmade pom poms | Lorrie Everitt Studio

DIY Easter themed gift packaging inspiration using handmade pom poms | Lorrie Everitt Studio

Tip: If you are going to use fabric bags to package edible items you should package the food in clear candy bags first. 

DIY Easter themed gift packaging inspiration using handmade pom poms | Lorrie Everitt Studio

Turn any plain wine bag into an Easter theme wine bag by adding a pom pom to the bottom of the bag. Who wouldn't love to receive this as a hostess gift on Easter weekend?
Tip: Sew the pom pom in place with a few stitches so it will not fall off. 

DIY Easter themed gift packaging inspiration using handmade pom poms | Lorrie Everitt Studio

Pom poms can be added to plain paper shopping bags using glue. I created tissue paper pom poms and tissue paper bunny "ears" to make my gift bags a little more special.


DIY Easter themed gift packaging inspiration using handmade pom poms | Lorrie Everitt Studio


You're Tote-ally Awesome - a Makeful DIY challenge

Sunday, February 28, 2016

You're Tote-ally Awesome | Makeful | Lorrie Everitt Studio

If you have been following me on Instagram you may have noticed that I have mentioned the Makeful community and Makeful TV a number of times. I was one of the first maker's to join the Makeful community last year and I have been encouraging all of my creative friends to sign up and join Makeful.

You're Tote-ally Awesome | Makeful | Lorrie Everitt Studio

I recently received a simple cotton canvas tote bag in the mail from Makeful. Their logo was screen printed in the bottom corner of the bag and it came with a note inviting me to have some fun with the bag and transform it into something beautiful ... and so I did.

You're Tote-ally Awesome | Makeful | Lorrie Everitt Studio

I spent a long time figuring out what I wanted to do with my bag. I knew I my direction would be something floral design with a creative quote but I wasn't sure what medium I wanted to use on my bag. Should I paint? Or maybe, sew? Or add an image using iron on transfers? 

I ended up doing a little bit of everything and I'm pretty happy with my final tote bag.

You're Tote-ally Awesome | Makeful | Lorrie Everitt Studio

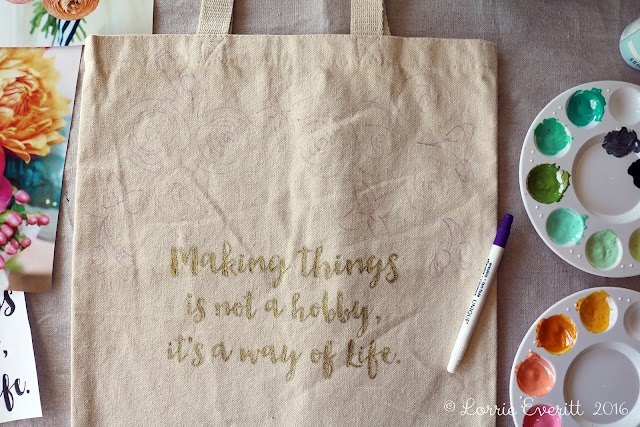
I started off by painting a quote with Martha Stewart's gold glitter paint. I should tell you that I added Martha Stewart's tintable fabric medium to all of my paints in this project.

You're Tote-ally Awesome | Makeful | Lorrie Everitt Studio

Next I used a disappearing fabric pen to roughly draw out my flowers before I started painting my overall design.

You're Tote-ally Awesome | Makeful | Lorrie Everitt Studio

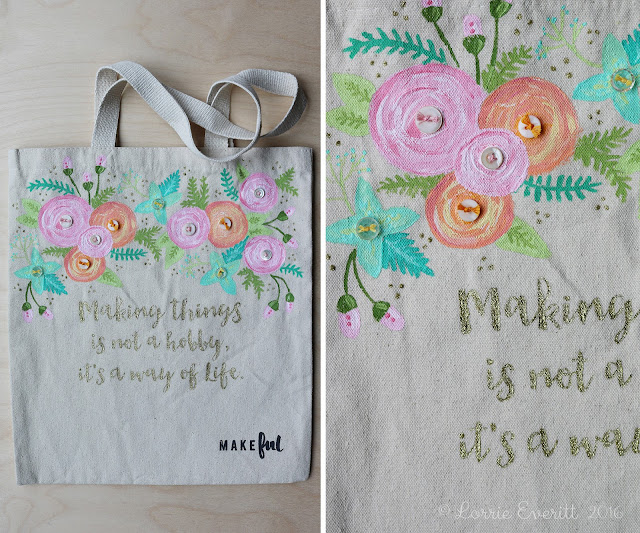
I wanted my floral design to be colourful and fun. I created a cup sleeve a little while ago for my reusable Starbucks cup which you can see in the first photo, and it was the inspiration for my colours on the bag.

You're Tote-ally Awesome | Makeful | Lorrie Everitt Studio

After painting the flowers I decided to sew some of my vintage buttons to the bag using different colours of embroidery floss for visual interest and for a surprise functional reason. You see I could not stop at just decorating the outside of the bag. I had to add some details to the inside of the bag as well. 

You're Tote-ally Awesome | Makeful | Lorrie Everitt Studio

I added a felt pocket inside the bag to store smaller items like pencils and business cards. I also added an iron on transfer as a label so everyone would know that I created the bag. 

You're Tote-ally Awesome | Makeful | Lorrie Everitt Studio

Above you can see my felt pocket and flowers  before I added them to the inside of the bag.

You're Tote-ally Awesome | Makeful | Lorrie Everitt Studio

I sewed two large buttons inside the bag to hold the pocket. I sewed two button holes on the felt pocket. Once the pocket was attached to the inside buttons, I wanted to make sure that the pocket did not fall off the buttons easily, so I cut out two felt flower shapes with tight button holes and placed them as shown (above bottom right).

You're Tote-ally Awesome | Makeful | Lorrie Everitt Studio

And now I'm off to enter my tote bag to the Makeful weekly challenge. If you sign up to be part of the Makeful community you can enter the weekly challenges as well or just check it out for inspiration! Either way, get ready to be inspired. 

You can check out more totebags from this weekly challenge at #toteallymakeful #bemakeful.


embroidery hoop art using printable cotton fabric transfers

Thursday, October 1, 2015


embroidery hoop art using printable cotton fabric transfers | Lorrie Everitt Studio

After being inspired by the endless number of projects that have been popping up on Pinterest featuring art framed in embroidery hoops, I went to work digging through my sewing supplies for my stash of embroidery hoops. I did a lot of cross stitching back in the 80's and like most of my craft addictions, I (still) have a ton of supplies to use up.

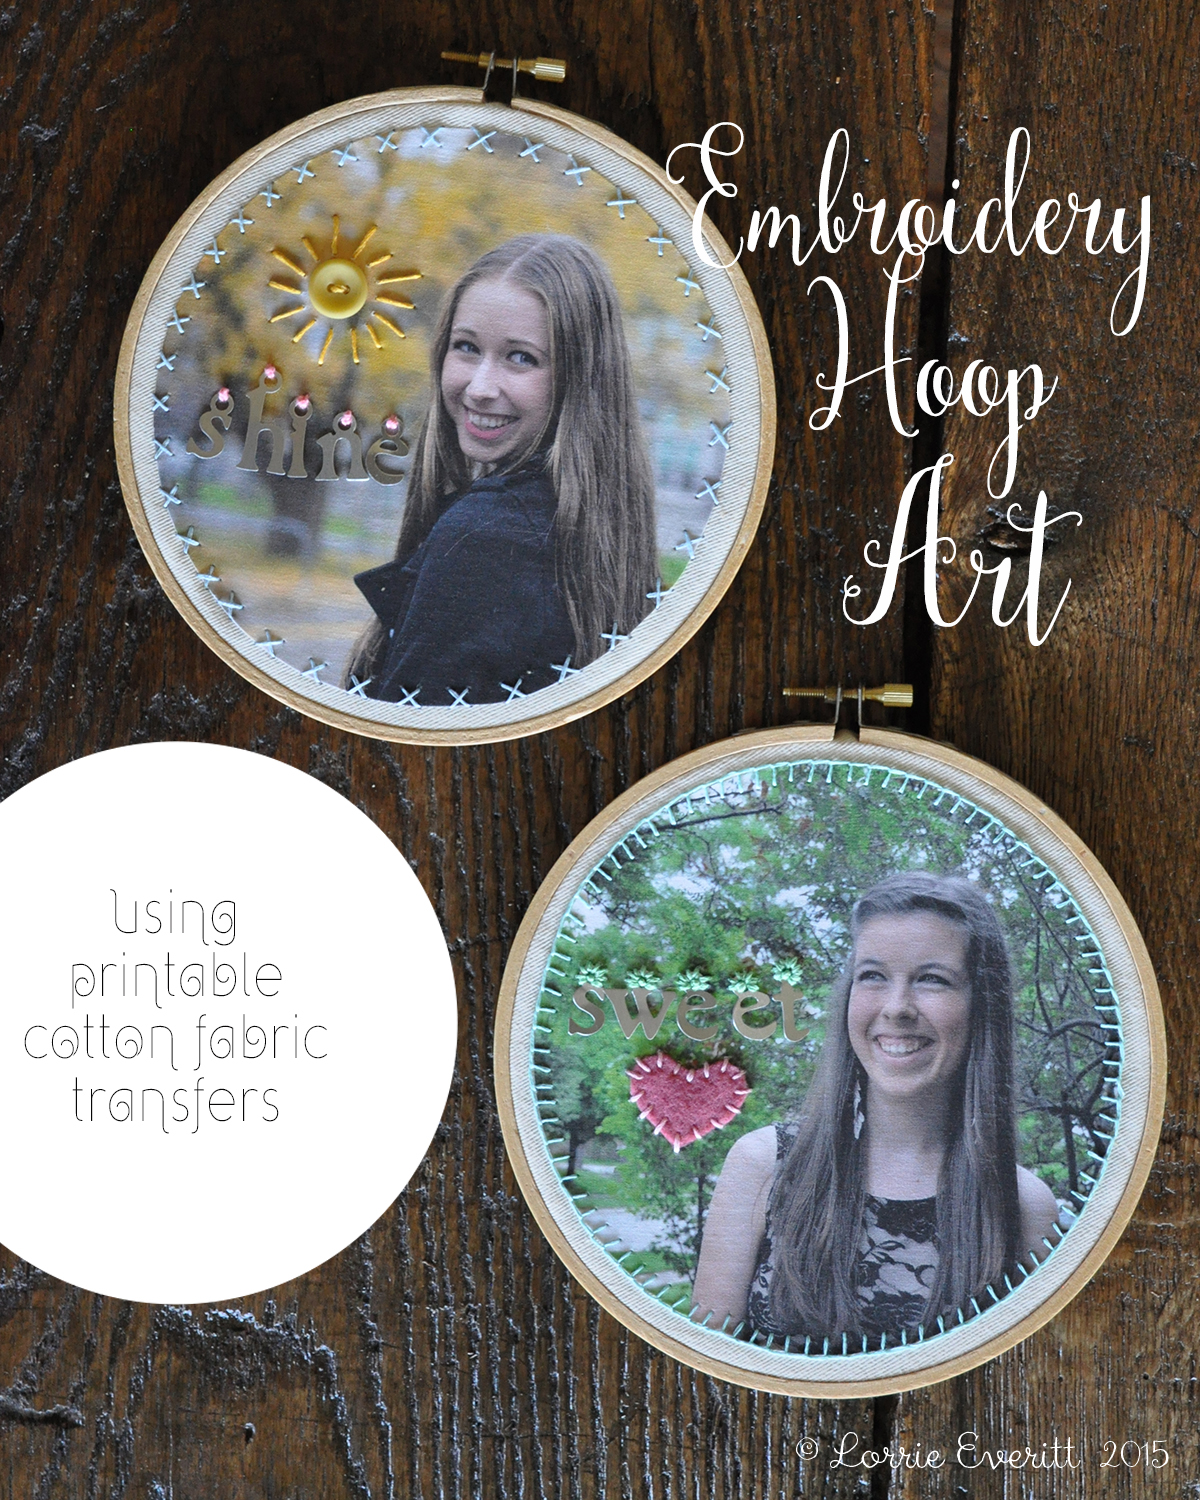
I have been playing around with these printable cotton fabric transfers and I decided to try them out for this project. Unlike most of the iron on transfers that I use, these ones are actually cotton fabric that goes through the ink jet printer - so you don't have to worry about reversing the image before printing. The adhesive is on the back so there is no fading when you iron them onto another fabric.

  embroidery hoop art using printable cotton fabric transfers | Lorrie Everitt Studio

Once you have printed out the fabric transfers you will need to cut the image out before you iron them onto the fabric of your choice. I used an inexpensive unbleached cotton for my background material.

embroidery hoop art using printable cotton fabric transfers | Lorrie Everitt Studio

Embroidery hoops are available in a number of different sizes. I sized my fabric transfer to just fit inside the embroidery hoops so that there would be room for me to stitch a decorative boarder around the image.

embroidery hoop art using printable cotton fabric transfers | Lorrie Everitt Studio

I have not been sewing for a while and forgot how relaxing it can be. It's easy to do while watching tv or sitting shotgun on a long car trip. I used a number of different colours and stitches on these pieces. The metal letters came from my scrapbooking stash and were perfect for this little project.

embroidery hoop art using printable cotton fabric transfers | Lorrie Everitt Studio

I also used a combination of felt and buttons to create little saying on each of my pieces ... like sweet "heart" and 

embroidery hoop art using printable cotton fabric transfers | Lorrie Everitt Studio

"sun" shine. If you want to re-create something similar to this and can't find the metal letters you can always add the words to your art before you print it on the fabric transfers.

embroidery hoop art using printable cotton fabric transfers | Lorrie Everitt Studio

Now I just need to find a place in my studio to hang these! 


diy crochet lace denim shorts

Tuesday, June 4, 2013

Are you ready for summer? I'm not. But after seeing all of the new crochet lace ribbons at Creative Bag this week I'm actually looking forward to wearing shorts again ... shorts with lace details that is.

We added lace to a number of my daughter's shorts last year. It was super easy to do and  a great way to spend a few raining days at the cottage. We added lace in different widths to different areas of the shorts - pockets, hem, waist band. You can see in the photos above that we added a small band of lace to the front pockets and a larger band of lace to the hem. There is no right or wrong way to do this and if you need inspiration for where to place the lace just check out your favourite denim retailers for ideas.

I just bought some of the ivory crochet lace this week at Creative Bag. After I finish updating a pair of my denim shorts I am going to figure out how to make a clip using the lace for my youngest daughter's hair. She bought a beautiful lace dress from Anthropologie to wear to her grade 8 grad and I have noticed that she has been pinning hair styles with lace bow hair clips. If I come up with something worth sharing I'll show you what we end up doing at the end of the month. 

Christmas packages tied up with divine twine

Thursday, December 15, 2011

My Christmas cards have been mailed out and I'm working on my Christmas packaging projects this week. This is a picture of the (80) cards I created this year.

I'm really in love with Divine Twine right now and knew that I had to use it as a detail in my handmade cards. I was quite happy that Creative Bag sells the larger (240 yard) rolls of twine because I am going to be using lots of it in my holiday wrapping projects.
Aren't these colours yummy? I decided to go with the blueberry colour because I knew that it would co-ordinate with the digital Christmas kit that I purchased earlier from Design House Digital. I would normally design my own graphics for our cards but this year I didn't have time and at $8 for the complete kit, it was just too good to pass up. The little owls were so cute and I adored all of the fun colours.
 Creative Bag also has these sweet little "bitty bags" that I thought were amazing. They are perfect for loot bags, class gifts, wedding favors ... and I'm sure that you will come up with more ideas. They come in a couple of sizes and lots of colours. I'm using the blue and white ones for some of my Christmas packaging projects this year ...
 Isn't this just the sweetest little paper gift bag! As you know I am not afraid to use paper on my sewing machine ... you may have noticed that I have machine and hand sewing on my Christmas cards again this year. I saw something similar to this on Pinterest and I could not resist doing it with the bitty bags for Christmas. No one is going to be peeking inside their Christmas presents without me knowing it this year!

Here's a closer detail of the top of the bag and my gift tags. I used plain manilla mailing tags as the base for my gift tag. The little owl tag was created in Photoshop using elements from my digital kit and then printed at Costco as a 4x6 photo. I try not to use my ink jet printer for projects like Christmas cards and gift items. The colours are so much nicer when they are printed, they last longer and they are actually cheaper to print this way. You can see that the divine twine has been wrapped around the tag and I used the same buttons that I had on my Christmas cards to hold the twine in place on the tag. The glitter tape is a decorative element but it also had a functional purpose - I used it hold the tag in place while I was sewing the bag closed on my sewing machine.

I am working on a few more Christmas wrapping projects this week that I'm going to share with you and I hope that you will pop back again to see what I am creating. I'm also posting my projects over on Creative Bag's blog so you can catch me there too.


recycled tee shirts

Friday, June 17, 2011


As the summer weather has finally arrived, I found myself going through our closets this morning to see what short sleeve tee shirts still fit, what needs to be donated to the second hand store and what can be used in a craft project!!

I discovered that my youngest daughter, who only seems to own tees with holes in them, actually has a few tees hanging in her closet with the hangtags still on them. I really can't wait until she has children someday. So, between Robyn's {favourite} tees and a few of my own, I found myself with a new supply of materials for craft projects.


I bought this cute Mickey Mouse tee shirt over ten years ago at Disney World that was too worn out to donate but I loved the screened logo too much to throw it out ... so I used it to create another one of my sewing kits in a bottle. I did a quick tutorial on these a while ago, you can see it here. I used a mini canning jar this time ... it is just the right size for a few spools of thread, some needles and pins.

I've already packed my mini sewing kit in a jar to take to a class I'm teaching on Saturday ... we are making ribbon bracelets and this will come in handy during class.
fyi ... there are still spots available for this class if you live in the area and are interested ... I'm only teaching this class once because my vintage materials are limited. Any supplies that I have left over after class I will use to make these bracelets to sell in my etsy shop.

I know that my oldest daughter talked about making a blanket out of her old graphic tees ... I think that we saw that idea on one of the Twilight movies. Bella's mom made one for Bella ... come to think of it, I have a feeling that Jacob's mom may have made one for Jacob too and that is why Jacob is always walking around without a shirt on! ;)

 If you have posted any project ideas with graphic tees that your older children can't part with on your blog (or know of other blogs that have) ... please let me know! I have a feeling that we are going to have some ideas flying around our house after school today. Have a great weekend!

{birthday} bunting tutorial

Friday, February 11, 2011

It's been another busy week for me ... more birthday celebrations, teaching a mixed media canvas class and test printing wedding invitations ... I'm looking forward to just hanging out with friends tonight!

I thought that I'd share with you a fun little project my daughter and her friend, Alexis made with me recently. This is a fabric bunting that can be used as a decoration for birthday parties, showers or any holiday celebration ... like maybe Valentine's day! This is a great "beginner" sewing project so you may want to try it with older kids as I did. My daughter Robyn made hers so that we could hang it up for her sister's 17th birthday this week ... Alexis made hers to use at her 13th birthday party last weekend.

Here's what you will need: assorted fabrics, wide ribbon, scissors (regular and pinking), a fast fade fabric marker, cardboard (to make a pattern), ruler, straight pins, thread and sewing machine.

I bought 5 different Amy Butler fabrics for our bunting ... I  love Amy's colours and prints! You don't need a lot of fabric for this project so I bought "fat quarters" of each print from a quilting store ... a fat quarter is one yard cut into 4 large squares - you could also just purchase 1/4 of a yard of each fabric. The Amy Butler fabrics are a little expensive (about $18 yard) so to keep costs down I used  an expensive solid fabric (about $6 yard) for the back of each triangle since our bunting would be hung so that the backs are not really visible. I was able to make 2 six foot long buntings and I still have fabric left over for other projects.

I wanted all of the triangles to be the same size so I made a template out of cardboard. Here's how I made my triangle template: (a) Draw a line 7" across ... this will be the top of the triangle. (b) On that 7" line find your half way mark (3 1/2"). (c) From your centre point, draw another line that is 11" long ... you now have a "T". (d) Now draw your triangle and cut it out. 

I traced around our template directly onto the fabric using a quick fading fabric marker - the ink disappears in about 24 hours ... it's like magic! None of our prints had a pattern that was one direction so I was able to flip the triangle template so we had almost no fabric waste as you can see in my photo!

We wanted 10 triangles in our buntings - two of each of the five different Amy Butler fabrics. We also had to cut 10 solid backings so we had to cut out 20 triangles in total.
This photo shows the next three steps ...
1. We pinned the wrong sides (one patterned front, one solid back) together for all 10 of our triangles.
2. Next we used our sewing machine to straight stitch the two longest sides of each triangle ... we could have sewn the top too but it wasn't necessary so we didn't bother.
3. After all of the triangles were sewn together, we used the pinking scissors to trim the edges of the two longest sides to give a decorative "zig-zag" edge (if you don't have fabric pinking scissors or prefer a straight edge, just trim with regular scissors!)

Next we need to sew our triangles onto a long, wide piece of ribbon - our ribbon was 6' long. I found a ribbon in the colour that we liked but it was a little thin and somewhat see through so I sewed a piece of lace onto the ribbon along one edge as you can see in the photo. 
The next step is to pin the triangles to the back of the ribbon. The triangles were placed so that they were touching each other and lined up about 1/2 way along the ribbon. I started to pin the triangles working from the middle of the ribbon and working out to the end of the ribbon so that I had some extra ribbon at each end for hanging.
The next step is to sew all of the triangles onto the ribbon ... we did two lines of straight stitching ... one at the top of the triangles (about 1/2 way through the ribbon) and again at the bottom edge of the ribbon so that the triangles would lay flat when hanging.

To finish the ends of the ribbon, simply turn the ends over to form a loop to hang and sew the ends in place using your sewing machine and you are done.
The girls added large buttons at each end of their bunting to hide the stitching from their loops ... a nice decorative touch with the lace. We hung Robyn's bunting on our fireplace mantle so I used some twine on the loops and hung the bunting from heavy candle sticks. I think that we are going to hang this in Robyn's bedroom over her bed later on ... she did a great job and just loves it.
Robyn made Haley a pillow from some of the fabric scraps ... we used the cuttlebug to cut flowers and I created the "love like crazy" graphics as an iron on. The back of the pillow is one of our favourite Amy Butler fabrics. It was Robyn's first pillow and she is dying to make another one for herself .... maybe this weekend!
And I made Haley this little mixed media canvas piece after teaching my class on Tuesday ... the denim pocket was from one of her baby outfits ... Haley knew it as soon as she opened her present. The words on the side of the photo say "always believe in fairytales".

I hope that you try to make one of these ... maybe add words to spell out something or keep it simple like I did and reuse it after your celebration for an everyday decoration! 


I'll be linking up at in-the-studio-sneak-peek-friday today!