Showing posts with label crafts. Show all posts

Let's Make Pom Poms

Tuesday, March 13, 2018

Let's make pom poms using The Loome Tools | Lorrie Everitt Studio

I've been wanting to try out The Loome Tools ever since I found out we'd be getting one of them in our swag bags at the Create Now Summit this May. Thanks to Melissa and arounna, I was able to try out the Loome Pom Pom and Tassel Maker and the Loome Pom Pom Trim Guide a little early so I could add some handmade pom poms to a few of the Easter DIY projects that I'm working on. 


Let's make pom poms using The Loome Tools | Lorrie Everitt Studio

Let's make pom poms using The Loome Tools | Lorrie Everitt Studio

You'll need the Loome pom pom tool and pom pom trim guide, yarn and scissors.

Secure yarn to one of the notches on the loome pom pom tool ...
wind yarn around and around ...
tie the centre core using a single strand of yarn (or twine) ...
remove pom pom from loome and double knot ...
cut loops  on both sides ..
use the pom pom trim guide to give your pom pom a "haircut" on each side ...
continue trimming until you like the shape of your finished pom pom!


Let's make pom poms using The Loome Tools | Lorrie Everitt Studio

Check back to see how I used these pom pom on with of my favourite Easter packaging supplies from Creative Bag.

Note: I used cotton yarns to make these Easter themed pom poms. The finished pom poms were not as dense and fluffy as pom poms made with wool yarns but I think that they are perfect for my spring time projects.

Cookie Cutter Projects for the holidays - bake, craft and wrap

Thursday, December 7, 2017


Eating cookies and baking cookies are two of my favourite Christmas traditions. I had a few custom cookie cutters made to match the Sweet Life Collection that I designed for Creative Bag. The metal cookie cutters are great for baking, crafting and gift wrapping projects.

Mary from Emma's Sweets made the most adorable custom cookies using the cookie cutters so I could feature them in a holiday themed styled shoot. She decorated the cookies two ways - in full colour and in white with gold details. The white and gold cookies were so unique and inspired me to create my oven baked clay ornaments.


And as you know I love to add special touches to my gift wrapping so the cookie cutters made their way into my holiday gift wrapping as gift toppers.


My oven baked clay ornaments can also be used as gift toppers. 


Here's how I created my oven baked cookie ornaments:


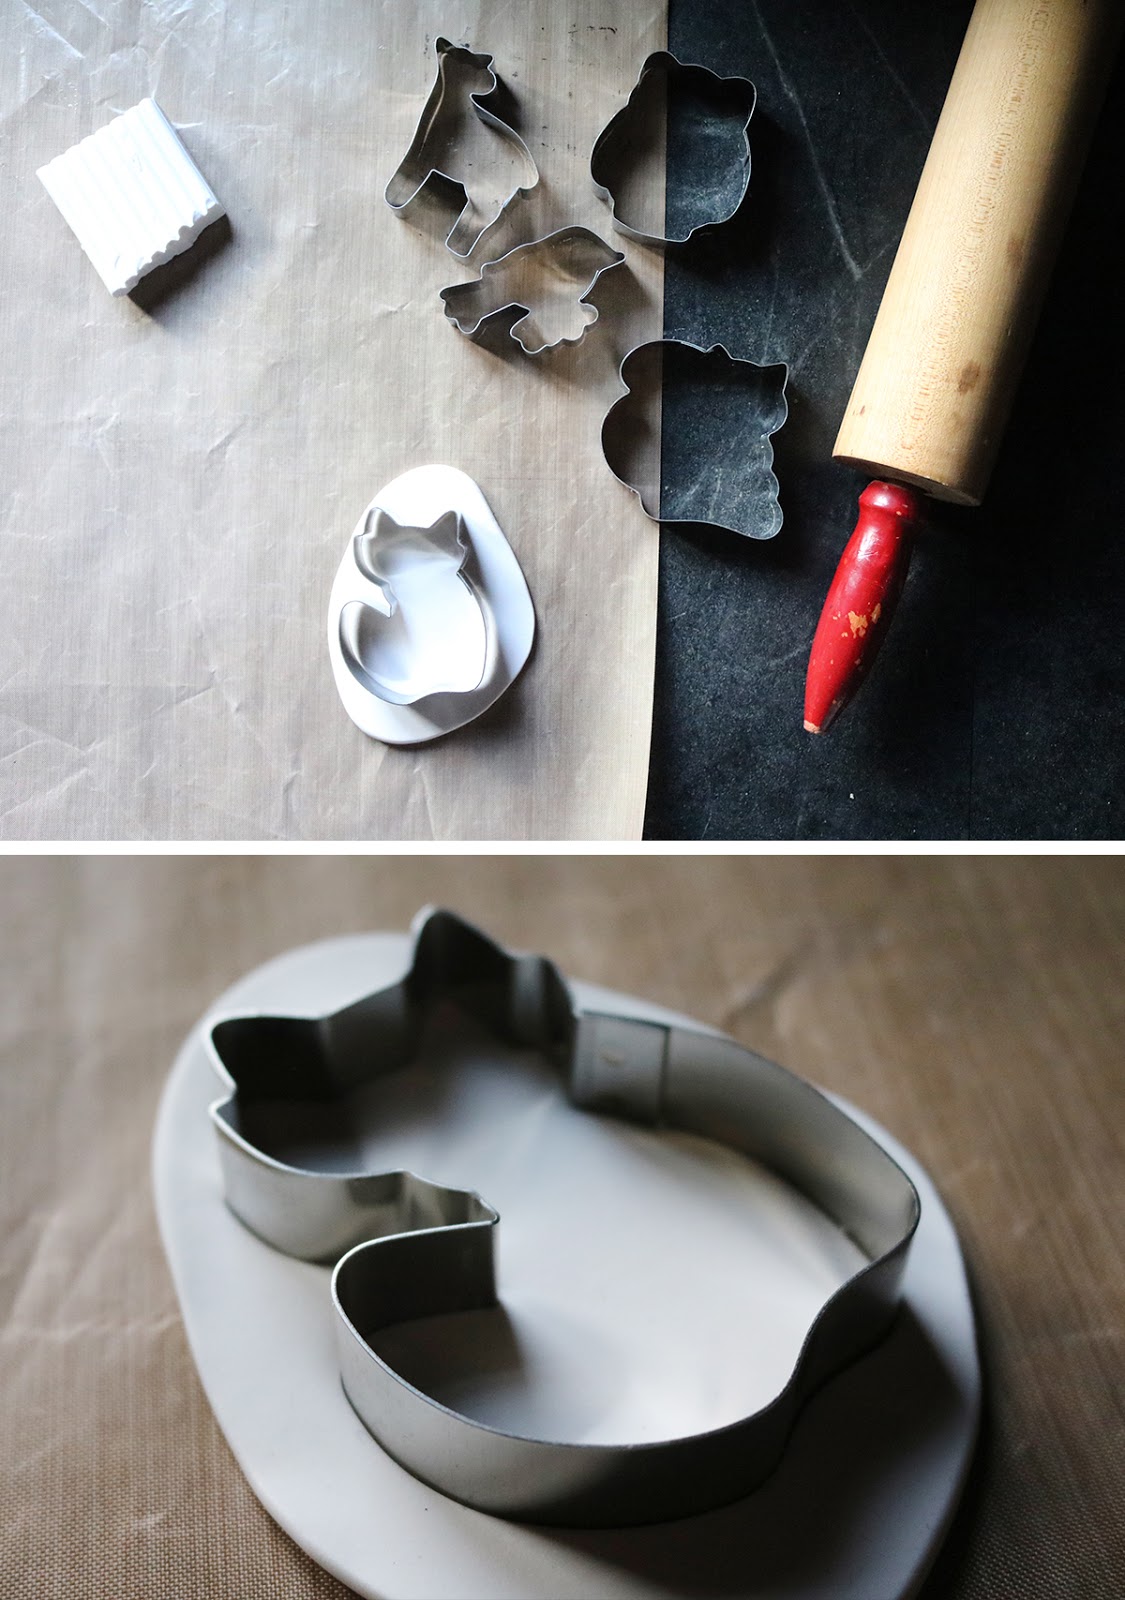
Gather your supplies: oven baked clay, cookie cutters, rolling pin, wire, wire cutters, bamboo skewer, paint, paint brush, twine. You'll also need a baking sheet, parchment paper and oven to bake the clay.

1. Soften clay and roll out oven baked clay just as you would regular cookie dough.
2. Cut the cookie shapes and set aside.
3. Wire loops will be used to hang the ornaments. Cut pieces of wire and bend as shown above. 
4. Using the bamboo skewer, make a hole in the top of the clay shapes and insert the wire loop.
5. Place the clay shapes on a baking sheet lined with parchment paper and bake as per the instructions on the oven baked clay package.


6. Paint the ornaments with as much or little colour as you want. I gave my ornaments a contemporary look by just adding a few gold details. I used my cookie pattern as a guide. 
7. Add twine, baker's twine, yarn or leather string to hang. 

Note: If you don't want to use wire loops to hang the ornaments, add a small hole in the clay before baking using the bamboo skewer.

Sources for custom cookie cutters: owl, deer, squirrelbird, fox.


Wishing you a sweet holiday season and I hope that there are lots of cookies!


Use up your craft stash inspiration - part two.

Sunday, August 21, 2016


I can't believe how long I have hung onto some of my crafting supplies. Take for example a jar full of colourful clamp file paper clips and an old potato masher. They have been in my cottage crafting stash for over ten years. 


I know that I have had these items for at least ten years because it was in 2006 that I created the potato masher photo holder (above). I purchase two potato mashers at a garage sale near our cottage and I always intended to make the second potato masher into a recipe card holder. 


So this weekend, I finally got around to making my recipe card holder. It took me about ten minutes to make and I'm going to show you how I did it. 

Here's what you will need: an old potato masher with a wood handle, a metal clamp file paper clip, a 1/4" screw, a screw driver and a pair of pliers.


Step One. Pre-drill a small hole in the handle of the potato masher so it will be easier to add the screw. I made a quick hole using a nail and hammer.


Step Two. Using a pair of pliers, bend open one side of the metal clamp file paper clip as shown above. Bend it just enough so you can add the screw into one of the holes.


Step Three. Screw the metal clamp file paper clip in place on the wood handle. Bend the clamp file paper clip back into shape using the pliers and that's it ... you're done! 


Now I am thinking that it would be fun to make a few more of these to use for entertaining. They would make interesting sign holders for a food bar.


Here's one more photo so you can see what they look like from the side. By the way, I glued my photos and recipe cards to drink coasters so they will not bend easily. 


Use up your craft stash inspiration - part one.

Thursday, July 21, 2016


Like most craftaholics, I have boxes of crafting supplies taking up space in my home. I have hoarded so many supplies over years that I have decided it's time to start using up products in my craft stash. It's time to make some of those inspirational projects that I've pinned, ripped out of a magazine or sketched out in one of my notebooks. It's time to hold off from purchasing new crafting supplies for a while. Well, let me clarify that, I may need to purchase more glue, or a few new colours of paint, or if I win the lottery, I will have to purchase the Circut Explore machine  ... but other than that, no new crafting supplies. 


These funky clothespins are an example of one of the projects that I have done in the past to use up some of my crafting supplies. My sister-in-law, Kerry, and I spent an evening with a pile of crafting materials (and maybe a bottle of wine) and came up with these.


We used plain clothespins, scrapbooking paper (scraps) assorted resin flowers, a paper cutter, scissors and glue.


I have packed up a couple of boxes with supplies from my craft stash to take to the cottage this weekend. I am looking forward to some down time over the next few weeks to be able to craft with my family and friends. I'll be posting pictures of our projects on Instagram and when I am able, I will post more ideas on the blog to hopefully inspire you to use up your craft stash.


personalize holiday cards and gifts with photos

Wednesday, December 16, 2015

personalize holiday cards and gifts with photos | Lorrie Everitt Studio

Are you ready for the holidays? The countdown is on! My cards are in the mail, I've started gift wrapping many of our gifts and I can't wait to start my holiday baking this weekend. 

I take photos of my family all year round and for the past 21 years I have tried to incorporate a few of my favourite photos into my holiday crafting projects. Today I'm going to share with you a couple of the things that I did with my photos this year.  

personalize holiday cards and gifts with photos | Lorrie Everitt Studio

I shot photos of my daughters on the beach of Lake Erie this summer and I was originally planning to use one of the pictures on the front of our Christmas cards as I always do. But I ended up doing something a little different this year. I purchased these holiday cards and personalized them on the inside with my photos.

personalize holiday cards and gifts with photos | Lorrie Everitt Studio

I cropped and re sized my photo to fit the inside of my cards and added a holiday message using Photoshop. I didn't have a lot of spare time to make my cards so I printed my photos at home on my Canon PIXMA Pro-100. I love my photo printer because the photos look like they were professionally printed and I know that the colours won't fade over time.

personalize holiday cards and gifts with photos | Lorrie Everitt Studio

I set up my photos so I could print twelve at a time on 13"x19" sheets of photo paper. I cut the photos out using my large paper cutter. You could use scissors to trim your pictures but a paper cutter is quicker and your finished photos look more professional.

personalize holiday cards and gifts with photos | Lorrie Everitt Studio

My premade Christmas cards had rounded corners so I used the Crop-a-dile corner chomper to round the corners on my photos as well. I really like this corner cropping tool because it allows me to crop four or five pieces of paper at a time. I use glue dots to attach my photos to the cards. 

personalize holiday cards and gifts with photos | Lorrie Everitt Studio

And there you go! I personalized 80 cards in just a couple of hours!

The other project that I wanted to show you are my holiday photo gift tags ...

personalize holiday cards and gifts with photos | Lorrie Everitt Studio

I've created these for my family gift for many years. I like to number the backs of my daughters' photo gift cards so they have to open their gifts in the order of the tags. It makes Christmas morning a little more fun as we watch them hunt for which present to open next. 

For this project I sized and cropped my photos in Photoshop to fit my tag shaped paper punch. I printed them on my PIXMA Pro-100 photo printer at home so I would have better control of my picture size for this project. I was able to print eight tags at once using 8.5"x11" sheets of photo paper. I like to add baker's twine to my gift tags so I added a hole to each tag using this single hole punch

personalize holiday cards and gifts with photos | Lorrie Everitt Studio

Here's a close up of one of my gift tags on a small kraft gift box that I embellished with lace and gold glitter tape, a deer figurine and a mini bottle brush tree. 

Stay tuned ... I have a few other projects that I'm working on for the holidays! 


BRIKA whimsical wreath workshop in the Makeful learning studio

Sunday, November 29, 2015


Last week I was invited to attend a workshop at the Makeful learning centre in BRIKA's Yorkdale popup store. The whimsical wreath workshop by DeLight Floral Design and My Little Secrets was fabulous. The supplies on hand were beautiful and everyone's wreath was truly one of a kind.


This photo was featured on BRIKA's Facebook page. My wreath (and hand) is on the left. Isn't the wallpaper in the background adorable!


I don't have space to hang seasonal wreaths in my home so I knew when I was creating my project at the workshop that I would have to do something a little more with it when I got home.


So the next day I gathered some supplies and figured out a way to display my whimsical wreath on the fireplace mantle using a hard cover book.


I had a plaid flannel ribbon scrap that was too small to tie as a bow but it just big enough to hang the wreath in place on the book. I folded the ribbon in half and looped it around the top of the wreath.


Then I simply stapled the ribbon in place to a couple of pages in the middle of the book.


The book had an embossed title on the cover so to cover it up and add little something extra to my wreath I glued a birch wood slice that I painted with chalkboard paint. I thought about writing a holiday message using chalk markers but my "hello" message will allow me to display my wreath well into the new year. 


If you have a crafty friend and you're looking for a fun evening to get your craft on you really need to check out the workshops at BRIKA.


These are some of the pics that I took at the BRIKA Yorkdale popup shop. If you like to buy handmade ... this is the place to be. There's a great mix of products by some very talented artisans. I loved the cafe and just past the cash desk is a diy area that you can gift wrap your purchases. It's brilliant!


The Makeful learning studio at the very back of the store is like a crafter's dream come true. The studio set up is so inspiring. Makeful is a new lifestyle TV channel that is all about celebrating the creativity within all of us! Whether you are into food, design or diy they have it all and it's in free preview right now. You can find out more about Makeful and the Makeful community on their website.