Showing posts with label party decor. Show all posts

DIY rainbow weaving wall hanging

Monday, April 27, 2020


Crafting and making things has always been a way of life for me. And right now, creating things has become a very big part of my daily routine as we adjust to life during a pandemic. It's been weeks since stay-at-home orders where put into effect and I have been using the extra time at home to learn a few new DIY skills. 

First up - weaving on a loom. 

I've wanted to learn how to weave ever since I saw the first hand woven wall hanging pop up in my Instagram feed. I purchased a mini loom kit from local maker Chip and Sparrow a while ago. The loom kit that I used is called the Mezzo Loom and comes with all of the tools that you need to get started. The small loom is a wonderful way to use up scraps of yarn . The kit comes with written instructions but you can also find great beginner videos on the Chip and Sparrow website. 

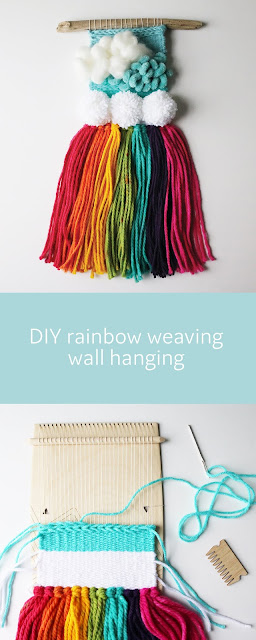
Mini weavings like the rainbow one that I created can be accomplished in an afternoon. Here's how I created my rainbow inspired mini wall hanging: 


Sources: Mezzo Loom Kit (comb, 6"x9" wood loom, pick up, 7cm yarn needle, 17.5cm needle and manual), crochet thread, assorted wool/acrylic blend/roving/chenille yarns, pompom maker, scissors.

I highly recommend watching this how to warp, weave and taking off a weaving video to help you get started.


1. Natural crochet thread was used to create the warp on my loom.

2. Rainbow coloured tassels were created using seven colours of yarn - red, orange, yellow, green, blue, purple, pink. To create fourteen tassels (two of each colour) cut ten 22" strands of each colour.  Each tassel was formed using groups of five strands of yarn - loop yarn as shown over two strings of the warp and pull down to form the tassel.


3. Once all of the tassels have been added, trim the ends to one length.


4. Weave a 1.5" block of white yarn to create a base for the white pompoms.


5. Create three pompoms that are about 2" in diameter when complete. I made my pompoms using the Loome pompom maker.


6. To create a "sky" above the rainbow. The rest of the weaving is made up of blue yarns that have a variety of thicknesses and woven to create different textures. You can create textures by using a variety of different weaving techniques, such as the plain and braided (soumak loop) weaving techniques, that I created above. 


7. Chenille yarn was woven with large loose loops (plain weave) in a small area on the right to represent raindrops under the (roving) clouds. 


8. White roving was loosely woven into a fluffy cloud shape just to the left and and slightly higher than the chenille raindrops. 


9. Fill the remaining open space around and above the "cloud and raindrops" with another blue yarn. Finish the top of the weaving with a braid weave


10. Remove the weaving from the loom. Add a piece of driftwood or wood dowel to the top warp loops at this point so you can hang your weaving.


11. Sew the pompoms to the white woven area just above the rainbow tassels and you are done!


 Thanks for following along! 

I recently posted this weaving on my new Instagram account @makeandmerryco . On that account I am trying to give you inspiration for not only making things but also ideas for how you can use what you make. So in that spirit ... imagine how fun this rainbow wall hanging would look as decor piece for a baby shower or rainbow themed party. After the party, hang it in the baby's room or in your home.

If you make one of these and post it on Instagram please use hashtag #makeandmerry so I can see it!



Let's get creative! Dress up gift bags with DIY watercolour ribbon.

Monday, September 23, 2019

Let's get creative! Dress up gift bags with DIY watercolour ribbon.

Let's get creative! Here's a sweet idea for making plain white gift bags a little more colourful by just changing out the ribbon handles. 

Let's get creative! Dress up gift bags with DIY watercolour ribbon.

I recently had the pleasure of working with Gloria Vazquez-Abrams from Historia Wedding and Event Planning and the amazing team that she brought together for a styled shoot wedding. Gloria's pastel coloured theme was filled with so many whimsical details and as soon as I saw her mood boards I knew that I needed to find a way to work my DIY watercolour ribbons to the set up.

Let's get creative! Dress up gift bags with DIY watercolour ribbon.

I removed the white ribbon handles on these white and gold foil edged gift bags and replaced them with the rainbow coloured ribbon.

Let's get creative! Dress up gift bags with DIY watercolour ribbon.

Gloria filled the gift bags on this glorious sweet table with cotton candy. The colours in the cotton candy and gourmet chocolates are so much fun and I love the way that the ribbon handles on the gift bags add that little bit of extra colour pop to the overall set up.

Let's get creative! Dress up gift bags with DIY watercolour ribbon.

The rainbow ribbon handle gift bags were also used in another area of the set up. Gloria incorporated the gift bags and these gift boxes along with balloon, paper flower, drapery and vinyl floor decal installations to create a centre stage area for the Cirque Entertainment.

Let's get creative! Dress up gift bags with DIY watercolour ribbon.

Let's get creative! Dress up gift bags with DIY watercolour ribbon.

Interested in doing this for a wedding or party?

Let's get creative! Dress up gift bags with DIY watercolour ribbon.

Here's a quickie tutorial to show you what I did and how to figure out how much painted ribbon you will need.


Let's get creative! Dress up gift bags with DIY watercolour ribbon.

The ribbons that came on the gift bags can be removed by simply cutting the ribbon and pulling them through the holes from the inside of the bag. But I suggest that you remove at least one ribbon handle by untying the knots and removing the handle in one piece.

Let's get creative! Dress up gift bags with DIY watercolour ribbon.

So as you can see above, I used the original ribbon handle to work out not only how long the ribbon needed to be for the gift bag but to also calculate how much ribbon I would need to paint so that I could change the ribbon on all of the gift bags I planned to use.

To add the rainbow ribbon to the gift bag I tied a knot on one end of the ribbon, feed it through both holes of the bag and then tied a knot on the other end of the ribbon to finish. Repeat on the other side of the bag.

My tip to make wrinkled ribbon smooth: Use a straight iron on a low temperature to easily iron out wrinkles. 


Let's get creative! Dress up gift bags with DIY watercolour ribbon.


Credits for Styled Shoot:

Planning and Styling by Historia Wedding and Event Planning 
Photography by Samantha Ong Photography 
Draping and Vinyl Floor Decals by Finer Events  
Paper Flower Décor by Floral Fantasy Studio 
Tableware Rentals by Sweet Bee Tea Party  
Linens, Chargers, Napkins and Chairs by Chair Decor 
Invitations, Menu, Place Cards, 3D Animal by A Good Day Inc. 
Packaging Supplies by Creative Bag
Chocolates by Stubbe Chocolate 
Favours by Marie Genevieve 
Cotton Candy by Bucket and Whisk 
Custom Lighted Designs by Marquee Marc  
Cirque Entertainment by Articus Productions  
Dress by Papilio Boutique 
Accessories by The Loved One 
Hair and Makeup by Beyoutiful Brides  


Let's get creative! Dress up gift bags with DIY watercolour ribbon.

Tuesday, December 12, 2017


Creating sweet tables has to be one of my favourite things to do during the holidays. 

You don't need to have a lot of different treats to create a holiday sweet table. I used assorted serving dishes, buffalo gift boxes, burlap ribbons, mini trees and lights for my festive set up.

I prefer to put out a little bit of everything in smaller containers and then refill them every once in a while so that the display looks some what full for most of time.

Here's how I set up my little stress free sweet table:

home for the holidays - set up a sweet table | Lorrie Everitt Studio

Buffalo plaid gift boxes are both functional and decorative in my set ups. If you don't have gift boxes, you can create a similar look using books covered with wrapping paper "jackets" like I did here.

home for the holidays - set up a sweet table | Lorrie Everitt Studio

I have created these snow globe inspired jars filled with cookies as hostess gifts for years. This year I thought that it would be fun to make one for myself and use it as the focal point of my sweet table display. 

 I use coarse sugar to create a snowy base in the glass containers.The mini gingerbread house and cookies are from Mad Batter Bakers. The container is more of a display element so you may want to fill another serving dish with gingerbread cookies for guests to easily take and eat.

home for the holidays - set up a sweet table | Lorrie Everitt Studio

I filled a candy dish with custom made sugar cookies from Emma's Sweets. You can add coarse sugar to the bottom of the candy dish so that the cookies will stand up.

home for the holidays - set up a sweet table | Lorrie Everitt Studio

Another small candy dish was filled with assorted colours of french macarons from Macaronz and placed on a gift box for height.

home for the holidays - set up a sweet table | Lorrie Everitt Studio

Not everything on your sweet table has to be baked goods. I like to fill larger containers with chocolates, popcorn, candy and nuts.

home for the holidays - set up a sweet table | Lorrie Everitt Studio

Once the serving dishes have been set up I fill in large spaces with gift boxes tied up with ribbon. I like to use pretty gift boxes in my holiday decor and in January I fill them with Christmas tree decorations for storage.

home for the holidays - set up a sweet table | Lorrie Everitt Studio

Finally I add in mini trees and battery operated strings of lights.

home for the holidays - set up a sweet table | Lorrie Everitt Studio

Guests may think that your sweet table is too pretty to eat so make sure that you tell them it's okay to help themselves!


home for the holidays - set up a sweet table | Lorrie Everitt Studio


Sweet DIY: donut display board

Monday, November 20, 2017

sweet DIY - donut display board for the holidays and beyond | Lorrie Everitt Studio

I have been waiting for a reason to create a large beautiful donut wall. The problem is that I am not a wedding or party planner and I did not host any large parties this year. I am planning to do some holiday entertaining and I thought that this might be a great opportunity for me to put my own twist on the donut wall concept that is a little more holiday entertaining at home friendly.

sweet DIY - donut display board for the holidays and beyond | Lorrie Everitt Studio

 So I came up with the idea of turning these wood market trays into donut display boards. They will hold a dozen mini or regular sized donuts. You can replenish the donuts during the party to keep it looking full. And the trays are not huge so you can easily store them after the event and reuse them again.

sweet DIY - donut display board for the holidays and beyond | Lorrie Everitt Studio

 I painted this donut display board white and added gold details to the end of the the wood pegs. Learzi from Autumn Grey Designs added the gold hand lettering and the adorable mini donuts were made by Macaronz. 

sweet DIY - display board for donuts and cookies | Lorrie Everitt Studio

 My donut display board is also perfect for displaying decorative cookies with a hole.

sweet DIY - display board for donuts and cookies | Lorrie Everitt Studio

sweet DIY - display board for donuts and cookies | Lorrie Everitt Studio

Caitlyn from Cakelaine created the festive wreath cookies that were displayed above as well as all of the cakes and sweet treats for our holiday themed party.

Here's how to make these donut display boards yourself:

sweet DIY - donut display board for the holidays and beyond | Lorrie Everitt Studio

 1. Gather your supplies: Wood market tray, small wood pegs, kraft paper to work out spacing, ruler, pencil, drill, paint (optional).

2. Use kraft paper to figure out spacing for the holes that you need to drill into the tray. Make sure that you leave enough space around the donuts. Centre the kraft paper on the wood tray and mark where to drill with your pencil. 

3. Select a drill bit that is the same size as the wood pegs. You want the holes to be tight so you will not require glue. Drill holes in the wood tray. 


sweet DIY - donut display board for the holidays and beyond | Lorrie Everitt Studio


4. Place wood pegs in the holes. Paint if desired. 

sweet DIY - donut display board for the holidays and beyond | Lorrie Everitt Studio


Tip: You can prop the board up against a wall. Or, if you want the display board stand on it's own, I suggest that you super glue a large square vase to the back of the tray. 


If you make one of these for your own party I'd love to see it! Use hashtag #lorrieeverittinspire and follow me on Instagram for more holiday diy inspiration. 
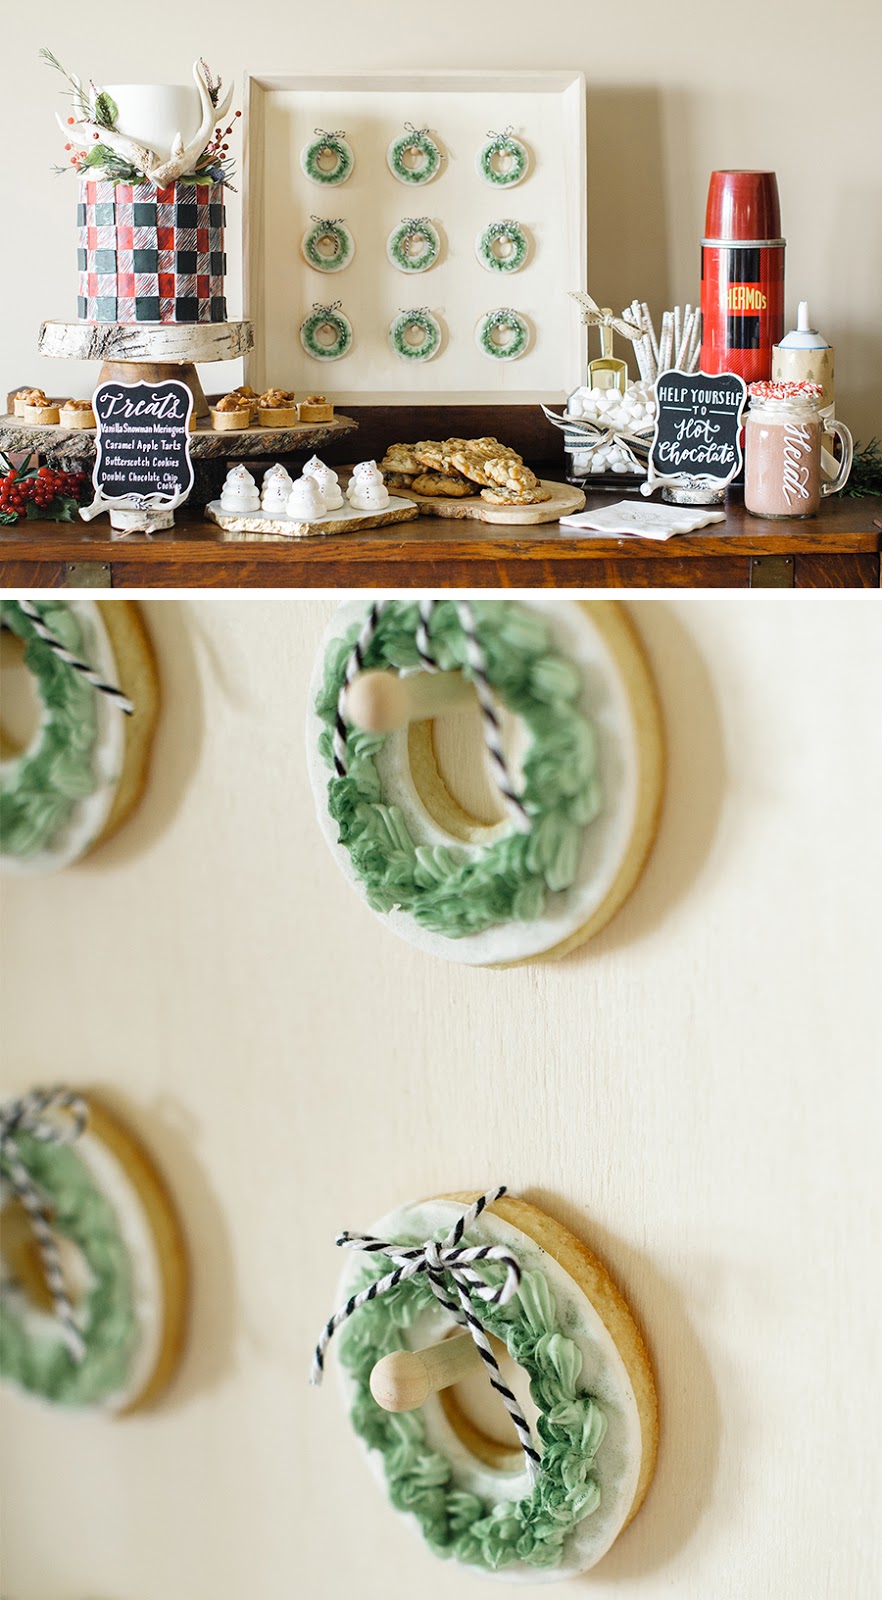

Photo credits:

Donut display set up:

photography  Janet KwanPhotography 
mini donuts Macaronz 
hand lettering  Autumn Grey Designs 
greenery  Flower Treasures      
packaging products Creative Bag
entertaining products Weddingstar
creative direction Lorrie Everitt

Cookie display setup:

photography  Heidi Lau Photography 
hand lettering  Love Lettering   
florals Flowerly 
cake and sweets  Cakelaine   
packaging supplies  Creative Bag  
entertaining supplies Weddingstar
creative direction  Lorrie Everitt  
& the handcrafted artisans:


sweet DIY - display board for donuts and cookies | Lorrie Everitt Studio