I got a little creative today with my "odds and ends" of vintage china and crystal pieces that have been waiting to be upstyled into something new and useful. I love the look of beautifully decorated cupcakes displayed on tiered stands and I decided that I'd try to make a couple of them to use when we are entertaining this summer at the cottage. Let's just say that I made a couple of them and I found they are useful for more than just displaying cupcakes ... I'm going to call these my "Mad Hatter tea party stands" ...
Here's one of my finished pieces ... and as you can see, I'm using it on a dresser to display some of my jewellery. I'm going to make another one for my studio because I think that it will look sweet on my desk ... maybe I'll make one with little tea cups that I can fill with treasures waiting to be used in my art.
Here's how I made my Mad Hatter tea party stands ...
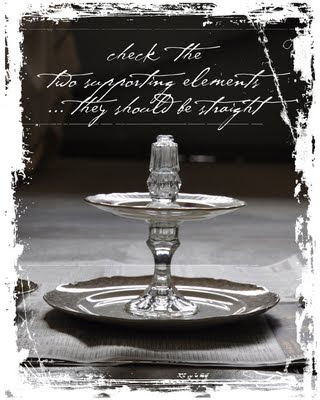
I used three different sizes of plates - a dinner plate, a lunch plate and fruit nappy. I also used two crystal pieces to use as supports - a candle stick and a salt/pepper shaker (with the top removed).
To adhere all of the pieces together I used E-6000 glue.
Note: I washed all of the dishes and made sure that everything was very dry before I started.
I arranged the plates from largest at the bottom to smallest at the top. I did the same with the crystal supports, the candle stick was the larger of the two supporting pieces so it was used on the bottom layer. I placed a ring of the E-6000 glue on the bottom of the candle stick and then adhered it to the centre of the dinner plate.
Allow the glue to set for a few minutes before you move onto the next layer so that the pieces don't slide around on you ... now is a good time to start a kettle of water to make a tea if you are following along with me!
... then add some E-6000 glue to the top of the candle stick and place the medium sized plate over top of the candlestick - being careful to centre the plate over the larger plate. Quickly remove the medium sized plate and turn it over. You should see a ring of glue from the candle stick on the bottom of the plate. At this point I added more E-6000 to the bottom of the plate because I wanted to make sure that there is a good bond between these items. Let the glue dry slightly ... go finish making that cup of tea and bring it back to do the next step which is to place the plate on top of the candle stick. Allow this layer to dry before going onto the next step. You can drink your tea now!
Now you will repeat the process for adding the candle stick to the plates but this time you will do it with the salt/pepper shaker. You need to make sure when you adhere the salt shaker to the middle plate that it is directly over top of the candle stick or your tiers will look off balanced. You also need the top of the salt shaker to be flat so if it isn't - remove the top piece.
Once you have placed the smallest plate on top of the salt shaker ... take a look from the top and make sure that all of the plates look centred ... similar to my picture ...
and check again that the centre supports have not shifted. Once everything is perfectly lined up ... let it dry!
I can't wait to make some cupcakes with the kids at the cottage this weekend and display them on one of my Mad Hatter tea party stands!
Happy Canada Day to all of my Canadian friends! I hope that you have a great long weekend.
I also wanted to share with you a very inspiring magazine called "Mollie Makes" - it is from the UK - and I just found by chance last week ... I think that you will love it! Here's a promotional video that they created to launch the magazine ... very creative! I love their tag line too .... "for people who love the crafty life".


Oh my, how I love this! And I cannot wait to get to all of my mismatched pieces. Thank you so much for sharing.
ReplyDelete