upcycled magazine rack

Saturday, October 29, 2011

I've been inspired by some of the diy projects that I've pinning to my "restyled projects" board on pinterest and thought that I'd share one of my recent restyled projects with you.

This upcycled magazine rack was a metal rack that my Mother-in-law "rescued" from the garbage at an electronics store ... I thought that I had some "before" pictures of this to show but I must have deleted them from my camera. The metal rack was in good shape and I my Mother-in-law thought that she and Grandma would like to be able to use it in the kitchen to hold cooking magazines ... they just didn't like the advertising that was on the rack and thought that I could do something with it.
Here's the front and side views of the rack. I covered everything that was originally painted black on the rack with pages from an old dictonary using gel medium. I didn't cover the silver/chrome parts because I thought that they looked fine. I antiqued the dictonary paper with distress inks (vintage photo) to give the piece an aged look.
Here's a close up of the bottom front of the rack.
I printed an art poster print at Costco and used gel medium to attach the poster to the front panels of the rack. I distressed the poster using Tim Holtz distress inks so that it would blend into the dictonary papers on the sides. The collage art  was created on my computer using my own digital elements and some digital scrapbooking papers that I purchased. 
I wanted the birds to stand out a little bit so I covered them with "glossy accents" by Inkessentials.
Because the rack was metal I thought that it would be cute to include some paper flower magnets. The magnets are decorative and functional. They display recipe cards and shopping lists.
There are lots of great tutorials on how to make paper flowers online ... there are some on my pinterest boards if you want to try to make them yourself.  I used gel medium to attach the paper flowers, paper leaves and some ribbon & lace scraps to wooden game pieces. FYI - my magnets of choice are rare earth magnets ... just keep them away from your computer and credit cards.
Here's one more shot showing the top of the rack with three of the magnets and the gift tag I attached.

I have a couple of other restyled projects that I am just about finished that I will share with you next time! Are you working on any restyling projects for your home? If so, I'd love to know about them ... I'm always looking for new ideas to add to my pinterest boards. Happy crafting!

pendant trays with glass inserts - tutorial

Friday, October 14, 2011

I'm totally in love with pendant trays and glass inserts right now. There are so many different pendant tray shapes for necklaces, earrings and rings and don't even get me started on all of the different colours of metal. The vintage copper is my favourite at the moment.

Here's a little tutorial on how to use the pendant trays and glass inserts to make your own jewellery!
It is almost the same as my glass tile tutorial here but we do a couple of different things at the end.

Let's gather our supplies first! You will need a pendant tray and glass insert, something to use as art (I create my own digitally and print the jpeg file at Costco), glossy accents (or your favourite brand of diamond glaze), E-6000 glue, an xacto knife and small emery board. I work on a self healing matt and I use wax paper to protect the matt when I am using the diamond glaze or glue.
The first step is to add a small amount of diamond glaze to the back of your glass insert. The back of the glass is the flat side if you have a puffy glass insert. You want to cover the entire back of the glass insert but do not add too much diamond glaze to cause it to drip down the sides.

NOTE: You do not want any air bubbles in the diamond glaze so DO NOT shake the bottle (ever). I also suggest that you turn the bottle upside down before you start so that any air bubbles move to the top. If your diamond glaze does not flow easily, use a pin to clear the tip.

Next you are going to flip your glass insert over and place it on top of your art. Do not press down on the glass. You can gently slide the glass over the art to position it. It is important that you watch the positioning of your glass for the next 10 to 15 minutes to make sure that it does not slide while it is drying. The diamond glaze will take many hours to dry ... I usually start these at night and let them sit overnight before I start the next step.
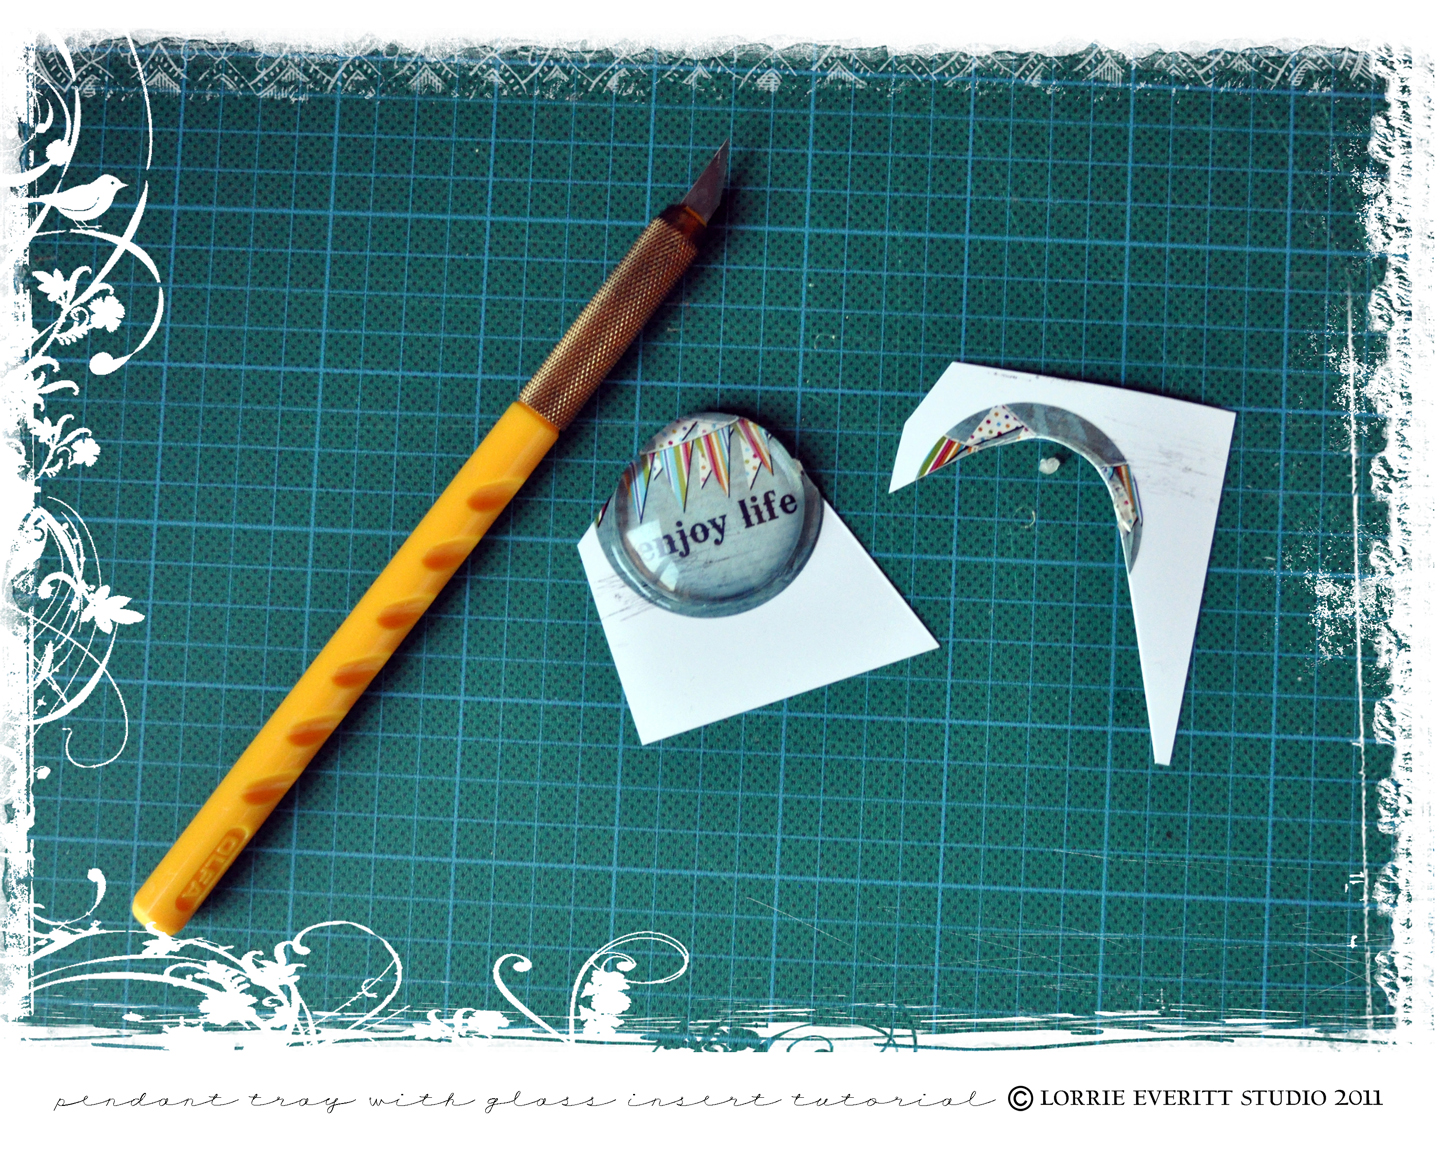
Once your piece is completely dry you are ready to cut the excess paper from the glass. Use an x-acto knife to cut around the shape of your glass insert. If you have any excess diamond glaze on the sides of the glass you can use the x-acto knife to scrap it off at this point. Then use your small emery board to sand any extra paper from the glass ... you can see more details on how to do that here in my glass charm tutorial.
I like to add a thin coating of diamond glaze to the back of my glass tile at this point. No one will see it but I think that it protects the art. It doesn't need to be thick and don't worry if you have any air bubbles. Once this is dry (in a few hours) you are ready to add the glass insert to the pendant tray.
Apply a small dab of E-6000 glue to the centre of the pendant tray. Place your completed glass insert into the tray. Take some time to position your glass insert so that it is the way you want it to look and then press down on the glass insert. Leave your piece to dry for an hour or so. 
Once the E-6000 is dry you are ready to add a chain and wear your new necklace. This same technique for the pendant trays works for earrings and rings as well. Again, this is another "additive" project ... once you make one everyone will want you to make one for them too ... which is fine because you will love making these and they make great gifts!

I have a bunch of these blank pendant tray kits for sale at Scrapbook Queens.
They are also sold in the jewellery section of better craft stores and of course at bead stores! 

Have a great weekend.

new jewellery findings

Tuesday, October 11, 2011

I have been super busy this fall with lots of projects on the go. I just need to find some time to organize my photos and my thoughts so I can share a few of them with you.

I feel like a kid in a candy store with some of my new jewellery findings. I'm especially excited about my new pendant trays for necklaces, earrings and rings. I've also got some amazing glass domes that are perfect for making your own paper weights ... I'm thinking teacher's gifts at the moment. 

I'm putting together another little tutorial to show you how to use the pendant trays with the glass inserts ... I will post it later this week.

Scrapbook Queens has my new jewellery findings and glass domes in stock now.


I'm also working on class projects using my jewellery findings and glass domes for holiday gift giving classes. The glass domes make wonderful paper weights and I was thrilled to find the perfect box to hold my paper weights at Creative Bag.

The picture above is a close up of my little gift box for the glass dome paper weight. The small mod box from Creative Bag was plain ... so of course I had to make it my own with paper and ribbon scraps.  I think that I will have to  include one of these gift boxes as a part of the paper weight class ... they were just too much fun to make. 

I'll let you know when my class projects and dates are finalized. You can see more information about my classes here .

Hoping that you have a happy and creative week!

tea time with my scrapbooking supplies

Tuesday, September 20, 2011

I love tea. Decaf Earl Grey with lactose free milk is my favourite.

This is a tea box that I decorated at the cottage a few years ago. It was just a plain wooden tea box and I'm not really sure where I got it from. It was not an antique or I'd remember everything about it.

I used my scrapbooking papers and some embellishments to decorate the outside and inside of the box.
This is the outside of the box. I used modge podge to glue all of the scrapbook papers to the box. If I was making it again today I would have used gel medium instead of modge podge but either will work. I sanded the edges of the paper to give the box an aged look but also to make the corners tidy.
I didn't do a lot of decorating on the outside lid of the box because the box is usually open when I use it for company and when it is not in use it's in the cupboard. The picture in the metal frame is the sunset in front of our cottage ... my favourite place and time to sit and drink my tea.

 Here is the inside of the box ... you can see that I stained the wood ... it would have taken too long to add scrapbook papers to each of the dividers and I figured that they would be covered with the tea bags most of the time so it was not really worth the time or paper. I found scrapbook papers with numbers on them that fit perfectly in each little section (I love numbers).

 This is my favourite part of the box and the reason I wanted to decorate it. I used a picture of my oldest daughter when she was 3 years old to decorate the lid. She loved to play tea with her stuffed animals ... she had a play house at our old cottage and she would pull all of the wicker furniture out of the play house and set up a tea party under our umbrella. I loved those days.

I had to be very careful when I chose elements to attach to this layout because I didn't want them to fall off or get hit by the tea bags.

I've been using this tea box at the cottage for about 5 years. I really should look for another tea box so I can make one for home. I'd love to find a picture of myself and my grandmother drinking tea together when I was smaller ... that would be a great keepsake.

I hope that if you have one of these boxes hanging around in your home that you will think about personalizing it with something that makes your heart sing.

I'm teaching this weekend at Scrapbook Queens in Mississauga and I am hoping that some of the new scrapbook papers for Fall and Holiday have arrived! I'm starting to think about Christmas gifts already. Have a great week!!

I believe

Wednesday, August 31, 2011

I believe in pink.
I believe that laughter
is the best calorie burner.
I believe in kissing,
kissing a lot.
I believe in being strong
when everything seems
to be going wrong.
I believe that happy girls
are the prettiest girls.
I believe that tomorrow
is another day,
and I believe in miracles.

I love this saying by Audrey Hepburn. I came across it again today as I was learning how to "pin" on pinterest. That site is totally addictive ... check it out if you haven't already!

Today was my birthday. My daughter took a couple of pictures of me so that I could remember what I looked like today. I added Audrey's quote to the photo because it is so "me".

owl always love you

Monday, August 22, 2011

The count down to back to school is on in our house as we begin our second last week of summer holidays. Lists for school supplies and fall clothing have started to appear on the kitchen table and I know that time is starting to run out to get everything ready for the new year.  

With bts in mind, I thought that I share a sweet little project that you can make with the kids ... it's another decorative clipboard. I made some of these one afternoon with the kids on our street and they loved it. They are going to use their clipboards to keep track of school notes and memos on their desks at home.

These are simple to make using scrapbooking papers, some distressed ink, paint and old buttons for the eyes. I use Claudine Hellmuth's studio multi-medium matte as my adhesive of choice for most of my mixed media pieces. We added letter stickers and scrabble tiles to make fun sayings. And of course we had to decorate the silver clip at the top ... mine has a ribbon and bottle cap magnet but some of the girls used ribbon and large flowers.
After I finished the clipboards,  I decided to use my "Emily owl" design to create some wall art and project samples for a mixed media class that I am going to offer this fall.

I ended up making a few variations of the same design because I love to show how you can make a basic project kit your own with just a few simple changes.

This first piece would be adorable in a bedroom ... I love the quote "always kiss me goodnight".  The paper flowers were fun to make and I added some rhinestone bling just because I don't think you can ever have too much bling! (for a boy's room take out the flower details and change the paper for the owl's body to something more graphic)
This next piece was created with a bright blue background which immediately gave the design a totally different look. And instead of a quote I used a large chipboard letter covered in silver glitter to customize this for someone special.  "E" is for Emily owl!
I'm sure that you are getting the idea now. This last picture is of the three samples that I recently put on display at Scrapbook Queens for my fall classes. I have not scheduled dates for my fall classes yet but as soon as I do I will update my class website and let you know. If you are interested in being on my class email list ... send me an email and I will add your name to the list.

I hope that you enjoy the week with your kids if they have not started school yet and find a little bit of time to do something creative with them to get them excited about the new year.

World Photo Day

Friday, August 19, 2011

So today is World Photo Day and I thought that I'd share with you some of the photo tricks that I have used this month. I love this new picture that my daughter took of my husband and I on the beach. My husband, Peter, is not always the most co-operative "model" and my best shots of him are when he is not looking or is doing something with the kids.


Here's how my daughter, Haley, and I worked together to get a picture that I would be happy to print. I set my camera to "action" and then I told Haley to just keep clicking ... then after a few {boring} photos I leaned into Peter and gave him a kiss on the cheek. As you can see Peter was a little surprised and he loosen up and gave us a natural smile.


As much as I loved the final photo ... I didn't like the person & two seagulls in the background by my head ... so I opened up Photoshop and started to work with my "clone stamp tool" to clean up the background. If you have never used the clone stamp tool before I'm going to suggest that you check out Rebecca Cooper's blog simple as that for her clone stamp tool tutorial ... it's easy to follow and she has some great tips on photography and using Photoshop.
 

Here's one last picture of my daughters on the beach.

I hope that you get your camera out today and take a few pictures to remember the day. By the way, 4x6 photos are on sale for eight cents at Costco (Canada) until the end of the month ... another good reason to take some photos!


We do not remember the days ... we remember the moments.