Chalkboard love ... get organized using chalkboard signs and labels!

Wednesday, September 4, 2013

Do you have a passion for all things chalkboard right now? I do! I have made a number of projects for Creative Bag over the past few months with all of their amazing new chalkboard products. During our last few days at the cottage this summer we were blessed with a few rain days (yeah rain days ... an excuse to stay inside and spend time crafting) and I ended up reorganizing my cottage craft supplies using a bunch of my recent chalkboard purchases.
chalkboard inspiration from Lorrie Everitt Studio | lorrieeverittstudio.blogspot.ca
I picked up the metal buckets in my craft cabinets a number of years ago from the dollar store. I was using tags with strings on the bucket handles to organize the items stored in the buckets but the tags would flip around every time I opened the cabinet doors and I was just tired of dealing with them any more. These mini chalkboard signs with clip backs from Creative Bag are perfect for helping me to organize my supplies. I used a fine chalk marker to write on each sign. I like chalk markers for projects like this because the words will not rub off easily every time I touch the sign. You can use water to wipe the marker and re write so it is possible to change your mind ... for a while. Once the marker has dried and set it does not wipe clean with water ... but you can always add a fresh coat of chalkboard paint yourself and start again!
chalkboard inspiration from Lorrie Everitt Studio | lorrieeverittstudio.blogspot.ca

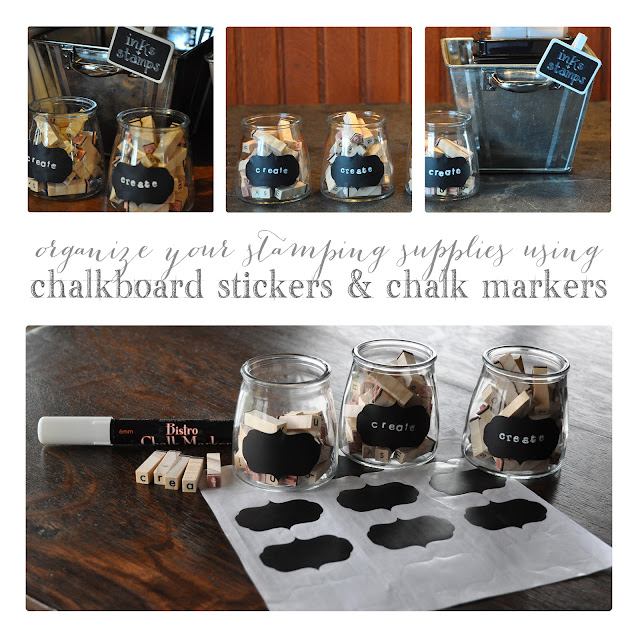
I also used these adorable chalkboard labels from Creative Bag to organize some of my other supplies in vintage glass bottles. I love how my mini letter stamps are now organized and ready to be used. I picked up a bunch of these mini stamps in different fonts a long time ago and was struggling to find a way to store them. The stamps were packaged in individual boxes by font and I knew that they would always be out of sight, out of mind and never used unless I could find a way to store them so that it would be easy to see at a glance. I used the stamps and a chalk marker to "stamp" directly onto the chalk labels. I can tell what font is in each container by simply looking at the label. 

If you would like to see how I used the chalk markers with my stamps you can see my full tutorial here on the Creative Bag blog.

Looking for some awesome chalk fonts to use for digital scrapbooking or crafting projects? Here's ten of my favorites and all are free to download!


10 chalkboard fonts from Lorrie Everitt Studio | lorrieeverittstudio.blogspot.ca

 sign handwriting 

follow Lorrie Everitt on Pinterest at pinterest.com/lorrieeveritt/
Looking for more blackboard inspiration? Follow me on Pinterest!

The kids are back to school. I hope that you can find some time this week to have a little "me time" and get creative with your own chalkboard projects!

diy crochet lace denim shorts

Tuesday, June 4, 2013

Are you ready for summer? I'm not. But after seeing all of the new crochet lace ribbons at Creative Bag this week I'm actually looking forward to wearing shorts again ... shorts with lace details that is.

We added lace to a number of my daughter's shorts last year. It was super easy to do and  a great way to spend a few raining days at the cottage. We added lace in different widths to different areas of the shorts - pockets, hem, waist band. You can see in the photos above that we added a small band of lace to the front pockets and a larger band of lace to the hem. There is no right or wrong way to do this and if you need inspiration for where to place the lace just check out your favourite denim retailers for ideas.

I just bought some of the ivory crochet lace this week at Creative Bag. After I finish updating a pair of my denim shorts I am going to figure out how to make a clip using the lace for my youngest daughter's hair. She bought a beautiful lace dress from Anthropologie to wear to her grade 8 grad and I have noticed that she has been pinning hair styles with lace bow hair clips. If I come up with something worth sharing I'll show you what we end up doing at the end of the month. 

It's a banner day - my submission!

Friday, May 17, 2013

"Start everyday like it's your birthday" banner by Lorrie Everitt
I read about an exhibition on Oh My! Handmade Goodness this week that inspired me.

The exhibition is called "It's a Banner Day" and it is hosted by Hygienic resident artist, Patti Murphy and local artist Kat Murphy. Patti and Kat have invited artists - designers, photographers and artists from all over the world - to participate in this exhibit. Everyone is asked to create a banner that represents an artful message of hope, good news, happiness and/or success. The banners will all be strung together to decorate the gallery. 

This is my submission!

My banner started out as a graphic design that I created on my computer using a mix of fonts, one of my favourite bird illustrations and photo that I took of my chalkboard to use as the background. I printed the completed graphics onto professional photo paper and was prepared to stop there because I have so much on the go with work, family and volunteer projects right now. But after cutting out my printed banner and looking at the simple one dimensional banner, my "mixed media" side took over and I lost all control. The next thing I knew, I was pulling mixed media supplies out of the cabinets in my studio. Glue, brushes, boxes of paper, scraps of vintage and new ribbons, jars of coloured buttons, and spools of sewing threads were littered all over my table in a matter of minutes. 

Everything just seemed to fall into place and an few hours later as I was packaging up my completed submission. I realized when I was driving to the post office that the extra time I spent on this project made me feel happy. It was as if I had spent an afternoon at the spa getting pampered. I felt wonderful, relaxed and ready to dive into my "to do list".  

If you are interested in finding out more about this exhibition you can find it here on the "It's a Banner Day" website.


If you are thinking about submitting a banner yourself ... there's still time! You can get all of the details regarding submissions and to download the templates here. 

It's a Banner Day Exhibition with artists Patti Murphy and Kat Murphy.
If you are looking for more of my project ideas don't forget that I also blog for Creative Bag.
I just posted some free downloads there that can be used for wedding and party packaging projects. 

Resin Flower Love {at an incredible price}

Friday, March 8, 2013

Resin flowers are one of my favourite elements to add to jewellery, handmade cards, gift wrapping and home decor projects. I just made 8 large rose resin flower rings for some of my girlfriends. We are going to be together this weekend with our families and I thought that it would be a nice surprise for everyone to have matching rings. 

Creative Bag has all of their resin flowers on clearance for 10 cents a package. Depending on the size of flower they are packaged in four or six ... what a deal! You can see them online here but they will not last for long. If you live in Toronto, Mississauga or Pickering it's best to go to the store to see what is available. 

I bought a bunch of the pink resin flowers to put aside for a large party. I can use them on invitations, favors and other elements. I don't have a party planned right now but with two teenage girls I know that they will come into use at some point. 

Oh yeah, and this is how I packaged the resin flower rings. I used small canvas bags and stamped a design on each one. Baker's twine and cotton ribbon were used to attach the handmade gift tags to the canvas bags. All of these items are available at my new website  just pretty parties and of course at Creative Bag.

Storybook banner tutorial

Sunday, January 27, 2013


I saw the idea for these storybook banners on Pinterest earlier this week and I knew that it would be a great project for my daughter and I to make for her bedroom. My daughters and I have adore Golden Books and collected quite a few of them over the past few years. We like to make them into dream journals. 

As you can see, to create our book banner we used a children's book with lots of colourful illustrations. If you use a book with just text you could embellish the book pages to match your decor, colours, party theme or whatever.


This simple project can be created in less than an hour and requires very few materials and tools. 
Here's what I used for this project: a Golden children's book, twill tape (I used about 3' for mine), a disappearing ink marker, a piece of paper to create a template, pencil, scissors and sewing machine. 

1. Remove the cover of the book. Cut all pages so they are the same size. You can use a paper cutter for this part if you have one. 
2. Create a template for the shape of the bottom edge of the banner pages from the blank paper. Use the template and a pencil to trace the banner shape onto the bottom of each page and cut out.
3. Arrange the pages the way that you want to see them in the finished banner. There are two sides for each page so if you are using children's books with illustrations you will want to see what they will look like before you start sewing them together. 
4. Next, you will want to create a loop at each end of your twill tape and make sure that each banner page is evenly spaced out along the twill tape. To do that I used a disappearing ink marker to indicate on the twill tape where to make the loops and where to position each banner page. I positioned the pages so that the top edge of the banner page lined up with the top edge of the twill tape. The disappearing ink will "disappear" in a few hours so don't wait too long to do the next step.
5. Now you are ready to start sewing. I did a zigzag stitch at the top of the twill tape and stitched continuously along the twill tape and added the banner pages as indicated along the way. Once all of the banner pages where zigzag stitched to the twill tape, I did another row of straight stitching along the bottom edge of the twill tape so that the twill tape sits flat for hanging. The last bit of stitching that needs to be done is to create and stitch a loop at both ends of the twill tape for hanging.
If you use all 12 pages of a Golden children's storybook you can arrange the pages to tell  a story. If you don't want the banner to be as long as mine, just select the pages that you want and adjust the length of the twill tape. 

Paint colours for our new house

Thursday, January 10, 2013

Our family moved to a new city last summer. I LOVED the new custom built, open concept home that we were living in but we wanted to move closer to a school for my youngest daughter. The homes in the area of the school are all really nice older homes on mature lots with lots of trees. We really like the new city because it has a wonderful downtown area, it feels like a small town more than a large city and we are half an hour closer to our cottage. 

Our new home is the complete opposite to our last home. The ceilings are not as tall so a few of my furniture pieces do not  fit in the rooms ... I had to get rid of my beautiful 9' Christmas tree in November and buy a 7 1/2' tree. I have lots of small rooms instead of large open spaces. I will need to purchase or find the time to make lots of art work to fill the walls. 

We have been living here for just over 4 months now and we have been making lots of small changes.  We are now thinking about what we want to do in regards to painting and I have been starting to collect paint colours.

Here's some of my inspiration! Tell me what you think. 


You can find the sources for these pictures on my Pinterest boards here.

I am totally in love with the birch tree wall paper. Have not shown it to my husband yet. I know that he will try to remind me about how much I hate having to take down wall paper ... but I don't think that I will get tired of this one for a long time and I am just think about it for an accent wall in the living room!

Here's the colours that I am thinking about ... although they look a lot cooler in the pictures than they do in the swatches. I want warm greys to go with my existing furniture.  I am thinking about using one of the two lightest greys on most of the walls. The dining room could be a little darker so maybe stone harbor in the dining room. I will have to do all of the trim over so I am thinking  a warm white (cloud white) for the trim. I am going to remove most of the doors on the main floor to make the rooms seem more open. There will only be a few doors left and I am thinking about painting the doors (only the doors not the door trim) a dark grey (gray). I love the black doors in some of the photos that I have pinned but I have a feeling the dark warm grey will be better .The spindals on the stairs have already been painted white and I may paint the rest of the wood in dark grey.

I have not shown any of this to my husband yet. I know that he is thinking we will just paint everything taupe again so keep your fingers crossed for me!! I have already convinced him to let me paint all of the wood wainscotting a warm white ... it was either that or buy a new sofa and chairs and he most likely thought that painting would cost him less! 


Tuesday, January 1, 2013


Happy New Year! 

Wishing everyone a wonderful twenty thirteen.