Showing posts with label gift wrapping. Show all posts

DIY gift topper inspiration for the holidays

Thursday, December 19, 2019


I often add something extra to my gift wrapping and I call them "gift toppers".
They make my gift wrapping look a little more unique and sometimes the gift toppers are an additional gift.


Take for example these ornaments. Once the kraft gift boxes have been unwrapped, the ornaments can be enjoyed longer by being added to the Christmas tree.

You can purchase ornaments to be used in your gift wrapping or you can create your own.


I embellished these clear disc ornaments using paint markers. I used a Sharpie water based paint marker which is not permanent but I found it easier to use and make changes because I am not a professional hand lettering artist.  


If you are like me and like to give gift cards or cash as gifts, I always try to add a gift topper my gift wrapping. It might not seem like I put a lot of thought into the gift but the gift wrapping gives a great first impression and lets the recipient know that I spent some time on this gift.


I shared how to make these clay ornaments using cookie cutters in this post. These ornaments are really easy to make & paint and something that you can do with the kids in an afternoon. Who wouldn't want to receive a gift with an ornament attached as a gift topper like this?!

If you like the faux lettering that was added to this plain kraft bag you can find my DIY how to post here. 


Gift toppers can also be photos and fresh foliage ... or both! Here I added photos that were printed on cardstock to a magnetic closure gift box and a simple kraft paper shopper.

If you look at the close up details below you can see that I 
1. cut slits into the photo to slide a ribbon through it so it could be attached to the box
2. added fresh foliage using two sided tape that was covered up with decorative washi tape
3. used two-sided foam tape to give the photo a lift on the paper shopper that I decorated with a white paint pen.


I hope that these gift topper ideas inspire you to add some to your holiday gift wrapping.

You can see more of my holiday gift wrapping and decorating ideas on Instagram.


DIY your holiday gift wrapping using faux lettering and more - you can do it (really!)

Friday, December 13, 2019


Christmas is just around the corner. If you have been pinning inspirational ideas for your holiday gift wrapping, I hope that some of these ideas will make one of your "I'm actually going to do this" Pinterest board.


I used plain kraft paper bags, boxes and wrapping paper and made them my own with just a few simple supplies like white paint markers, stamps and ink, fresh foliage, ribbon and twine.


I stamped a truck image on this box and bag and added snowflake doodles using a white paint marker. 

The fresh cedar foliage was adhered to the packages using two-sided tape. As you can see in the close up photos (below), I added a small slit in the kraft bag just above the trunk area so I could slip the cedar into the bag for extra support.


I created my own printed bags, boxes and wrapping paper by simply drawing free hand doodles of snowflakes and foliage.


Here's the steps for how I created the simple foliage and assorted snowflake shapes ...


Tip: Sketch out your doodles using a white pencil before using the paint marker.


Are you a hand lettering expert?! I'm sure that you've already been adding your hand lettering skills to use in your gift packaging. Not a hand lettering expert? No problem! You can still do this. All of these gift bags and boxes were created with "faux lettering". 

Keep reading and I'll share how anyone can do this too.


I could not have done the faux lettering on these boxes without having some lettering or graphics to trace. My "not so secret" source for the hand lettering graphics on all of these packages are part of Callie Hegstrom's Farmhouse Christmas digital kit.


I purchased the digital files by Callie from Design Cuts a couple of years ago and it is still one of my favourite sources for Christmas DIY projects. If you have a Cricut Maker or Explore Air, you may find the amazing lettering and graphics in this kit useful for vinyl and iron on projects.

Note: You will need Adobe Illustrator or Photoshop to open the files in the digital kit. 

This is how I add the faux lettering to just about any surface that you can't see through to trace:

1. In Illustrator, open the Farmhouse Christmas graphics .ai file. Select the lettering and graphic elements that you want to use and copy them to another document. Re size the lettering and graphics to fit the space. Print your file on regular paper. 
Note: Eliminate the excess white space around the design by cutting it out as shown below.

2. As well as lettering to trace, you will need the following supplies - white tracing/transfer paper, painter's tape, pencil, white paint marker, white pencil and kraft bags (boxes or wrapping paper).

3. Position the design onto the kraft bag and hold it in place with tape. Place the tracing/transfer paper with the chalky side down between the art work and the bag. Using a pencil, trace the lettering to transfer the image onto the bag. 

Note: If your design did not transfer at all - The chalky side was facing the wrong way. Turn it around and try again.
If your design is really light and difficult to see, you probably did not press hard enough. Trace it again using a little more pressure.


4. Remove the transfer paper and you should see the lettering. At this point, you can add more free hand details to your design using a white pencil and go over any areas of the lettering that may be a little light or difficult to see.

5. Now we are ready to add the faux lettering using a white paint marker. Test your paint marker to make sure that the paint is flowing properly. Take your time and draw each letter as you go. Tip: If you think about the each letter as an individual element, you will find that it is easier to trace them and your lines will be more precise.

6. Allow the paint from the marker to completely dry and you are ready to start your gift wrapping.


Here's some of the ways that I completed my gift wrapping using ribbon, twine, gift toppers and tissue paper ...


I hope that you try to add some DIY elements to your gift wrapping this year. It's such a great way to personalize your gifts. 

Find me on Instagram for more creative inspiration this holiday season. If you try out any of these ideas tag me @lorrieeveritt so I can see what you did!


DIY Watercolour Ribbon - You Can Do It (Really!)

Tuesday, April 9, 2019

diy watercolour ribbon tutorial | Lorrie Everitt Studio

Looking for a little something special to add to your gift packaging and decorating? Try painting white satin ribbon using watercolour paints

diy watercolour ribbon tutorial | Lorrie Everitt Studio

DIY watercolour ribbons are not only a pretty handmade detail but they are also a great way to customize ribbon to match your decor, theme or packaging materials.

Here's how I do it:

diy watercolour ribbon tutorial | Lorrie Everitt Studio

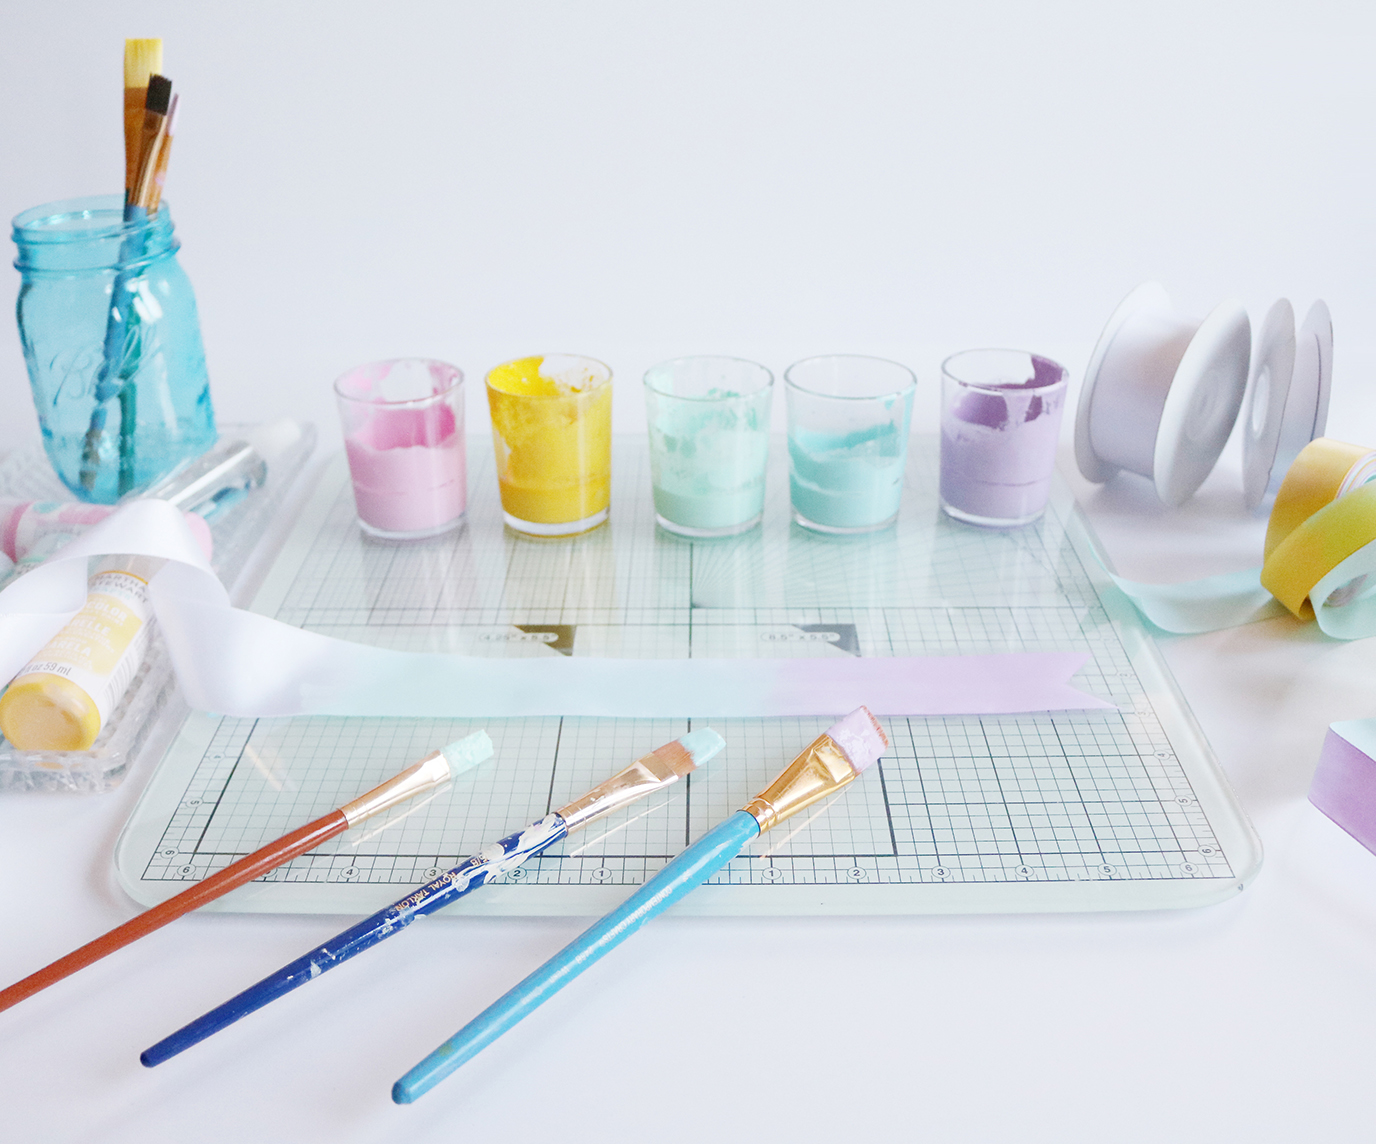
Gather your supplies - Martha Stewart watercolour paint, white satin ribbon, water spray bottle, paint brushes, a protected work surface. 

diy watercolour ribbon tutorial | Lorrie Everitt Studio

1. Use small containers to mix the watercolour paint with water. Experiment with how much water to add to the paint and test on a scrap piece of ribbon. You'll need to be able to easily brush the paint onto the ribbon but you don't want to water the paint down too much that the colours become too faint when it dries. I recommend using a different paint brush for each colour of paint.

Tip: You can use a hair dryer to speed up the drying time to check for colour.


2. You should work on a protected work surface and keep a roll of paper towel on hand for clean up. Lightly spray the white ribbon with water before starting to paint.

Tip: Use tin foil on a counter top if you are painting longer pieces of ribbon.

3. The watercolour paint should be brushed onto the ribbon in a continuous manner so that when you change colours the paints overlap slightly. There is really no right or wrong time to change the colours - just keep in mind how you are going to use the ribbon and how many colours you would like to see.

Tip: If you are using the ribbon for decorating favours, you may want to cut the ribbon a little larger that what you will need and then paint the individual strips.

4. Allow the ribbon to dry completely before using. 

Good to know: I use a drying rack to hang my ribbon as they dried.
Do not place wet ribbon in the dryer. 


Now that you've made all of this beautiful ribbon ... here's some ideas for how to use it this Easter! 

diy watercolour ribbon tutorial and Easter inspiration | Lorrie Everitt Studio

Find my free download for the faux hand lettering on the glass container here.

diy watercolour ribbon tutorial and Easter inspiration | Lorrie Everitt Studio

diy watercolour ribbon tutorial and Easter inspiration | Lorrie Everitt Studio

Find the free download and tutorial for adding the hand lettering to this cake pop box here.

diy watercolour ribbon tutorial and Easter inspiration | Lorrie Everitt Studio

diy watercolour ribbon tutorial and Easter inspiration | Lorrie Everitt Studio

diy watercolour ribbon tutorial and Easter inspiration | Lorrie Everitt Studio

diy watercolour ribbon tutorial and Easter inspiration | Lorrie Everitt Studio

I hope that you paint some of your own watercolour ribbon. If you do, I'd love to see it! Tag me on Instagram using @lorrieeveritt so I can find your post.


diy watercolour ribbon tutorial and Easter inspiration | Lorrie Everitt Studio

Special thanks to my collaborator friends for this blog post:


diy watercolour ribbon tutorial | Lorrie Everitt Studio


DIY Easter themed gift packaging using pom poms

Saturday, March 17, 2018


 DIY Easter themed gift packaging inspiration using handmade pom poms | Lorrie Everitt Studio

In my last post I showed you how to make your own pom poms using The Loome pom pom tools. Today I thought that I'd show you some of the Easter themed projects that I created using my pom poms.

DIY Easter themed gift packaging inspiration using handmade pom poms | Lorrie Everitt Studio

I placed pom poms on these burlap tote bags. I think that these tote bags would be so sweet for an Easter egg hunt. Finish the front and the backs of the bags or just add a pom pom to one side ... there's no right or wrong.

On the front: a small pink pom pom along with a few hand stitched whiskers. 
On the back: a larger white pom pom.

DIY Easter themed gift packaging inspiration using handmade pom poms | Lorrie Everitt Studio

Turn plain muslin drawstring bags into Easter favor bags by adding pom poms. I added a small punch of colour to the pom poms to represent a bunny nose and a chick beak. It was easy to add an embroidered word to the muslin bag for another fun detail.
Tip: I used disappearing fabric ink pens to write out what I was going to embroider.

DIY Easter themed gift packaging inspiration using handmade pom poms | Lorrie Everitt Studio

DIY Easter themed gift packaging inspiration using handmade pom poms | Lorrie Everitt Studio

DIY Easter themed gift packaging inspiration using handmade pom poms | Lorrie Everitt Studio

Tip: If you are going to use fabric bags to package edible items you should package the food in clear candy bags first. 

DIY Easter themed gift packaging inspiration using handmade pom poms | Lorrie Everitt Studio

Turn any plain wine bag into an Easter theme wine bag by adding a pom pom to the bottom of the bag. Who wouldn't love to receive this as a hostess gift on Easter weekend?
Tip: Sew the pom pom in place with a few stitches so it will not fall off. 

DIY Easter themed gift packaging inspiration using handmade pom poms | Lorrie Everitt Studio

Pom poms can be added to plain paper shopping bags using glue. I created tissue paper pom poms and tissue paper bunny "ears" to make my gift bags a little more special.


DIY Easter themed gift packaging inspiration using handmade pom poms | Lorrie Everitt Studio