

I'm totally in love with pendant trays and glass inserts right now. There are so many different pendant tray shapes for necklaces, earrings and rings and don't even get me started on all of the different colours of metal. The vintage copper is my favourite at the moment.
Here's a little tutorial on how to use the pendant trays and glass inserts to make your own jewellery!
It is almost the same as my glass tile tutorial here but we do a couple of different things at the end.

Let's gather our supplies first! You will need a pendant tray and glass insert, something to use as art (I create my own digitally and print the jpeg file at Costco), glossy accents (or your favourite brand of diamond glaze), E-6000 glue, an xacto knife and small emery board. I work on a self healing matt and I use wax paper to protect the matt when I am using the diamond glaze or glue.

The first step is to add a small amount of diamond glaze to the back of your glass insert. The back of the glass is the flat side if you have a puffy glass insert. You want to cover the entire back of the glass insert but do not add too much diamond glaze to cause it to drip down the sides.
NOTE: You do not want any air bubbles in the diamond glaze so DO NOT shake the bottle (ever). I also suggest that you turn the bottle upside down before you start so that any air bubbles move to the top. If your diamond glaze does not flow easily, use a pin to clear the tip.

Next you are going to flip your glass insert over and place it on top of your art. Do not press down on the glass. You can gently slide the glass over the art to position it. It is important that you watch the positioning of your glass for the next 10 to 15 minutes to make sure that it does not slide while it is drying. The diamond glaze will take many hours to dry ... I usually start these at night and let them sit overnight before I start the next step.
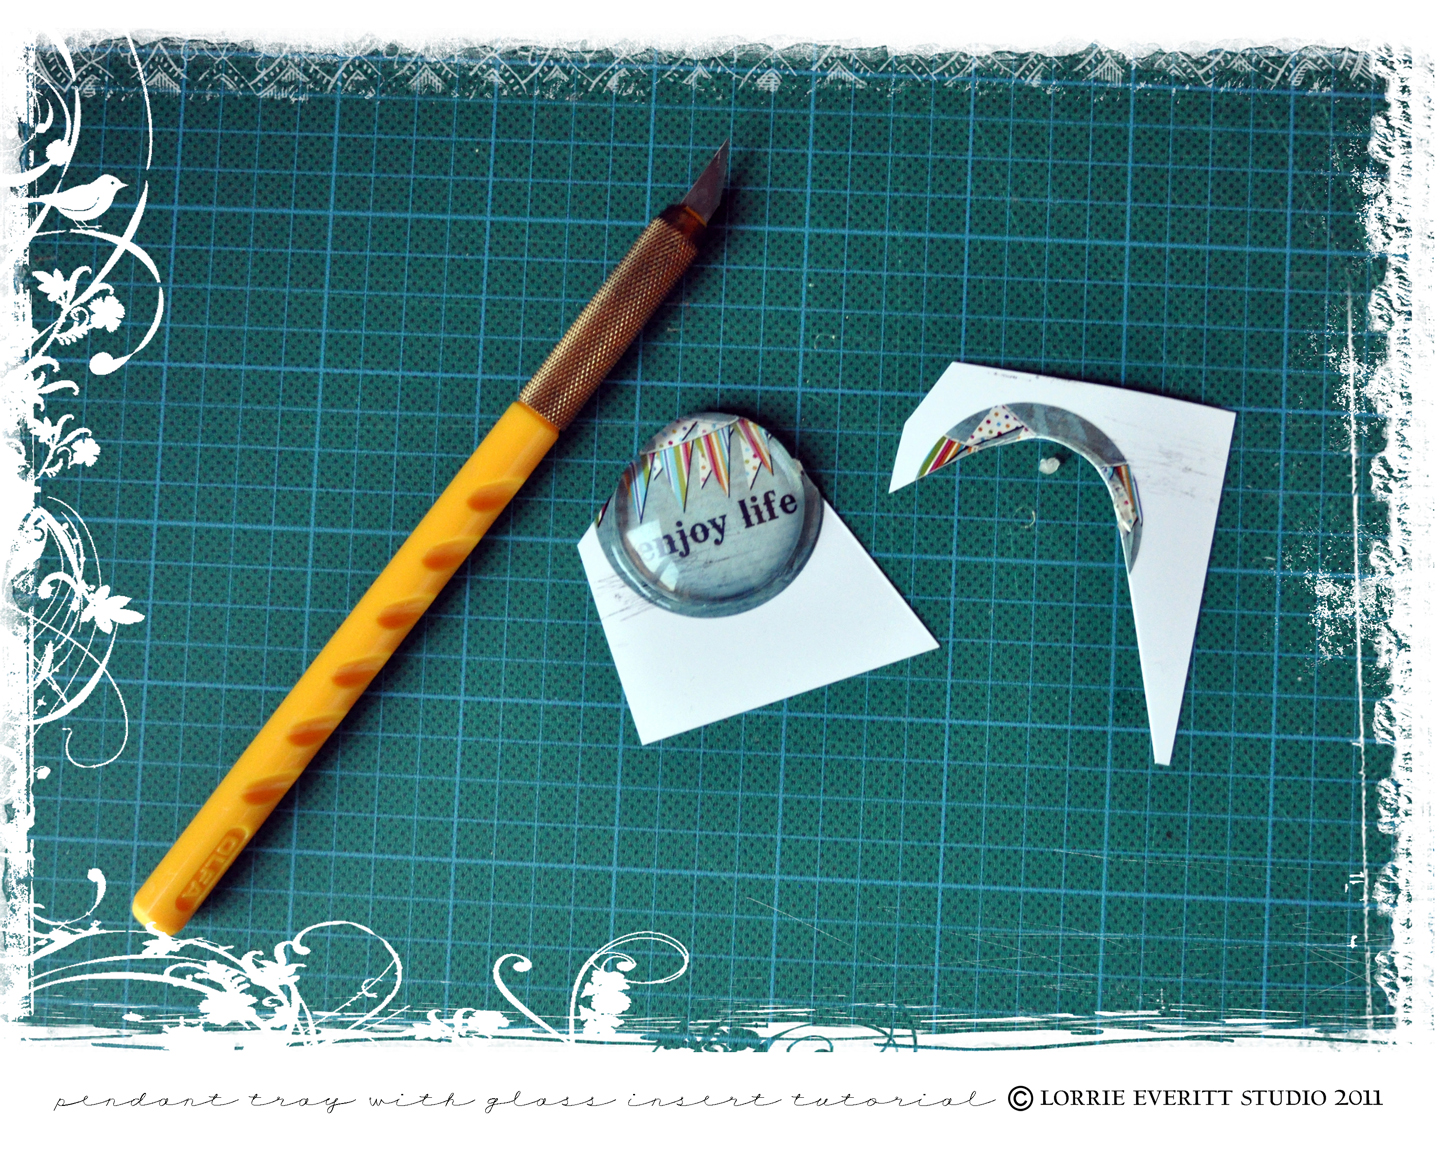
Once your piece is completely dry you are ready to cut the excess paper from the glass. Use an x-acto knife to cut around the shape of your glass insert. If you have any excess diamond glaze on the sides of the glass you can use the x-acto knife to scrap it off at this point. Then use your small emery board to sand any extra paper from the glass ... you can see more details on how to do that here in my glass charm tutorial.

I like to add a thin coating of diamond glaze to the back of my glass tile at this point. No one will see it but I think that it protects the art. It doesn't need to be thick and don't worry if you have any air bubbles. Once this is dry (in a few hours) you are ready to add the glass insert to the pendant tray.

Apply a small dab of E-6000 glue to the centre of the pendant tray. Place your completed glass insert into the tray. Take some time to position your glass insert so that it is the way you want it to look and then press down on the glass insert. Leave your piece to dry for an hour or so.

Once the E-6000 is dry you are ready to add a chain and wear your new necklace. This same technique for the pendant trays works for earrings and rings as well. Again, this is another "additive" project ... once you make one everyone will want you to make one for them too ... which is fine because you will love making these and they make great gifts!
I have a bunch of these blank pendant tray kits for sale at Scrapbook Queens.
They are also sold in the jewellery section of better craft stores and of course at bead stores!
Have a great weekend.


That is such a beautiful necklace! Awesome tutorial. I really like your enjoy life artwork.
ReplyDeletei have always wanted to know how to make one of these, i just have to figure out what to use in South Africa..as we don't have any of those products..lovely tutorial thanks for sharing
ReplyDeleteLovely personalized pendants... I hope its ok if I try making them?
ReplyDeleteThose are fantastic! Thank you for sharing this great tutorial! I love the little 'enjoy life' artwork that you used for these. Beautiful! Thanks for joining us 'in the studio' and sharing this! :)
ReplyDeletehi could you reply to me? I want to make something like that but I don't know where to find a pendant tray in W.A,do you know any shops around w.a that sells cheap pendant tray and the glass insert?
ReplyDeleteYou can buy these on Etsy - they will ship them to you - you can buy kits and bundles.
Deletehttp://www.etsy.com/shop/CandytilesStudio?section_id=5746859
Great idea :)
ReplyDeleteThank you!
ReplyDeleteI'm having a little issue with air bubbles forming a few days to a week after the pendant is complete. I ensure that I have drying time between each stage. Do you have any idea why bubbles would form (only in some of my items) after piece is complete and when there where none present when adhered to the tray??
Thanks! xx
Choose the best tray-holding hand. Some waiters like to use their stronger, dominant arm to hold the tray. Others prefer to leave their dominant hand free to maintain balance and hand out the items that are on the tray. The right way is the way that feels best to you.
ReplyDeleteThank you for the blog! We get all of our pendant tray supplies from https://www.lillyds.com/ They are a great supplier.
ReplyDelete