it's time to drink champagne and dance on the tables

Monday, December 29, 2014

It's time to drink champagne and dance on the table | free printable for poster from Lorrie Everitt Studio

2014 is almost over and I'm looking forward to starting a brand new year.

I am not hosting a New Year's Eve party this year, but if I was, I would use the poster that I created earlier this year for a wedding as a backdrop for the bar! I just love the saying ... "it's time to drink champagne and dance on the tables". 

As a little gift me from me to you, I thought that it would be fun to share the poster as a free printable that you can download here. I printed my poster at Costco as a 16" x 20" photo with a matte finish. 

Please keep in mind that this printable is for personal use only - if you are interested in using my art for commercial use, please contact me first.

It's time to drink champagne and dance on the table | free printable for poster from Lorrie Everitt Studio

If you are looking for the gift tags that are shown on the favors in the photo above, you can find them here.

I purchased my 2015 daytimer today and I can't wait to start filling in the pages with things I am going to do and events I want to remember. 

2015 is going to be awesome! Happy New Year.


go old school with a diy holiday game

Tuesday, December 23, 2014

make it yourself - the jolly St. Nick game | Lorrie Everitt Studio

Here's a fun little project that I designed to keep the kids busy this holiday season. It's a game that is not played on a cell phone, tablet or tv ... it's old school and it can be played by two or more people. Put it on the kids table to keep the little ones busy for a little longer so the adults finish their meal in peace.

make it yourself - the jolly St. Nick game | Lorrie Everitt Studio

I designed the game for an issue of Creative Living Magazine and you can find the download for the printable as well as the complete instructions to make the game here.

make it yourself - the jolly St. Nick game | Lorrie Everitt Studio

A quick recap of the diy instructions: The game is contained in a soup/ice cream container. Six small wood blocks were used to create the "dice". My (free) download printable includes both the art for the top of the container lid and the game instructions that will be place on the inside of the lid.

make it yourself - the jolly St. Nick game | Lorrie Everitt Studio

I painted the wood blocks with chalkboard paint and used a white chalk marker and small letter stamps to spell out "jolly". To create the Santa face on the sixth side of each of the dice, I drew a moustache and two dots for eyes.

make it yourself - the jolly St. Nick game | Lorrie Everitt Studio

The red and white stripe washi tape is a cute finishing detail. If you can't find a striped washi tape like mine, look for a pattern and colour combination that matches the printable.

Now I'm off to finish my holiday baking. Happy Holidays!


setting the table for Christmas day

Sunday, December 21, 2014

diy burlap ribbon tree | Lorrie Everitt Studio

Yesterday I hosted a surprise birthday dinner party at my home to celebrate my husband's grandmother's 98th birthday. Grandma is the sweetest, nicest and most lovable lady I've ever known and such an inspiration ... she is 98 and still goes to yoga classes! 

Today I spent the day cleaning up from the party and started to prepare the dining room table for Christmas dinner. I have been making these adorable little burlap ribbon trees and I plan on putting them at each place setting.

After featuring my burlap trees in Creative Living Magazine, I had a few people ask me how I made them. So I thought that I'd share a quickie tutorial on how to make them here ...

diy burlap ribbon tree | Lorrie Everitt Studio

My supplies: green burlap ribbon, styrofoam cones, T-pins, two sided tape for ribbon, striped paper straws, mini metal pails, florist foam, kraft sizzle and baker's twine.

Use one T-pin to keep the ribbon in place at the top of the cone. Wrap the ribbon around the cone to cover the pin and continue wrapping down the surface of the cone. Once you get to the bottom of the cone do one final wrap around so that the ribbon overlaps enough for you to add a piece of two-side tape to end. You can see in the photo above (bottom right) that the burlap ribbon should come down a little lower than the bottom of the cone so that you do not see the cone. Add a paper straw into the centre bottom of the cone.

diy burlap ribbon tree | Lorrie Everitt Studio

Add a chunk of floral foam into the pail to support the paper straw. I tied baker's twine around the pail and added kraft sizzle to hide the floral foam. 

These trees are pretty simple to make and I think that if I store them properly they will last for a number of years.

diy burlap ribbon tree and s'more favor for Christmas dinner | Lorrie Everitt Studio

I'm also adding these s'more favors to every place setting. I have decorated the clear take out boxes with the green burlap ribbon that I used to make the trees and lace ribbon left over from my holiday gift wrapping. We have an outdoor fireplace in the backyard and I'm hoping that the weather is nice on Christmas day so that we can toast our s'mores outside after dinner.


diy - oreo cookie hostess gift

Thursday, December 18, 2014

diy oreo cookie hostess gift

I don't always have a lot of time to do holiday baking and over the years I have come up with a few creative ways to make store bought items look like they are homemade. Dipping oreo cookies in melted chocolate is one of my favourites right now and if you add holiday sprinkles they are sure to delight both young and old. Package a bunch of these cookies up in a gift box and you've got a great gift for a teacher or your next door neighbours. 

Here's how I make these ... 

diy oreo cookie hostess gift

Step One. Gather your ingredients. Oreo cookies, chocolate candy melts in a colour of your choice, holiday sprinkles.

diy oreo cookie hostess gift

Step Two. Melt the chocolate candy melts according to the instructions on the package. Dip cookie into melted chocolate as shown. 

Tip to keep the chocolate melted a little longer ... I place the container in a larger bowl containing boiling water.

diy oreo cookie hostess gift

Step Three. Quickly add sprinkles before the chocolate hardens.

Tip: I use a baking drying rack to keep the cookies standing upright to dry so I can keep dipping more cookies.


diy oreo cookie hostess gift

When your cookies look as good as these, you want a clear box or a box with a window like this one for your gift packaging.

These are so simple to make and the kids will love to help you out ... so go ahead and let them!

Find more of my food packaging ideas for the holidays here.


paper straw wreath tutorial

Thursday, December 11, 2014

paper straw wreath tutorial | Lorrie Everitt Studio

Today I thought that I'd share with you a quickie tutorial that you can make in an evening with the kids. Paper straws are one of my favourite party and crafting supplies because they come in so many great colours and patterns. I've been making these wreaths for a few years and  they may look difficult to create but they really are not. I always make them using all of the same colours of straws but for this tutorial,  I've broken down the different steps and layers by using 4 different colours of straws so it's easier to see and explain. 

paper straw wreath tutorial | Lorrie Everitt Studio

First you will need to gather all of your supplies. 
1.  ninety-six paper straws (of course, I purchased my paper straws at Creative Bag)
2.  my template (download it here and use it to cut out a wreath form or to use as a guide) 
3.  a six inch diameter flat wreath form (like this one or make one from foamcore)
4.  glue (I used a clear drying glue that is suitable for paper) 
5.  scissors

paper straw wreath tutorial | Lorrie Everitt Studio

Step one. Print out the wreath template to use as a guide for your straws if you are using a premade flat wreath and tape it to the back of the wreath. 
Optional Note: if you can't find a flat wreath base, use the template to cut your own.

Now you are ready to glue your first 24 straws (pink) to the flat base. I started by gluing down the first 4 straws as indicated above. Let them dry completely before continuing. Next you want to glue five straws in each of the four open spaces. Use the template to make sure that your straws are all spaced evenly to create a circle. Allow to dry completely before moving onto the next step. 
Tip: You can add a large book on top of the straws to keep them flat while they dry if you want.

paper straw wreath tutorial | Lorrie Everitt Studio

Step 2. Cut "1 off the ends of 24 (green) straws. You will not need the 1" pieces for this project but you can save them to make a paper straw garland. Glue the shorter (green) straws in between the (pink) straws as shown above. To keep the straws at the same distance from the centre - you may need to pinch the end of some of the straws if space is a little tight. Allow the straws to dry before going onto the next step.


paper straw wreath tutorial | Lorrie Everitt Studio

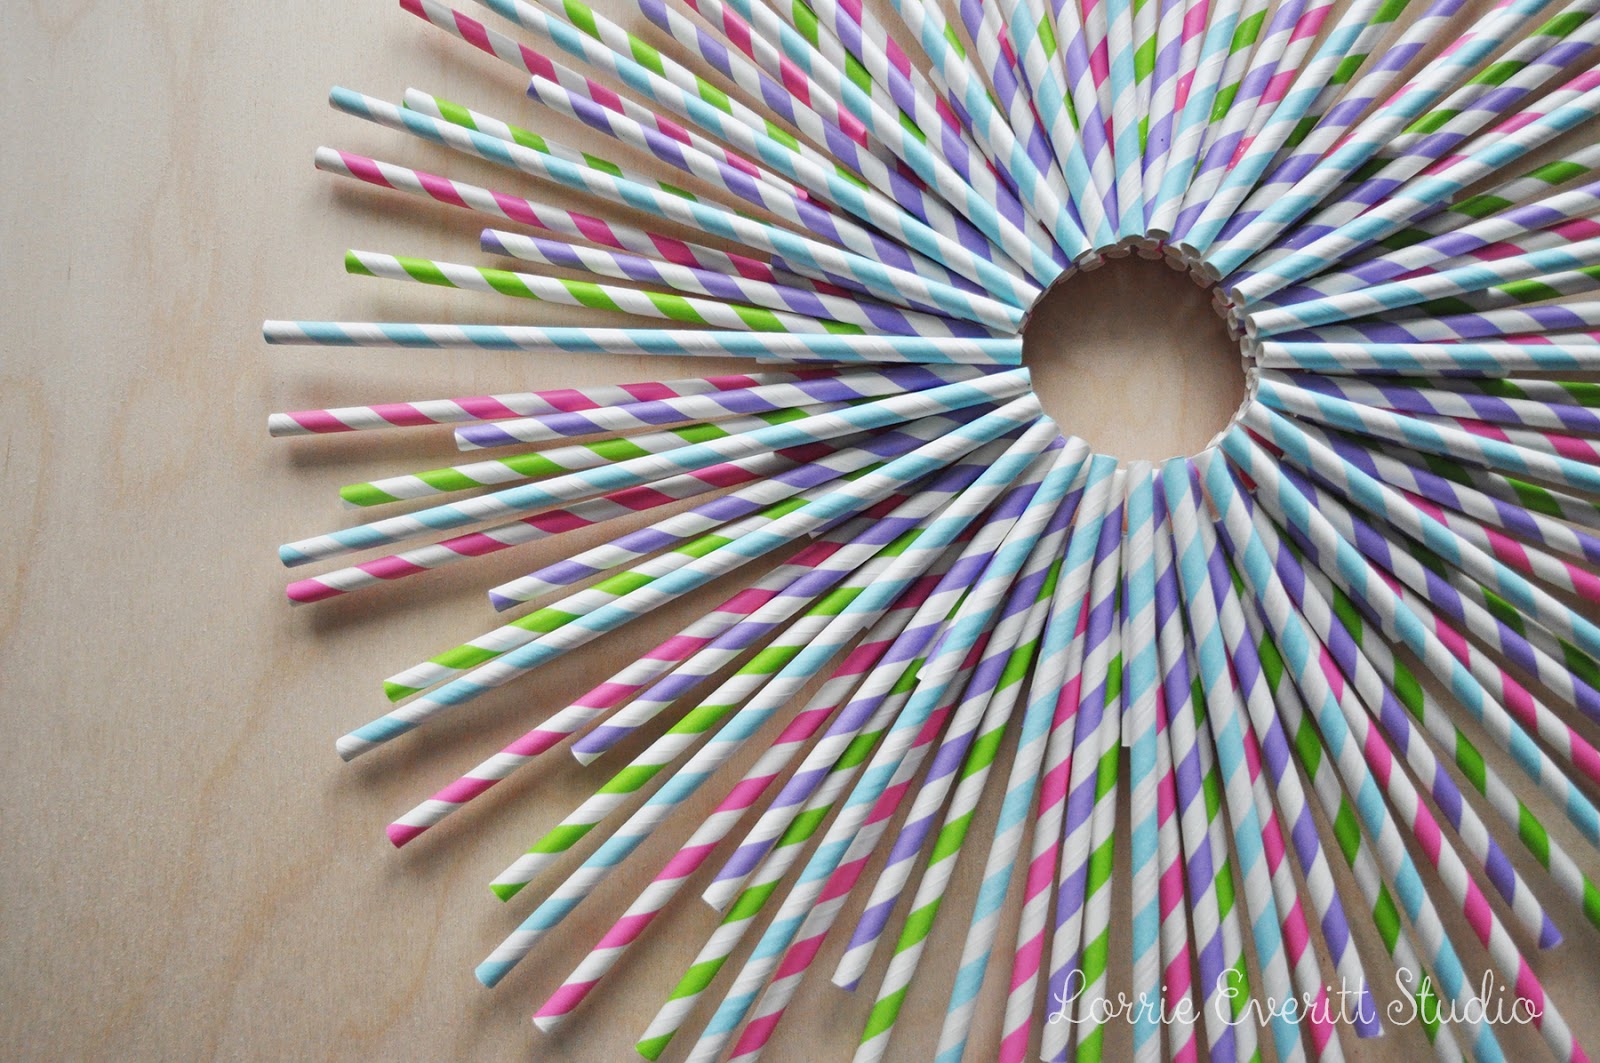
Step 3. The next 24 straws are going to be cut down again but this time we will use both pieces of each straw. Cut 2" off twenty-four (purple) straws. You are going to glue the longer straws on top of the first layer of straws  - you can see there is a purple straw in between, and on top of, the pink and green straws. The (purple) straws are positioned so they meet in the centre of the wreath just like the pink straws on the first layer. Allow these to dry.

 paper straw wreath tutorial | Lorrie Everitt Studio

Step 4. Glue the twenty-four 2" (purple) straws in between the longer (purple) straws on the second layer as shown above. Again, if the space is a little tight, you can pinch the end of any straws that you need in order to keep the spacing even. Allow to dry.

paper straw wreath tutorial | Lorrie Everitt Studio

Step 5. This is our third and last layer of straws. This layer requires 24 uncut (blue) straws. They will be glued directly over the twenty-four 2" (purple) straws. Allow to dry. Remove the paper template from the back and attach a piece of twine to hang.

paper straw wreath tutorial | Lorrie Everitt Studio

After looking at my finished wreath ... I kinda like the look of the different colours! I think that this would be sweet for a child's party.

paper straw wreath tutorial | Lorrie Everitt Studio

I'm using paper straws in my holiday decorating (again) this year. I added a red and white striped wreath to a chalkboard piece that I made for the mantle in our family room.

My paper straw wreath project was featured on Rogers TV Daytime (Durham) show last week. You can see it here ...

Lorrie Everitt on Rogers TV Daytime (Durham) | Creative Bag

If you make a paper straw wreath, I'd love to know what you did with it. Leave me a comment or a link to your project on your blog!