Showing posts with label entertaining. Show all posts

Tuesday, December 12, 2017


Creating sweet tables has to be one of my favourite things to do during the holidays. 

You don't need to have a lot of different treats to create a holiday sweet table. I used assorted serving dishes, buffalo gift boxes, burlap ribbons, mini trees and lights for my festive set up.

I prefer to put out a little bit of everything in smaller containers and then refill them every once in a while so that the display looks some what full for most of time.

Here's how I set up my little stress free sweet table:

home for the holidays - set up a sweet table | Lorrie Everitt Studio

Buffalo plaid gift boxes are both functional and decorative in my set ups. If you don't have gift boxes, you can create a similar look using books covered with wrapping paper "jackets" like I did here.

home for the holidays - set up a sweet table | Lorrie Everitt Studio

I have created these snow globe inspired jars filled with cookies as hostess gifts for years. This year I thought that it would be fun to make one for myself and use it as the focal point of my sweet table display. 

 I use coarse sugar to create a snowy base in the glass containers.The mini gingerbread house and cookies are from Mad Batter Bakers. The container is more of a display element so you may want to fill another serving dish with gingerbread cookies for guests to easily take and eat.

home for the holidays - set up a sweet table | Lorrie Everitt Studio

I filled a candy dish with custom made sugar cookies from Emma's Sweets. You can add coarse sugar to the bottom of the candy dish so that the cookies will stand up.

home for the holidays - set up a sweet table | Lorrie Everitt Studio

Another small candy dish was filled with assorted colours of french macarons from Macaronz and placed on a gift box for height.

home for the holidays - set up a sweet table | Lorrie Everitt Studio

Not everything on your sweet table has to be baked goods. I like to fill larger containers with chocolates, popcorn, candy and nuts.

home for the holidays - set up a sweet table | Lorrie Everitt Studio

Once the serving dishes have been set up I fill in large spaces with gift boxes tied up with ribbon. I like to use pretty gift boxes in my holiday decor and in January I fill them with Christmas tree decorations for storage.

home for the holidays - set up a sweet table | Lorrie Everitt Studio

Finally I add in mini trees and battery operated strings of lights.

home for the holidays - set up a sweet table | Lorrie Everitt Studio

Guests may think that your sweet table is too pretty to eat so make sure that you tell them it's okay to help themselves!


home for the holidays - set up a sweet table | Lorrie Everitt Studio


Sweet DIY: donut display board

Monday, November 20, 2017

sweet DIY - donut display board for the holidays and beyond | Lorrie Everitt Studio

I have been waiting for a reason to create a large beautiful donut wall. The problem is that I am not a wedding or party planner and I did not host any large parties this year. I am planning to do some holiday entertaining and I thought that this might be a great opportunity for me to put my own twist on the donut wall concept that is a little more holiday entertaining at home friendly.

sweet DIY - donut display board for the holidays and beyond | Lorrie Everitt Studio

 So I came up with the idea of turning these wood market trays into donut display boards. They will hold a dozen mini or regular sized donuts. You can replenish the donuts during the party to keep it looking full. And the trays are not huge so you can easily store them after the event and reuse them again.

sweet DIY - donut display board for the holidays and beyond | Lorrie Everitt Studio

 I painted this donut display board white and added gold details to the end of the the wood pegs. Learzi from Autumn Grey Designs added the gold hand lettering and the adorable mini donuts were made by Macaronz. 

sweet DIY - display board for donuts and cookies | Lorrie Everitt Studio

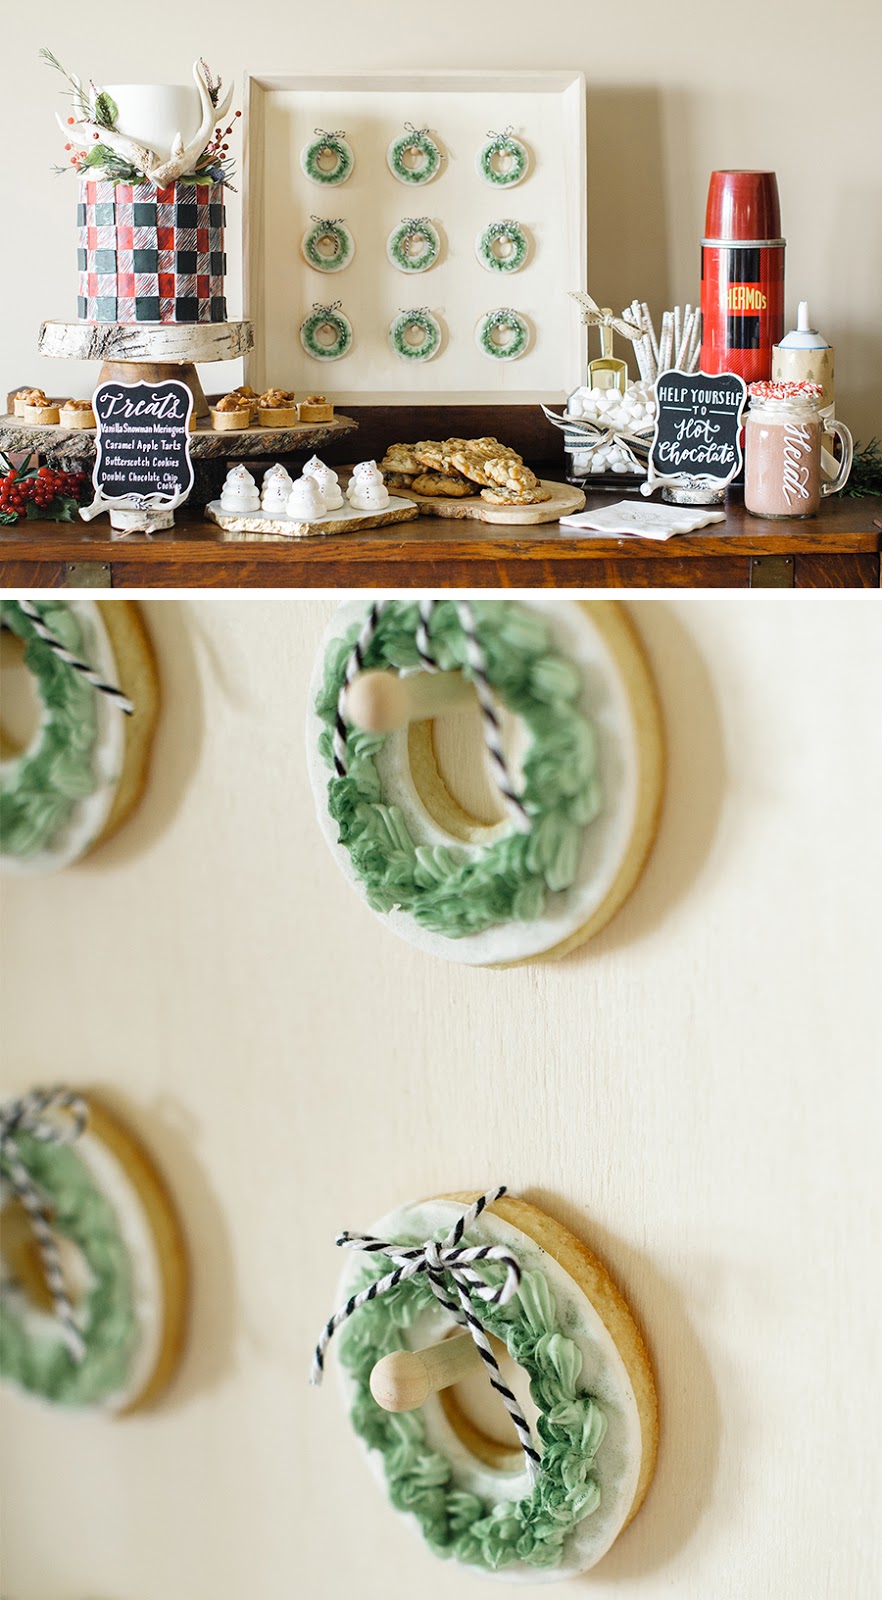
 My donut display board is also perfect for displaying decorative cookies with a hole.

sweet DIY - display board for donuts and cookies | Lorrie Everitt Studio

sweet DIY - display board for donuts and cookies | Lorrie Everitt Studio

Caitlyn from Cakelaine created the festive wreath cookies that were displayed above as well as all of the cakes and sweet treats for our holiday themed party.

Here's how to make these donut display boards yourself:

sweet DIY - donut display board for the holidays and beyond | Lorrie Everitt Studio

 1. Gather your supplies: Wood market tray, small wood pegs, kraft paper to work out spacing, ruler, pencil, drill, paint (optional).

2. Use kraft paper to figure out spacing for the holes that you need to drill into the tray. Make sure that you leave enough space around the donuts. Centre the kraft paper on the wood tray and mark where to drill with your pencil. 

3. Select a drill bit that is the same size as the wood pegs. You want the holes to be tight so you will not require glue. Drill holes in the wood tray. 


sweet DIY - donut display board for the holidays and beyond | Lorrie Everitt Studio


4. Place wood pegs in the holes. Paint if desired. 

sweet DIY - donut display board for the holidays and beyond | Lorrie Everitt Studio


Tip: You can prop the board up against a wall. Or, if you want the display board stand on it's own, I suggest that you super glue a large square vase to the back of the tray. 


If you make one of these for your own party I'd love to see it! Use hashtag #lorrieeverittinspire and follow me on Instagram for more holiday diy inspiration. 


Photo credits:

Donut display set up:

photography  Janet KwanPhotography 
mini donuts Macaronz 
hand lettering  Autumn Grey Designs 
greenery  Flower Treasures      
packaging products Creative Bag
entertaining products Weddingstar
creative direction Lorrie Everitt

Cookie display setup:

photography  Heidi Lau Photography 
hand lettering  Love Lettering   
florals Flowerly 
cake and sweets  Cakelaine   
packaging supplies  Creative Bag  
entertaining supplies Weddingstar
creative direction  Lorrie Everitt  
& the handcrafted artisans:


sweet DIY - display board for donuts and cookies | Lorrie Everitt Studio


diy party decor favourites and a couple of ideas for how to display them

Wednesday, March 23, 2016


Do you like to host parties? I do. I love party decorations and diy party decor projects. I have a few favourite diy party projects that I tend to make over and over because they are not only easy to make but they are also inexpensive.

 I am always trying to come up with new ways to display my party decorations so that I am not marking my walls or furniture and I'm going to share a couple of my ideas with you today. So let's get this party started ...


My number one go to diy party decoration - tissue paper pompoms. Tissue paper comes in so many colour options and best of all it is inexpensive. There are so many ways to make tissue paper pompoms. They can be hung from the ceiling or mounted flat to the wall, change up the size, use different colours of tissue to create an ombre effect or cut the ends like I did to create tissue paper flowers. 

When you combine tissue paper flowers with other large paper decorations you can create an amazing party backdrop. This is how I created my tissue paper flower pompoms:


1. You will need 6 sheets of tissue paper. The size of tissue is up to you so make these as large or small as you want. You will use two sheets each of three different colours to recreate my sample.
2. Accordion fold all of the tissue paper as shown above until you are left with one bundle of tissue about 1" wide.
3. Separate the three colours and cut each color as shown above - longest (outside) tissue has a pointed edge, middle tissue is shorter and has a rounded edge, and the shortest (inside) tissue has a fringe edge.
4. Open all of the tissue paper bundles and layer them together as shown.
5/6. Refold the tissue paper layers and add a twist tie to the centre as shown.
7. Open the tissue paper to create your flower one side at a time. 
8. The back of this pompom is flat for hanging on the wall.
 

A  neutral backdrop of kraft, white and gold paper party decorations gets a pop of colour with these pink tissue paper flower pompoms. I could easily remove the tissue paper flowers and replace them with pompoms in a different colour to reuse this backdrop for another party.


My secret for displaying this large grouping of paper party decorations was this large piece of pegboard. The paper decorations were tied to the board using baker's twine. I can set this display up days before the party and all I have to do is lean the pegboard against the wall when it's time to set up for the party. No nails or hooks required.


Tissue paper tassel garlands are my other go to diy party decoration. They are simple to create and you can make the garlands as long or short as you'd like. I also love that the garlands are extremely light so it makes displaying them a breeze. 

I came up with this way to display my tissue paper tassel garlands so that I don't have to worry about using tape on my walls or furniture. Here's what you will need: mason jars, wooden dowels, sand and clothespins.


I spray painted my mason jars gold and and added a band of gold glitter so that you would not see the sand inside of the jars.


I could have just used plain wood clothespins but I decorated mine with scraps of decorative paper and resin flowers.


I glued the clothespins to one end of the wood dowels as shown above. Put one wood dowel into each mason jars that has been filled with sand. 


Clip the tissue paper tassel garlands to the wood dowels as shown above and space the jars so that the garland hangs nicely. Depending on the length of the dowels, you can add this display to a table top or where ever you want!


Tissue paper tassel garlands are easy to create. These ones were created using Martha Stewart's ombre tissue paper but you can do this same technique with solid or printed tissue paper as well.


You can cut your tassels by hand or you can use the Martha Stewart tassel cutter like I did to get even cut tassels. You can check out this Martha Stewart YouTube video to see this amazing tool in action.


Here's a really quick look at how to make a tassel: (left to right) cut the edges of your tissue as shown, roll the tissue and then twist at the middle. Fold the tassel in half and then twist once more to create a loop for hanging.


I wanted to add a little glitter to my tassels so I used gold glitter tape just below the loop. The glitter tape does not stick to itself very well so you will have to use a little adhesive on the end of the glitter tape. 


You can cover the entire pegboard with decorations if you want. Just remember to leave one edge of the pegboard flat so it will sit on a flat surface.


Sweet table set up tricks for your Halloween treats

Friday, October 30, 2015


Are you hosting a Halloween party this weekend? Here's a few of my tips and tricks for setting up a Halloween sweet table. 

Tip no. 1 - It's okay to use an assortment of different containers and cake stands to display your treats. If you are going to use coloured dishes just try to keep them all to one colour so that the colours of the treats will take centre stage. 


Tip no 2 - Keep your treats simple and don't stress about having to make everything yourself. I used a combination of store bought treats (donuts and two-bite brownies) and combined them with some easy to make treats (candy bark and a chocolate covered cereals) and bulk food candies (gummy worms and candy covered popcorn).


The candy bark was so easy to make using melted chocolate and assorted candies and sprinkles. I was inspired to make my candy bark after reading the recipe in SheEntertains magazine.


Whenever I don't have time to make brownies I buy one-bite brownies and decorate them with store bought cake icing and sprinkles. Everyone just assumes that I made them myself. 


Trick no. 3 Use some Halloween decorations in your set up that work with the colours of your treats. I added pumpkins that I decorated!


Tip no. 4 - Try to elevate some of your serving containers so that everything is not at the same height. I used a few wood slabs in my set up - stacks of books or set up boxes will work too.


I decorated a number of pumpkins this fall using paint, glitter, tissue paper, chalk markers and gold paint markers. You can see some of them here and on Instagram.


The gold polka dots on my pumpkin were created with gold tissue paper and mod podge. It took me less than 15 minutes to decorate the pumpkin and all of my polka dots are the same size!


Here's a quick tip for cutting perfect tissue paper circles - use a paper punch! I find that it is easier to punch three or four sheets of tissue paper along with one sheet of text paper. 

I hope that your weekend is boo-tiful.