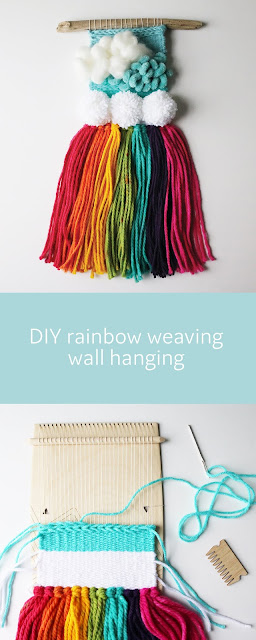
Crafting and making things has always been a way of life for me. And right now, creating things has become a very big part of my daily routine as we adjust to life during a pandemic. It's been weeks since stay-at-home orders where put into effect and I have been using the extra time at home to learn a few new DIY skills.
First up - weaving on a loom.
I've wanted to learn how to weave ever since I saw the first hand woven wall hanging pop up in my Instagram feed. I purchased a mini loom kit from local maker Chip and Sparrow a while ago. The loom kit that I used is called the Mezzo Loom and comes with all of the tools that you need to get started. The small loom is a wonderful way to use up scraps of yarn . The kit comes with written instructions but you can also find great beginner videos on the Chip and Sparrow website.
Mini weavings like the rainbow one that I created can be accomplished in an afternoon. Here's how I created my rainbow inspired mini wall hanging:
Sources: Mezzo Loom Kit (comb, 6"x9" wood loom, pick up, 7cm yarn needle, 17.5cm needle and manual), crochet thread, assorted wool/acrylic blend/roving/chenille yarns, pompom maker, scissors.
I highly recommend watching this how to warp, weave and taking off a weaving video to help you get started.
1. Natural crochet thread was used to create the warp on my loom.
2. Rainbow coloured tassels were created using seven colours of yarn - red, orange, yellow, green, blue, purple, pink. To create fourteen tassels (two of each colour) cut ten 22" strands of each colour. Each tassel was formed using groups of five strands of yarn - loop yarn as shown over two strings of the warp and pull down to form the tassel.
3. Once all of the tassels have been added, trim the ends to one length.
4. Weave a 1.5" block of white yarn to create a base for the white pompoms.
5. Create three pompoms that are about 2" in diameter when complete. I made my pompoms using the Loome pompom maker.
6. To create a "sky" above the rainbow. The rest of the weaving is made up of blue yarns that have a variety of thicknesses and woven to create different textures. You can create textures by using a variety of different weaving techniques, such as the plain and braided (soumak loop) weaving techniques, that I created above.
7. Chenille yarn was woven with large loose loops (plain weave) in a small area on the right to represent raindrops under the (roving) clouds.
8. White roving was loosely woven into a fluffy cloud shape just to the left and and slightly higher than the chenille raindrops.
9. Fill the remaining open space around and above the "cloud and raindrops" with another blue yarn. Finish the top of the weaving with a braid weave
10. Remove the weaving from the loom. Add a piece of driftwood or wood dowel to the top warp loops at this point so you can hang your weaving.
11. Sew the pompoms to the white woven area just above the rainbow tassels and you are done!
Thanks for following along!
I recently posted this weaving on my new Instagram account @makeandmerryco . On that account I am trying to give you inspiration for not only making things but also ideas for how you can use what you make. So in that spirit ... imagine how fun this rainbow wall hanging would look as decor piece for a baby shower or rainbow themed party. After the party, hang it in the baby's room or in your home.
If you make one of these and post it on Instagram please use hashtag #makeandmerry so I can see it!


No Comments Yet, Leave Yours!