inspiration - Tinsel Trading Company, New York

Friday, April 30, 2010

While I was in New York the other week, I stumbled upon this beautiful and inspiring shop at 1 West 37th Street called Tinsel Trading Company. I love antiques and vintage findings and this store has it all ... you would think that you just travelled back in time to the 1940's when you walk inside. I took a couple of pictures of the store windows but I think I would have shot another dozen pictures if I was not in such a rush to get inside to see all  of the treasures! This store has vintage European notions - threads, buttons, ribbon, metallic trims and fringes - that have been sitting (mainly unused) in the basement of this store since the mid 1900's. Check out Tinsel Trading Company's website for more details about it's history at http://www.tinseltrading.com/aboutus.html

Here's my friend Karen sitting in from of a wall of trim ... and here's some more pictures from inside the shop ...


We only had carry on luggage with us for the trip so I could only purchase a couple of things ...

here I am in the cash desk after making my purchase - a container of German "Emporium Pure Glass Glitter",
silver metallic thread (on it's original wooden spool - so cool!), a glass jar full of vintage buttons (I've collected vintage buttons for years and this is the biggest stash of pink pearl buttons I've ever seen at once) and a book called "French General Treasured Notions" by Kaari Meng.


The book was just published and it is all about crafts that were inspired by notions from this store!!! I saw the book at a bookstore in Grand Central Station about an hour earlier and decided not to buy it as I figured I could get it at home. Of course, I HAD to have it after being in the store. Unfortunately, the store was having a book signing the next day and we would be back home in Canada ... so I was unable to get my book signed (no autograph from Martha Stewart that day either ... good thing I didn't buy any lottery tickets that day!). Oh, that reminds me, if you check out the Tinsel Trading Company's website you will see that Martha loves this store too and it has been featured on her show and in her magazine quite a bit.

There is a little sequined bird project in the book that I think I will have to try ... as well as a button charm bracelet ... but the most inspiring part of the book for me right now is the photography and the graphics! I'm trying to put together a couple of small memory books from our New York trip and I'm going to give the memory books a vintage theme inspired by Tinsel Trading Company's visual displays and notions.

If you ever go on a trip to New York City ... I highly recommend visiting this store ... it is walking distance from both Times Square and Grand Central Station.


The store also reminded me to dig out one of my vintage button projects that has been collecting dust waiting to be framed. I sewed vintage buttons to a piece of heavy weight handmade paper (the paper is 30" x 23") ... it took me about 2 summers to complete it (as I only worked on it on rainy days at the cottage) ... hopefully, we will be going to the Christie Antique show later in May and I can find a suitable frame for it.  

earth day inspired picture

Thursday, April 22, 2010

"We usually cherish things that are unique. Why not the Earth?" this quote by astronaut and first Canadian woman in space, Roberta Bondar, was in the newspaper today and I felt very inspired by it.

Lately I have been working on little cards that I make using scraps of fabric, antique buttons and recycled silk flowers ... and in honour of today being the 40th international Earth Day I decided to made a little picture with some of the recycled flowers and one of the brown kraft bags that I saved from my trip to New York last week. I also wanted to work the word "cherish" from the quote into the project ... so I cut out some letters from a discarded children's book that I bought from the library.

 
Here's my list of recycled supplies ... kraft paper shopping bag, buttons, silk flowers, scraps of green fabric and an old book. I knew that I wanted to frame this so I grabbed a frame that I bought at IKEA a while ago and used it to determine what size I would have to make the picture. 

The flowers are easy to make ... I take apart old silk flowers in different colours and then recreated new flowers by layering two or three petals together. When I am happy with the size and colours I add an antique button and sew everything together with a needle and embroidery floss.

 
My IKEA frame had a matte so I used it as a template to cut out the kraft paper bag. Then I placed the matte on top of the paper bag to determine where I would place the up-cycled flowers. With a light pencil I drew out where the stems of the flowers would be. I cut small "leaves" from the green fabric scraps and placed them on either side of the stems. The word "cherish" was cut out of the book in pieces ... and I played around with the word placement until I was happy with the overall design.

Once the final placement was worked out ... I took everything off the paper and sewed the "stems" onto the paper with my sewing machine. I simply followed the pencil lines with green thread. To finish, I used a needle to pull all of the loose threads on the front of the paper to the back ... then hand knotted and cut off the extra thread. If there are any pencil lines showing it is easy to remove them with an eraser ... just be gentle.

I hand stitched the flowers to the tops of each stem using embroidery floss that matched the button colour. Gel medium was used to attach the leaves and letters to the kraft paper. Once everything was dry I added the matte and frame. This was a super easy project and it would make the perfect little gift for any tree-hugger you know!

Happy Earth Day!

... and here are a couple of pictures of the flowers I took this morning when I was out and about ...

New York inspiration, Art Saves and Giveaway update

Saturday, April 17, 2010

I just got back from New York with my friend Karen yesterday afternoon ... my mind is still going a mile a minute with all of the ideas and inspiration from our little visit to the "Big Apple". We saw a live taping of the Martha Stewart show... rode the NY subway ... shopped for beads ... drank lots of tea at Starbucks and took tons of pictures {530 pictures in 48 hours} ...    

The Martha Stewart show was amazing ...we were there for the Thursday April 15th show. Karen and I were one and two on the reserved seating list ... we were seated in the centre front row on the floor. We could almost reach out and touch Martha we were that close!! The show was on tv the same day that it was taped which surprised us because we thought that it would be on next week sometime. Katherine Heigl was on the show with Martha {they did a couple of crafts for their pet dogs}, Martha made stunning stained glass cookies with Dani Fiore {I'm going to have to try to make them with the dragonfly cookie cutter that we received}, Martha showed us how to make an in-house herb garden  and then she showed us how to make herb-based cocktails {the "Marthatini" looked yummy - I'm assuming the recipe is on the website somewhere} http://www.marthastewart.com/the-martha-stewart-show/two-days-ago

Here's our pictures in the studio ... we were only allowed to take photos before and after taping. Everyone in the audience was told to wear bright coloured clothing to the show that day. Karen wore her green jacket and a stunning necklace that her Mother made for her. The woman sitting beside Karen (checking her cell phone) is Lisa Mansour. Lisa has a shop in New York called NY Cake http://www.nycake.com/ ... the cookie cutters used to create the stain glass cookies on the show were from Lisa's store and she donated the cookie cutter giveaways for the studio audience {they were wrapped up so nicely ... I'm sure that Martha would have approved of the presentation! Thanks again Lisa!!}. I'm wearing a bright pink t-shirt with my favourite belt made from soda bottle caps, and old tire and car seat belt buckle. I also had my California licence plate purse with me and that went over well with the 4 ladies who sat behind us ... they all live in California and were in New York for a "girl's trip" while their husbands were back home fishing. 

  
Here's a shot of our loot bags after the show ... as well as my tote bag and "licence plate" purse. I recycled a denim mini skirt into a tote bag Wednesday morning before we left for the airport. I couldn't find a tote bag that was the right size and it was easy to sew the bottom of the skirt and add a woven belt as a strap. I got a lot of comments about it when we were walking around so I think that I may look through the girls' closets and see if there are any more denim skirts that can be restyled into tote bags.

My first project this week is to create something that I can send to Michaels Arts & Crafts Store home office to thank them for sending me on the trip to New York to see Martha ... it was really a dream come true for me and I am so glad that I was able to take Karen with me ... it is a trip that we will both remember fondly for many years to come.


I'd also like to thank Jenny Doh and her staff at Crescendo for featuring my story about how art has saved me  http://blog.crescendoh.com/readers_share/2010/04/art-inspires-brings-happiness-by-lorrie-everitt.html ... my story was posted just before I left for New York and this is the first chance that I've had to mention it. Crescendoh.com is a great website with tons of inspiration and artists to find and connect with. If you have ever read/purchased a Somerset Studio magazine you will totally fall in love with this site and blog.


And before I leave ... I want to announce the winner of my bookmark giveaway ... Robyn helped me out this morning to draw the winning name and it was Cynthia Kendall! Congratulations Cynthia ... please send me an email with your mailing information and I will get this out to you this week.   

funky glass bead bookmark giveaway

Monday, April 12, 2010


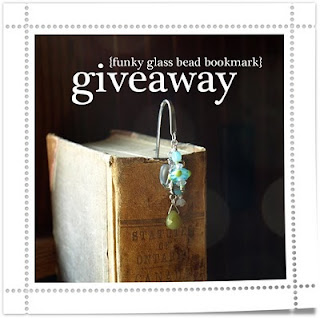
I thought that I'd do a little "giveaway" this week ... I'm so happy to be going to New York in a couple of days with my friend, Karen, to see a taping of the Martha Stewart Show and I thought that this would give me something to look forward to when I get back. I'm going to giveaway the "funky glass bead bookmark" featured above. I know that a lot of my family and friends are new to this "blogging thing" so I'll give you a couple of options to get into the draw ... 1. leave me a comment after this post or 2. join my group "followers" (see the right hand side of the blog). If you are already a follower - you are already in the draw!!!  I'll draw the winner on Saturday morning and post the winner's name on my blog.

Here's a little story about my funky glass bead bookmarks ... I've made these for years ... they are so cute and a great way to show off so many of the beautiful glass beads that I have collected. I made few hundred of these little bookmarks last year as a part of my therapy after my brain surgery. Making these bookmarks helped me physically and mentally ... and it was something that I wanted to do so it was fun. I worked on them for months and when I was done, I gave away all of the bookmarks to the hospital staff to thank the many doctors, nurses, therapists and volunteers who took such good care of me.


Just in case you would like to make one of these funky glass bead bookmarks for yourself ... here's how ...


you will need a variety of different sizes of beads, a couple of links of chain, head pins, jump rings, book hooks and a few jewellery making tools like pliers and wire cutters. I buy all of my supplies at Michael's and my local bead stores and I have been known to re purpose beads from necklaces and earrings on these bookmarks too. 

 
The first thing that I do is to create a few bead grouping on the head pins. There is no right or wrong way to do it so just have fun arranging a few small beads with a medium sized bead until you like what you see ... then twist the end of the head pin to form a circle (see picture above). Larger beads can just be added to the head pins by them self and then twist the end of the head pin to form a circle ...


once you have a bunch of beads on the head pins, you will need to attach a small length of chain to the book hook with a jump ring. Use your pliers to close the jump ring and then cut the chain with wire cutters so that the chain is about 1/2" long ...


I usually add about 3 or 4 bead groupings to each bookmark ... lay the beads out on either side of the chain to see how you want to position them. Attach each bead grouping to different links on the chain using jump rings and your pliers to connect them ... and that's it!

Warning!!! ... these are really fun to make and you will soon be finding yourself making these as gifts for everyone - family, friends, teachers, etc and you will be adapting the designs for different holidays.  I gave these out (with candy) to the children on our street for Halloween last year ... the bookmarks had pumpkin and ghost charms mixed in with orange and black beads ... everyone thought that they were really boo-tiful!


preparing for my etsy shop opening

Wednesday, April 7, 2010


I've been working the last couple of days on trying to get my shop set up on Etsy ... something that I've wanted to do for quite a while. I love Etsy ... I look forward to reading Etsy's daily emails (my morning inspiration!) and so I'm always totally surprised when I tell someone about Etsy and they look at me like I have two heads. Just incase you are one of my family members reading this right now - check this out ... http://www.etsy.com/ 

I'm almost there ... I have my etsy and paypal accounts set up ... I've been taking pictures of the handful of mini mixed media collages that I created last month ... and I am almost finished working on all of the other "non" creative things like packing materials and postal rates (ugghhh!). I'm setting my deadline to have some items listed in my shop by the end of the week. 

The collage picture above is one of the first items that I am going to put in the shop. I'll let you know when the shop is set up ... I think I will have to figure out how to add an Etsy button to my blog too (ughhh! another detail to work out!).

And while I'm on the topic of Etsy ... I just purchased a print this morning from Katherine Quinn. She is an artist from New Zealand that I have been admiring on Etsy for quite a while ... if you get a minute, check out her etsy shop at http://www.etsy.com/shop/sleepandhersisters


Here's what I bought from Katherine ... I can't wait to receive it!   

welcome to the cottage

Monday, April 5, 2010


Our family spent the Easter long weekend at the cottage. The weather was beautiful and there was lots to do outside as well as inside. We remembered that we had not been to the cottage since the end of December when we walked in the front door and saw all of the Christmas decorations and tree were still up!

There was lots of craft time worked in between cleaning, cooking and entertaining. Robyn enjoyed making "rock people" on afternoon.
 
Robyn loves to go through my containers filled with large smooth beach rocks that I collect every summer on the beach at the end of Long Point. She colours them with my coloured sharpie markers and adds googlie eyes ... and of course they all get a name!

I like to use the beach rocks a different way. I have family and friends sign the rocks and leave them in a large glass jar in our front entrance ... kind of like a guest book but better because I encourage everyone to not only write their name but to decorate the rocks as much or as little as they want.

I set everything out on a table so that it is one of the first things that you see when you walk into the cottage ...


I refill the bowl of rocks all of the time to make sure that there are lots to select from ...
we have lots of coloured sharpie markers to choose from ...
and the large glass cookie jar from Ikea is perfect for holding lots of rocks.

It always makes me smile to watch the kids go through the jar to find the rocks they decorated in previous years ... and then ask me if it's okay for them to decorate another rock this year. And I always say "yes" and remind them to write the year so that we will remember when they made it!


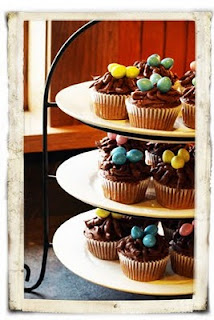
We still have some chocolate cupcakes to eat up from the holidays ... but with all of the chocolates and candies from "the bunny" ... I think that they may be around for a few days!