Let's get organized {part 3} - scraps of paper

Friday, January 28, 2011


I'm still organizing and cleaning ... with a little crafting tossed in to make it fun! Here's a couple of other projects that I came up with for my studio to organize all of the scraps of paper with notes and information that I have in my desk drawers and around my office.

I have been collecting American Art Pottery over the years and found that I had a couple of plain ones in a cupboard that were not very expensive and a good size to use on my desk. I turned the one pictured above into a piece of art that would function as a place to store computer and reference information.

I used vintage pottery that was not really valuable and plain ... you can find these at antique shops and shows and sometimes if you are lucky, at a second hand store (for a fraction of the price).

This project was a great way for me to get some vintage pieces that I love out of boxes so that I can see and enjoy them. I used a number of vintage elements: a photo, stamps from a postcard from Paris,  pieces of rhinestone jewellery, a metal light reflector and words from an old book. I also used some newer materials from my paper crafting supplies: paper flowers, fabric measuring tape and metal embellishments.
I used gel mediums (regular and heavy) to attach everything. I started with the fabric measuring tape and metal light reflector. I save my wooden stir sticks from Starbucks for projects like this ... it is so much easier to apply the gel medium ...
I removed the stamps from the back of the vintage postcard using steam from my kettle ... work slowly and carefully so that you don't burn yourself. I scanned both sides of the postcard to use digitally later on. I adhered the stamps to the pottery with soft gel medium and added a coat of gel to the front. The vintage photograph was purchased years ago at an antique show ... I'm always attracted to these for some reason ... and love the way that they are mounted on beautifully embossed cards. I don't know who this woman is but I'm calling her "Aunt Amy" after one of my favourite Great Aunts that I remember from my childhood. 
Next I layered a few paper flowers for colour ...

... added a piece of text out of a book ... this one came from the Cat In the Hat book.  It felt right on this piece as I'm trying to be a little more "fearless" this year!

And then my favourite part - the bling! I removed the pin back from the rhinestone brooch before I adhered it with heavy gel medium. The size and shape were perfect for this piece. Small rhinestones with added to the flower centres. I added a Tim Holtz metal crown to the photo to make "Aunt Amy" look like a princess. 

Another bling element was added to the space betwen the stamps and the fabric ... some distressing ink to age and then I set it aside to dry for a few hours.
When it was dry and I sat it up I realized that the back with just the ribbon and the original paper pottery label looked a little plain so I decided to add three vintage buttons.  
The pottery fits library cards and blank index cards (sideways). I made a couple of space dividers with mailing labels decorated with vintage buttons, bits of lace and trim and of course, a bit more text from The Cat in the Hat. 
I used another pottery piece to hold more index cards ... these cards have many of my website addresses, user id's and passwords - stuff that isn't "confidential" (like banking and credit cards). I didn't decorate this pottery because I knew that the two items would be together on my desk ... think simple black dress and killer shoes and jewellery.

I dressed up the index card dividers with distressing inks, alpha stickers and glaze drops. If you don't have glaze drops you can used Inkssentials Glossy Accents to get a similar effect on the letters. The index cards were about 1/8th of an inch too big so I cut them all with my paper cutter to fit the pottery ... so if you try to make one of these for yourself don't get too hung up trying to find a container that works.
And now my computer desk in my studio has a new look. My desk drawers are neat and I have all of my reference information at my finger tips!

I hope that this inspires you to get organized and be creative doing so! Have a great weekend!


let's get organized {part 2}

Monday, January 24, 2011

I'm still in my purge and organize mood and here's another project that I have been working on in my home studio. This photo is what one corner of my office looks like this morning after a few hours of organizing on the weekend.

I have soooo many scrapbooking supplies in my office and in the basement (where most of my supplies are kept) ... and although I like to think that I know where everything is ... I really don't. I spend way too much time looking through storage boxes that I have so neatly arranged on ikea shelving units in the basement. I'll be honest, I do label the boxes and everything appears to be really neat and orderly ... but I still seem to spend hours looking for "something" just right. 

I've seen lots of ideas for organizing supplies in magazines and on the internet but I wanted to use some things I already had on hand and didn't have to go out and invest more money ...especially after I started working out the math on how much I've spent on scrapbooking materials!
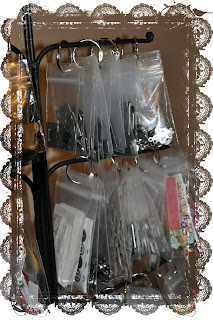
So I converted a metal jewellery stand that I purchased at Pier One Imports a few years ago into fixture to hold some of my scrapbooking elements in my studio.

... here's a close up of the jewellery stand ...
... I used three different sizes of clear zip lock bags to do this ... you can buy these at lots of places ... I got many of mine at the dollar store. Some of my bags had a hole at the top but if they didn't I simply added a hole with my crop-i-dile (but a regular hole punch will work too).
... then I used small binder rings to put the bags into small groups of similar things or items that went together. After that it was easy to organize and hang the bags on the jewellery stand. Now I do have to confess that I did have to go out and purchase additional binder rings ... I had a couple of dozen of them to start but I had way too many supplies to organize!
Here's how my new fixture looks in my studio office. I set it on top of a table that my Dad made for me years ago. Now I do have to admit that this is not all of my scrapbooking materials on this one little fixture ... I have a couple (couple ... who am I kidding, a bunch) of boxes of more ziplock bags on binder rings waiting for a "home". I think that I am going to work on converting one of my ikea shelves so that it will hold more of my supplies this way ... but that will be another project to work on!
I also reorganized the wire tiered basket in my studio ... it sits beside my new fixture and was looking a little messy. It still holds some of my completed mini albums in the top but the bottom is now full of blank albums and a couple of antique glass jars filled with additional supplies.

I have to remember to keep my eyes out for more of these metal jewellery stands and wire tiered baskets .... this is a great time of year to find things like this on sale.

One more thing that I did in my studio office is to use my antique suitcases to better organize my "basic tools". I now keep my most used tools and supplies in the small and large suitcase. The large suitcase is perfect for storing my paper cutter, glass and self healing mats and other cutting tools. The smaller suitcase is great for gel mediums, adhesives, pens, brushes, distress inks, etc. Now when I go to Scrapbook Queens to work on a project or teach a class I don't have to take much time getting ready, I just have to grab these two suitcases. I use the medium size suitcase when I am packing for a class to organize my class "kits" and any additional tools or materials that I will need for that specific class.

Next project to tackle ... my computer fonts and contact information!

let's get organized!

Friday, January 21, 2011

It's January and I've been in a "got to get organized" mood lately. Next to filling bags with outgrown clothing and toys that the kids have "out grown" to donate to the second hand stores ... I've been trying to re-organize the house so that everything has a place again.

One of the things I did yesterday was go through all of the winter hats, mittens and scarves and get rid of the items that we don't wear anymore. I separated everyone's things into baskets that would be kept in either the front hall closet or the laundry/mud room. I love baskets - the ultimate organizing tool that can also be used as part of your decor. I used simple black chalkboard tags to label each of the baskets.
Here's a picture of the cabinets I designed for our laundry/mudroom last year. The cabinets were made by one of our friends, Chris, who owns the area California Closets. I designed the cabinets so that they would  fit the baskets I already owned ... it's so much easier to design the cabinets around the baskets than to try to find baskets to fit shelving! The larger baskets hold footwear and smaller baskets hold accessories.
 I bought my black chalkboard tags at Michaels about a year ago - they were in a clearance bin and really inexpensive. They are made of wood and have a chalkboard finish to them. I could have used chalk to write on the labels but I didn't because these baskets are used often and being the perfectionist that I am I knew that I would not be happy if the words were getting rubbed off all of the time ... so I used a white sharpie peel-off china marker (pencil) to write on the tags and get the same look as the chalk. I can easy repaint the tags with black chalkboard paint if I ever want to change a name. 

After I bought these tags I realized how easy they would be to make them from wood or chipboard shapes! You can buy thin premade wood shapes at most craft stores and just paint them with black chalkboard paint ... if they don't have holes to tie them onto the baskets with ribbon, you can easily make holes with a crop-a-dile or a drill. Or if you have a cuttlebug (or similar diecutting tool) you can make tags from black chipboard ... again add holes with your crop-a-dile, add a ribbon and you are ready to start labelling those baskets! 

I'm going to try to share some more of my organizing projects over the next week ... so if you are in the organizing mood too check back for more ideas. If you have been posting some crafty organization ideas on your blog lately and have some ideas to share please let me know!


Valentine gift container inspiration

Saturday, January 15, 2011

Here's a little inspiration for Valentine gift giving using the little mini chocolate bar wrappers that I talked about in my previous post!

I recycled a little jar and used it to hold about 15 mini chocolate bars with my Valentine wrappers.
I saved one of my chocolate bar wrappers (you can download the art here) and attached it with two sided tape to a small shipping tag. I trimmed the wrapper down to size to cover about 3/4s of the tag. I then used Ranger distress ink on the edges of the tag and sewed a small scrap of lace near the top for an instant gift tag that matches the chocolates ... how's that for "branding"!

I then tied the tag onto the jar. My jar had a metal piece that keeps the lid attached to the jar so it was easy attach the tag. I then tied additional pieces of different coloured ribbons and lace to the metal piece above the gift tag.

This would be cute to give as a gift to someone. I can see this project being used as a Valentine decorating item .... maybe sitting on the kitchen counter or front hall table at home ... or how about at work on a desk!

feel the (chocolate) love with a free download for Valentine's day

Thursday, January 13, 2011

 
All we need is LOVE is all we need ... well and maybe a little chocolate!

Valentine's day is a month away and I thought that I'd share with you a little project that I designed for my youngest daughter as a valentine handout a couple of years ago. These mini chocolate wrappers are so easy to make and the kids can make them with you.

You can download the art for this project here. Please note that this download is for Personal Use ONLY - no commercial use in any way. If you'd like to share this information with your friends please send them here to my blog so that they can download the file themselves ... thanks again for your support! 

So let's get started making these mini chocolate bar wrappers ... 
First you will need to print my pdf file that you have downloaded. Print it in colour on regular weight white paper. You will need a paper cutter (or scissors), two sided tape, a pen or marker to add a name on the wrapper and some mini chocolate bars! I am using the new Hersey's miniatures chocolate bars that have blue, pink and green wrappers (for Valentine's day and Easter?) ... the colours are perfect with my graphics on the wrappers.
Cut out the wrappers using a paper cutter ... if you are into paper crafts or scrapbooking I'm sure that you have one ... if not, use your scissors and try to cut the wrappers as straight as possible. You can have your child write their name on the dotted line at this point ... it's much easier than trying to write on the label once it is attached to the candy bar.
The next step is to add two small pieces of two sided tape to the back of the wrapper as shown. Position the wrapper so that the label is centred at the front of the candy bar and attach one of the pieces of tape to the candy bar. The fold the wrapper completely around the candy bar and using the second piece of tape secure the wrapper in place.
And you are done ... pretty easy!

Just keep in mind that the chocolate bars that I've shown are not peanut free ... so make adjustments in your candy bar selection if you have any children with nut allergies. And if you want to be able to "address" these you can easily do so by adding small blank labels to the back of the wrapper ... I've done this before with little heart shaped labels.

I hope that you are feeling the love ... just try not to eat too many of these mini chocolates while you are making these!

new mixed media collage classes

Tuesday, January 11, 2011


I just finished another mixed media collage to use as a sample for my mixed media classes and workshops at Scrapbook Queens. This one is for my intermediate mixed media workshop and I've used a grid pattern to build the collage. This collage uses up some of my favourite paper scraps from the My Minds Eye's Lost and Found collection. I can't wait to teach this class because I had a wonderful time creating this piece ...
so many of the found elements on it have been sitting in my studio for a while waiting to be added to a special collage ... like the words "You're so lucky," said the rabbit ... I can't remember what children's book I cut that out of but it has been in my studio for over a year. Beeswax is the secret ingredient for the finished look of this piece and I know that we are going to have a blast experimenting with this medium in my workshops. I guess I'll have to update the pictures on my class website and display this collage at Scrapbook Queens later today.
If you are interested in taking any of my mixed media workshops here are some of my class dates:  Friday February 4th, 2011 - introduction to mixed media collage 2 (close up picture above) and Sunday March 6th, 2011 - intermediate mixed media collage.


happily ever after

Thursday, January 6, 2011


Happy New Year!

Okay ... so I'm a little late but my Christmas holidays seemed never ending and it's taken me a while to get back into my routine! I hope that you had a wonderful holiday whether you were taking part in family traditions or making some new ones!

We took our daughters to Disney World for Christmas. We have never been away from home on Christmas day but our girls are older now and we've been promising to take them to Disney again for a while. Our family had a great time and I think that this is a Christmas that they will remember fondly forever.


 We posed for pictures with lots of characters ... something that my husband was sure that the girls would not be into at their age and we would not have to "deal with on this trip" ... but they did ... we have pictures of every princess and character that we saw ...
... even my husband got into the characters after a while as you can see in this shot with Buzz Lightyear!

Disney was so inspiring ... the details on everything ... it was so over whelming and my head was going a mile a minute at times. I took almost 2,000 photos in 7 days so I know that they will be keeping me busy for a while as I work on memory books for the girls. I also purchased a Make Your Own Vinylmation collectible figure and I'm eager to "decorate" it soon ... I'll share more about it in another post! 

I've got a lot of projects planned for my classes this winter ... I have updated my class website and you can also see them on the Scrapbook Queens website .

I have lots on the go with a wedding stationery project that is almost ready to print and a paper crafting show I'm going to be attending in April. I'm going to be at the Scrapbook Queens' booth at Scrapfest in Kitchener . We are just working on the booth location and design ... and I'll share more once all of the details have been confirmed. I'm so looking forward to a busy and healthy 2011!

... and they all lived happily ever after ...