map art to wear

Friday, July 22, 2011

I {heart} maps ... always have and always will. I collect them when we travel. Maps make great keepsakes to scrapbook, journal or smash!

And lately I've been using them in my jewellery! They make great keepsakes ... like one I made above with a New York City subway map and a heart glass tile.

I made a few of these heart shaped charms with different subway stops from my trip there last year. I kept the one with Grand Central Station for myself. I was inspired by merchandise crafted with old New York City subway maps at a store located in Grand Central Station. After visiting that store, my friend Karen and I collected every subway map we could find to bring home with us.

I also tend to rip out the maps from my daytimers after the year is over. They are too cute to throw out and I'm a pack rat! I'm so glad that I have been able to use some of these smaller maps to create these tiny charms for earrings. The ones pictured with London and Paris were created for my oldest daughter as a reminder of her school trip to Paris when she was in grade 8. We were grounded at the London airport due to poor weather conditions and didn't make it to Paris until the second day of our trip. She will always remember that part of the story from our trip with these little keepsakes.
One more pair of earrings ... I think that these would be good for a Beatles fan ... they feature London and Liverpool!

So if you are off travelling somewhere this summer ... save a couple of maps from your destination ... you just may want to make a keepsake that you can wear!
If you live in the Mississauga (Ontario, Canada) area, I just added the heart shaped glass tiles and small earring sized glass tiles to my product line at Scrapbook Queens ! I am going to add them to my etsy shop for everyone else in August when I get back from the cottage ... if I have any stock left!
One last piece to share before I head off to the cottage ...
I just made these Betty & Veronica earrings ... they match my Archie scrabble tile bracelet that you can see here.  I made some of these Betty & Veronica earrings and necklaces with my girls - we can't wait to sit out on the beach with these!

photoshop actions - just playing around

Thursday, July 7, 2011

This picture of my daughter was on my post yesterday ... it was attached to my fashionista clipboard ... and I thought that I'd share with you what I did to create this photo.

To be honest ... I'm not totally sure what I did ... I am still learning! I do know that I was playing with my Photoshop Actions. I was reading about actions on Rebecca Cooper's blog - she has some great tutorials there for Photoshop that are quite easy to follow. It was there that I stubbled across Pamela Topping's website and her Photoshop Actions. Pamela has some free goodies if you are interested in trying out some actions on your own photos.

I encourage you to pop by to visit both of these talented ladies if you are interested in learning something new ... Rebecca is doing a giveaway on her blog for one of Pamela's Action packages ... oh what fun! I'd love to win any of them but if I had to pick just one I think that I'd go for "Secret Treasures"!

fashionista clipboard

Wednesday, July 6, 2011


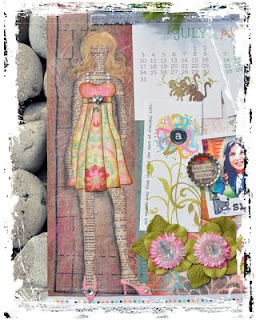
Here's a new project that I just completed ... it's a mixed media collage clipboard and I'm not sure where it is going to end up but I think that I will hang it up in my little display area at Scrapbook Queens for a while this summer.

I have been in a creative mood the past couple of days and really wanted to use these fabulous scrapbook papers that I bought at Scrapbook Queens about a month ago. The papers are from Basic Grey's  Sweet Threads collection ...


and I knew that I would use them in a mixed media piece at some point this summer. I was inspired to use the papers when I stumbled upon Julie Nutting's new book ...

it's called Collage Couture and it's amazing! Julie used a lot of different Basic Grey papers in her projects in the book ... including the sweet threads paper I have been hanging onto!

I've been using scrapbook papers as clothing in my mixed media collages for years but I have always painted the bodies, faces and hair and just used the papers for the clothing and accessories. What I loved about Julie's book is that she shows you how to use paper for the bodies too ... what a great idea! She still paints the hair and features of the faces so there is still some painting but not as much. It's like playing with paper dolls - remember how much fun you use to have doing that?

So here's my little project in a bit more detail ...


 I covered my clipboard in various papers, a little paint and some distressing inks to create my background. Then I added a "paper doll" that I designed using Julia's basic techniques. I love the idea of using pages from one of my old dictonaries as the body for my little fashionista.

.... here I've removed my notes so that you can see the clipboard a little better ...

The circle is actually a piece of sheet metal that I covered with more of my "sweet threads" paper. I wanted to be able to add smaller papers with a magnet to the bottom half of the clipboard and this worked perfectly.

So after adding a little bling, some vintage jewellery, a few flowers and vintage buttons and of course some lace and ribbon ... my piece was ready to be used to organize and display some of my papers and a photo ...


here it is again! I think that these would be great to make for a home office or studio. I may make these with my daughters for their bedroom study areas ... I can see a bunch of them grouped together like a fashion show! I'm also going to work on some similar projects that I can teach in the fall ... I'll keep you posted on that when I have more details worked out.

I hope that I have inspired you to check out the new Basic Grey papers at your local scrapbooking store and maybe take a look for Julie's new collage book at your local bookstore!

Happy crafting!